• There seems to be an uptick in Political comments in recent months. Those of us who are long time members of the site know that Political and Religious content has been banned for years. Nothing has changed. Please leave all political and religious comments out of the forums.

    If you recently joined the forums you were not presented with this restriction in the terms of service. This was due to a conversion error when we went from vBulletin to Xenforo. We have updated our terms of service to reflect these corrections.

    Please note any post refering to a politician will be considered political even if it is intended to be humor. Our experience is these topics have a way of dividing the forums and causing deep resentment among members. It is a poison to the community. We appreciate compliance with the rules.

    The Staff of SOH

  • Server side Maintenance is done. We still have an update to the forum software to run but that one will have to wait for a better time.

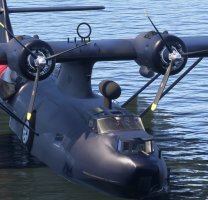
An old project brought up to date: Canso PBY-5 of SAGQ

Hi,
As the subject of the PBY has been relaunched on the official forum (https://forums.flightsimulator.com/t/consolidated-canso-pby-5/729183/12), here are some recent captures of the work in progress, notably on the military version (the one that occupies most of my days)

2025-09-30_145031.png

2025-09-30_145252.png

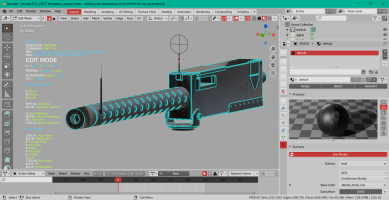
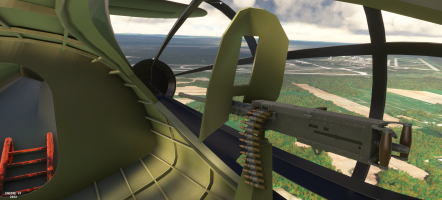
For Priller: I found this morning a M1919 machine gun for the turret (y)

Warning:
In version v0.9.0, no modification of textures is planned; the textures provided will be at the same level as those in version v0.8.0.
The reason is very simple: at the moment I still allow myself to make changes at any time or to be able to work efficiently on textures, I need frozen 3D models.
In fact, for almost 2 years now, I have been working with PBR Painter, a paid plugin for Blender that I installed on a Blender 4.2 version.
My operating method is as follows: from a frozen 3D model with UVs maps for each element, I export all the elements to be textured to OBJ files that I finally import into my version Blender 4.2 and then I can work on the PBR textures as I wish :cool: .
 
Last edited:
take your time Didier and thank you for your detailed information on your working methods and practices. I really appreciated these updates from you while on the GAS beta team. There is no substitute for clear communication.
 
2025-09-30_145252.png
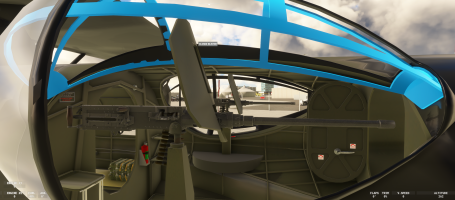
OK - hear me out... The section just aft of the flight deck gets a small kitchen, seating for two, and a TV on one side. The section where the bunks are now gets a shower, sink, and toilet. The bubble section gets a full-size bed with a clear view of the stars while sleeping as the plane floats in a mountain lake overnight!
 
Thank you for the information Tom, indeed the Canso that have been restored have changed a lot and they have modernized :cool:
While searching on the Internet, I found some videos on Youtube with visits inside these planes that show a multitude of details of this kind.

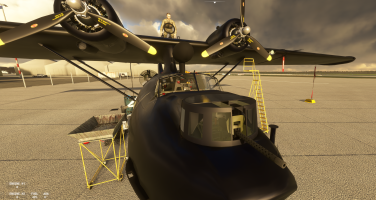
Yesterday, I also received two links for sites that I did not know and that allowed me to better understand what the front turret housed as well as the function of this small sliding door at the front of the plane. With the specialized magazines (see above) that I got, I had an idea of what was there but with these photos, I better understood the functions of each element of this turret.
For those interested:
- https://www.americanheritagemuseum.org/aircrafts/consolidated-pby-catalina/
- https://www.collingsfoundation.org/2019/05/a-p-boat-comes-home-the-journey-of-consolidated-pby-5a-bu-no-2459-begins/
 
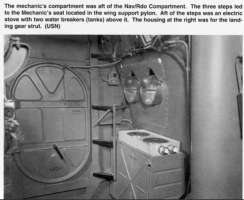
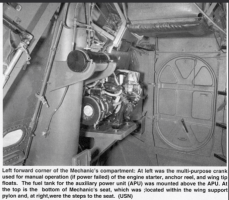
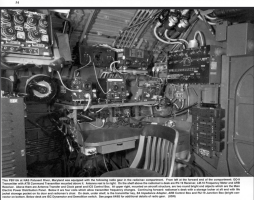
I think that’s what you had in mind can be illustrated on theses two pictures but these elements were most of the time (this changes according to the models: PBY-2 ... PBY-6) in the compartment located under the pylone that supported the wings.

The first image is the right part of the compartment after the radio/nav and the second picture the left part.
1759410898716.png
The vertical tube that is in the foreground at thr right of the photography was the part that "housed" the tubes and joints of the landing gear.

We can see it better on this screenshot: with the internal APU on the left and the seat for the flight ingineer above (fuel and electric management)

1759411501565.png
 
Hi,

For the BlackCat, DennyA and Tom's remarks made me think ...
I will include it in the next official version but with a restored VC (radio, gps and AP). This will give me time to finish the VC WWII calmly and then publish another version but purely military of the 1940s with some interesting details .... Perhaps, this new PBY will be only for MSFS 2024 with the new structure of files introduced by Microsoft (using attachments).
 
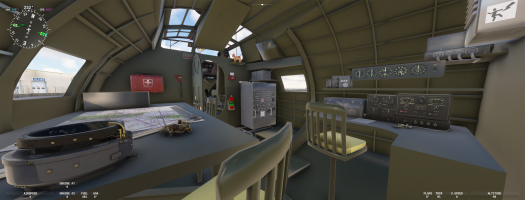
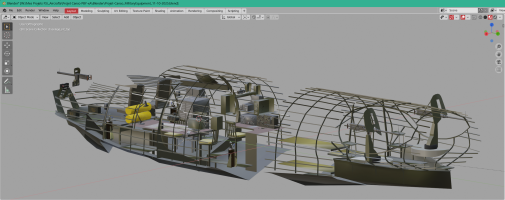
A little screenshot of the last days of work: radio and navigator equipments for the BlackCat version.

2025-10-07_150848.png
The Navigator part (on the left) is almost finished; there remains the console with 3 gauges: outside temperature, altimeter and speed.
For the Radio part, I will review the elements and textures: currently they are not PBR but simple diffused texture for now. The transmitter is quite successful: the element between the cockpit door and the right window.
I am a bit disappointed with the navigator's compass which was very detailed but due to the lack of light in this part of the plane, the interior of the compass is very dark. Maybe by modifying the gauge’s glass texture, it should improve visibility on details.
I still need to "cut out" the hatch above this station (hatch just before the wing's pylon) because the navigator was using this hatch to calculate his route with the sextant.

Ah I was going to forget, the texture of the 2 tables must be modified: the support was indeed metal but the top was wooden. :cool:
 
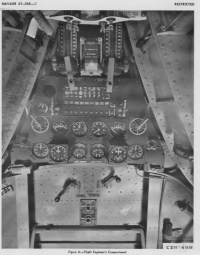
Maybe because I have enough documentation to carry it out quite precisely but I don’t think I will go so far as to move the functional controls that on the restored aircraft have been migrated to the cockpit for easier piloting. simply for the visual.

Flight Enginneer's Compartment.png


But for that, I will need to review this entire compartment by removing the internal clapboards to leave only the structure and the external sheets. So I could move the APU to its original place and add in front the small kitchen with the two electric plates (see above).

This afternoon, I just finished the M1919 which was placed at the front in the turret.

2025-10-07_163425.png
 
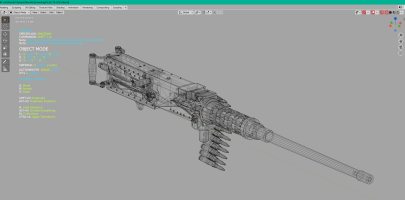
And a machine gun .50 for each blisters of the BlackCat :

2025-10-08_202609.png
All guns are located in the PBY, as you can see:

2025-10-08_204611.png

2025-10-08_204838.png

You can now start a new fly to the North Atlantic in search of U-boats or to the Solomon Islands to rescue pilots lost at sea:

2025-10-08_205211.png

Aïe, I forgot to add the sights on the .50 guns :p
 
Hi,
For the moment, I didn’t have enough information on the elements that made up the radio station, so I installed in my current development version the elements that I had on my hard disk in the meantime.

Yesterday reading a Avialogs document (820 pages) I managed to have the exact composition of the radio elements

2025-10-14_191753.png

And by continuing the research, I obtained almost all the information that I was looking for on three websites that currently I did not know:
- https://www.tuberadio.com/robinson/museum
- https://aafradio.org
- https://www.radiomuseum.org/r/westinghou_go_9_pby_transmitter_cay_20103_cay_52192_cay.html#

With these three sites, I was able to have fairly good quality color images that will allow me to model almost all the elements that are listed in the image above. I don’t think I could make them functional but at least their representation will be as accurate as possible.
 
Hello,

The modeling phase is almost finished (95%), there are still some minor details but as I had committed to a v090 version at the end of September, I think this version should suit and fill the people who have been waiting since 2023.
Before making it available on my site, I show you a link on my dropbox (no passord required) which will be valid for one week in order to give the preview of this version to the users of SOH. Thank you for being patient if the Dropbox is overused :cool: .

You can make your remarks following this post, if they can be easily corrected (minor details) I would try to include them in the final version that will be released from October 23 on FrenchVFR (http://frenchvfr.free.fr/en)

=> https://www.dropbox.com/scl/fi/7yc9...v092.zip?rlkey=qhn1kybupwgzkv5nht9kdhgcl&dl=0

This version was tested on both simulators and works on 2020 and 2024.
It is corrected for all the issues that were noted to me and now has 2 additional 3D models: a PBY-6A and a BlackCat (modern VC - the old fashion one is intented for the v1.0.0)

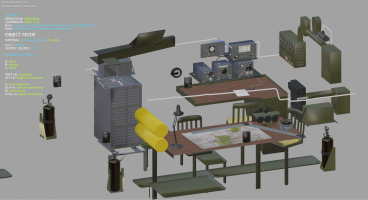
The radio/navigator bulk (the textures are provisional) for the BlackCat version that was finished this afternoon.
As you can see, I tried to be as faithful as possible to reality (see photo two posts above)

1760893814750.png
Before starting your engines (the right one first - read the documentation) check the aircraft’s balance, it prefers a centering rather on the front (I use the GotFriend freeware for FS2024 to manage this point)
Booting via CTRL+E is possible but it also works in Cold & Dark.
If you start in flight, remember to check the Control Lock on the pilot’s yoke (this should be corrected following a remark from DennyA) because if it is present, the flight surfaces will be blocked.

All the work done between v080 and this version is listed in the ChangeLog_v092.txt file in the Documentations directory. This file also contains what is planned by me to have a v1.0 by the end of the year.

In this version almost nothing was done on the textures: redo all the textures in PBR with PBR Painter, this will be the subject of my next work for V1.0.0 (and finish the BlackCat interior part).

PS PBR Painter is a payware (45$) that consists of a plugin available on Blender 3.x and 4.x and which does the same work as Quixel (I work with Gimp) or Substance Painter (I never got used to the interface of the SP 2017). If some are interested in this software, I could open a post to talk about it and give you my opinion as I works with it since 2 years now (bought when it was only worth $20 ;) ).
For more informations about this plugin: https://bytebrushstudio.gumroad.com/l/pbrpainter
 
Last edited:
For the modeling part, uniform colors or low-resolution textures allow a better understanding of 3D and the model in space. As much as I enjoy researching on the Internet to find details, explanations about an object included in the plane that I am modeling, the texture part is what I like the least, probably because I am not very comfortable with this step.
And yet it is not a part of the creation that I ignore because without good textures, a 3D model is not worth much.

In 2017, I had carefully followed Gordon’s posts on his discovery of Quixel, I even intervened a few times because the subject interested me. Unfortunately, Quixel is a plugin for PSP and I have been used to using Gimp for more than 20 years. Therefore, by searching a little I found a product from Allegorithmic that worked without needing another product and was called Subtance Painter (SP). On the occasion of a promotion, I even bought a license at that time but the interface was a bit off for me. Since then, SP has acquired great notoriety and has become a must for creation in video games.
While searching again I found Armor Paint, a low-cost software developed by a Russian who had the advantage of being very light and which allowed working on PBR textures for FS. This product was regularly updated and it was necessary to download the sources to compile them with Visual Studio. I practiced it for 3 or 4 years but with Covid, product updates have become very rare.
But Blender also has painting functions on 3D surfaces and several products offer plugins that take advantage of this possibility. There are at least 5: Ucupaint, HAS Paint Layer, Layer Painter Ravage 2 et ... PBR Painter.

I discovered PBR Painter in 2022 in version 2.3.4 for Blender 2.83 (it cost $20 at that time). Since the software has not stopped being updated by following the different versions of Blender. Currently it is in version 3.3.2 for Blender 4.2.x (support for Blender 4.4 is planned yet) and since its beginnings the author has added a lot of features.

It consists of a very simple plugin to install and which adds a specific tab in the bar at the top of the interface. The concept is very simple: we create a new material to which we can assign textures (albedo, metallic, roughness, glossiness, directX, OpenGL, etc) in different resolutions in as many layers as we want, in the spirit of 2D drawing software.
In addition, we can design pecific layers called masks (procedural or from gray gradient textures) that allow a multitude of effects. A certain number of masks can be created via textures baked via Blender functions: curvature for example
All this is dynamic and one can interchange at any time the different layers according to their desires and needs. Nothing very different from Quixel or SP but all this happens in Blender with the same interface which greatly facilitates the handling for a person who is comfortable with Blender.

Of course, the part of exporting the result is very important because PBR Painter allows to export all the textures necessary for Prepar3D or MSFS in order to then create the final textures ... I’m thinking about the Comp texture (ambient occlusion, roughness, metallic) for MSFS.
To create this comp, I use a graphical freeware find on FSDevelopper and called ORM-Maker which can create very simply the texture witch drag and drop on it interface.
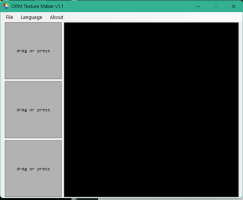
1760947600739.png

There are also TexFusion v1.0.0 : https://www.fsdeveloper.com/forum/resources/texfusion.295

PS: P3D is based on a (diffuse, specular, glossiness) model (from memory) while MSFS chose the (albedo, roughness, metallic) model.
Albedo isn't the Diffuse texture because some informations of Specular map should be included in the Albedo. Also Roughness can be created inverting the Glossiness but it's not the better solution.

To understand PBR technic, Marmoset has a very interesting post about this subject:
=> https://marmoset-co.translate.goog/posts/pbr-texture-conversion/?_x_tr_sl=ar&_x_tr_tl=tr&_x_tr_h.

Another explanations about PBR technics by GrandSkyes614 (who use also PBR Painter):

To comeback on PBR Painter, the best way to understand how this tool works is to follow a video demonstration about creating an object.

This Blender plugin has :
- a video channel where you will find a large amount of tutorials (https://www.youtube.com/@pbrpainter1091)
- as well as a Discord address to talk with the author or submit ideas: : https://discord.gg/8PZq9x2fvB
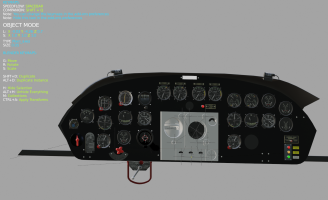
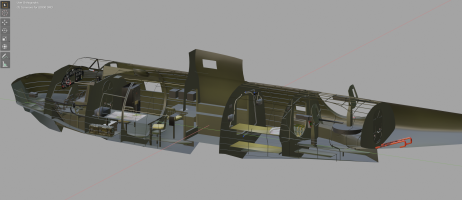
 
Last edited:
Hello Lagaffe, I am flying your very cool PBY in FS2024. I will try it in FS2020 soon. In FS2024 at idle power settings the propeller seems to want to go to the fully feathered position? In the simulator they are still spinning very slowly, but the picture shows them stopped. You can see the main wheels are blury because they are spinning. In the water the main wheels keep spinning. I am still working to understand and set up your wonderful PBY, controls and how it flys. Great work and I really like your panel with the Garmin setup. Very nice indeed. Thank you for all the time and effort you are putting into this project. PBY Idle.jpg
 
Since this morning and following your remark (post on FS2024), the circular ADF antenna (this on the wings) has been reduced in size and the access door above the navigator desk has been opened in the 3D model, there are still the joints and the animation to be performed.

Regarding the propellers and despite my numerous readings, I have not found how the blades are oriented when the engines shut down and unfortunately my technical expert on this aircraft passed away last year.
The hypothesis that I have retained in this version only takes into account one animation for the blades that are oriented between 0° to 87.5° (feathering). These two values correspond to the positions 0 - 100 of the prop levers (yellow). So if you push the yellow levers forward at max values: you get the position 87.5° (feathering).

Redoing all the animations of the propellers would take too much time so I thought of another solution that would consist in associating via the XML code the feathering position (87.5°) with the 0-10% positions of the props levers then on the area 10%-100% to vary the blades between 12° and 29° it is-to say the operating area described in the manual, thus even by pushing the levers forward at most the position of the blades can never exceed 29°.

For the wheels that continue to turn: the XML code used for the wheels (blurred / still) are the standard Behaviors model of Asobo and all the points of contact have been successfully associated, therefore currently I do not see the reason for this ... but i wil investigate :unsure:
 
Last edited:
Excellent work lagaffe and thanks for your effort. It's normal the low fuel pressure the dials mark? And yes, I have the fuel booster on.
Thanks a lot again for your work
 
Back
Top