I'm making this another thread to keep the sticky above on topic.
To build for Combat Flight Simulator 3 (CFS3) you need Gmax and the Aircraft, Vehicle and Building SDK for CFS3. The SDKs used to be available from Microsoft but the CFS Insider site is gone so they're all here in the SOH library. If you're building in any other modelling software you'll need to get the model into Gmax to export to the sim, unless by any chance you're using 3ds Max 4.2!
Build your model like for any MS flight sim and link the various parts together in a proper hierarchy. At the top of the hierarchy is a Dummy object or a very small polygon named after the model: the SDK includes two finished models (P-47 and Ju-88) so you can look at these to see what I mean.
All animated objects must be named as per the SDK section Modelling Aircraft and Vehicles and pay attention to the keyframe ranges. Some objects use purely rotation animations (rudder, ailerons, wheels, props etc) so the sim animates these for you and all you must do is align the pivot correctly for each object.
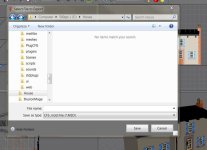
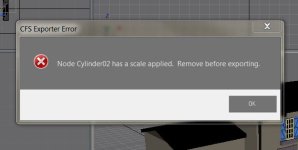
When you're ready to try exporting for the sim, reset scale for the whole model as described in the sticky thread above. Then it's File/Export..., select the CFS .m3d (*.M3D) option and supply a file name and location. Export is pretty quick, but scale errors are always flagged up.
You'll get a modelname.M3D file and that's all, but a functioning model needs aircraft.cfg, an .air file and a damage and effects .xdp file. All of which take a lot of work, so cheat to start with and borrow an existing set: make a copy of an existing aircraft folder and put it somewhere safe. Rename your model's .M3D file to match this aircraft and place it in the chosen folder, overwriting the original.
Textures are .DDS, DXT1 or DXT3 if you need transparency. The version of ImageTool supplied with the SDK will convert bitmaps to .DDS, as will Martin Wright's DXTBMP or if you have Paintshop Pro or Photoshop you can use the excellent NVidia plugin (I do). Plain Gmax transparency also works if mapping is not used, eg canopy Perspex. Unmapped models display just fine in their Gmax colours.
This next bit is really important. In a working CFS3 aircraft folder there is a file with a .BDP extension: It codes information about the model to make loading and running quicker. If you make any changes to a model, its damage file, its sound files or .air file (flight model) you must delete the .BDP file from the aircraft folder. CFS3 will generate a new one automatically.
Fire up CFS3 and go fly!
Any more questions, just ask.
To build for Combat Flight Simulator 3 (CFS3) you need Gmax and the Aircraft, Vehicle and Building SDK for CFS3. The SDKs used to be available from Microsoft but the CFS Insider site is gone so they're all here in the SOH library. If you're building in any other modelling software you'll need to get the model into Gmax to export to the sim, unless by any chance you're using 3ds Max 4.2!

Build your model like for any MS flight sim and link the various parts together in a proper hierarchy. At the top of the hierarchy is a Dummy object or a very small polygon named after the model: the SDK includes two finished models (P-47 and Ju-88) so you can look at these to see what I mean.
All animated objects must be named as per the SDK section Modelling Aircraft and Vehicles and pay attention to the keyframe ranges. Some objects use purely rotation animations (rudder, ailerons, wheels, props etc) so the sim animates these for you and all you must do is align the pivot correctly for each object.
When you're ready to try exporting for the sim, reset scale for the whole model as described in the sticky thread above. Then it's File/Export..., select the CFS .m3d (*.M3D) option and supply a file name and location. Export is pretty quick, but scale errors are always flagged up.
You'll get a modelname.M3D file and that's all, but a functioning model needs aircraft.cfg, an .air file and a damage and effects .xdp file. All of which take a lot of work, so cheat to start with and borrow an existing set: make a copy of an existing aircraft folder and put it somewhere safe. Rename your model's .M3D file to match this aircraft and place it in the chosen folder, overwriting the original.
Textures are .DDS, DXT1 or DXT3 if you need transparency. The version of ImageTool supplied with the SDK will convert bitmaps to .DDS, as will Martin Wright's DXTBMP or if you have Paintshop Pro or Photoshop you can use the excellent NVidia plugin (I do). Plain Gmax transparency also works if mapping is not used, eg canopy Perspex. Unmapped models display just fine in their Gmax colours.
This next bit is really important. In a working CFS3 aircraft folder there is a file with a .BDP extension: It codes information about the model to make loading and running quicker. If you make any changes to a model, its damage file, its sound files or .air file (flight model) you must delete the .BDP file from the aircraft folder. CFS3 will generate a new one automatically.
Fire up CFS3 and go fly!
Any more questions, just ask.


