Mapping Exercise Two
Basic mapping of the aircraft
Objectives
 explain a basic mapping technique
 export the mapping via md3 to Lithunwrap
 create a texture bitmap template
 apply this texture to the model
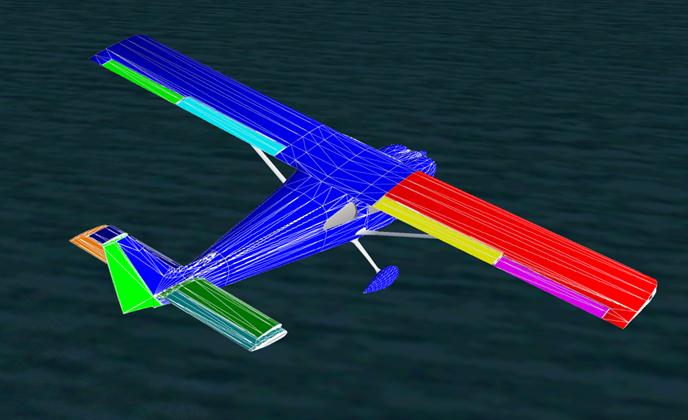
fig. 1 - exterior model mapped as shown in fs2004
Overview
This tutorial, part 2, will demonstrate steps required to map the wings and attached parts as one unit on one texture sheet or template. Part 3 tutorial will then show how to export that map to create a template and save it. The texture template will then be applied to the model in GMax. There are methods superior to this but the objective here is to get your started with some basic mapping and template exposure. You may use this technique for fast, simple and even detailed results as you wish. The process flow can be very simple, fast, and effective.
If you do not have a GMax model to work with, you can download this exercise here:
Mapping preparations
Open your GMax project and hide all the exterior parts except for the wings, flaps, ailerons, and any other attached parts you want on this texture sheet. generally we will work from the standard top, bottom, left and right viewports but pan around when necessary to check our work as shown below.
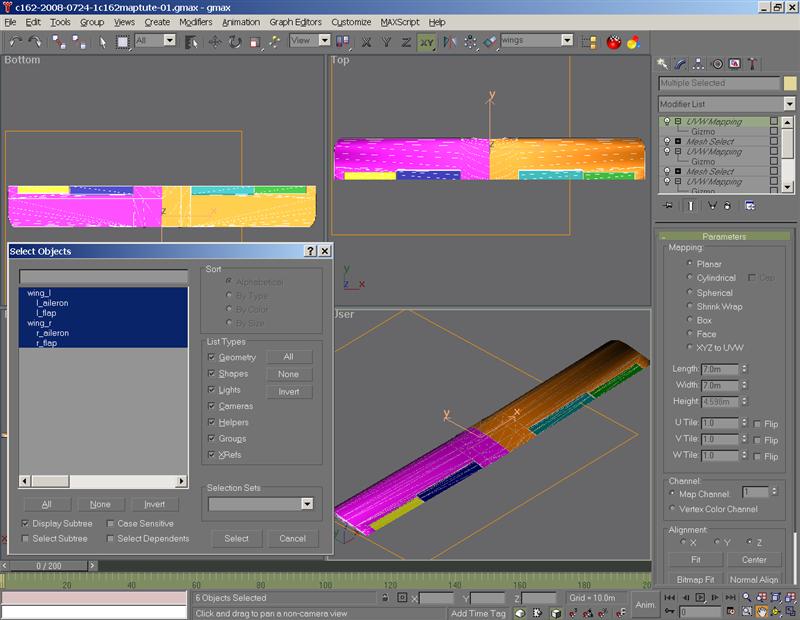
fig. 2 - previously mapped wing parts after texture template applied
We want the end result of this tutorial to produce a template that looks something like the following texture.
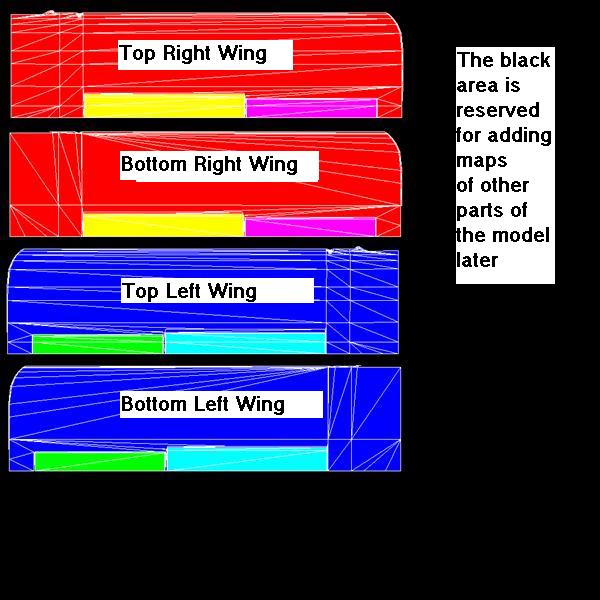
fig. 3 - Example template output from Lithunwrap
So, with the wings and associated parts shown and all other parts hidden, let's get started.
- Select all the unhidden parts shown to be included in this map. Once selected, you can create a named selection as shown to easily recall these objects.
- From the top viewport (press t) you should have this view.
- Select ignore backfaces in the command panel.
- Create a mesh select in the stack and select poly sub-object mode.
- Now, use the lasso selection tool to select the polys from the top of the right wing.
- Select the bottom viewport (press b) to ensure we have no unwanted selections.
- Unwanted polys can be deselected by holding down alt and mouse clicking the poly
- Now pan around all the objects to ensure that there are no unwanted selections, or that all wanted selections have been included. Zoom in close as necessary hold down cntrl and mouse select to add polys to the existing selections. Return to the top viewport.
- With the polys selected, we can now add a UVW map modifier to the stack. select the gizmo.
- We must now size and orient the gizmo correctly. Note the yellow handle at the top center and the green edge on the right. This is the proper orientation to look at the texture shown in figure 3 above, i.e. The top has the handle, the right side border is green. Since we are doing a 1024x1024 texture (square), we must size the length and width of the gizmo the same. In the command panel rollout, set the length and width parameters at 7.0m for this example. Changing orientation is done with the rotate tool and the gizmo pivot (in 90-degree increments), or by selecting the orientation options in the rollout. This is best done after changing the length and width size parameters so you can see the orientation better.
- To make best use of the texture template, move the gizmo so that the selected wing surface is at the top left of the rectangle. Leave a little room on the two sides to ensure the texture artist has room to work.
- With the right wing top surface mapped, switch to the bottom viewport and add a mesh select to the stack and select poly sub-object mode.
- To ensure we include all the unselected right wing polys, go to edit menu and select select invert. this will select all unselected polys on the right wing and all the polys of the left wing. now, turn off ignore backfaces, and using the lasso selection tool, hold down alt and lasso de-select all the left wing polys. the result should look like fig. 6.
- Now add a UVW map to the stack for the bottom of the right wing parts. select the gizmo, change the length and width dimensions to 7.0m and change the orientation as shown, handle at bottom and green border at the right. then move the gizmo and rectangle so that it leaves room for the first map. refer to fig. 3 above to see how that should look.
- To start the left side selection, first turn on ignore backfaces and add a mesh select and choose poly sub-object mode.
- Now lasso select the left wing polys as shown in fig. 8. Rotate the scene and check your poly selections for unwanted or missed polys.
- Once you are happy with your selection, add a UVW map to the stack, select the gizmo, change the length and width dimensions to 7.0m and reorient the map as shown in fig. 9. Allowing space above this map for the previous two wing side maps.
- Now flip to the bottom viewport and add another mesh select. Turn off ignore backfaces and this time we will use the edit/invert selection, and use the alt lasso to de-select of all the right side polys. Rotate the viewport to ensure the select is clean.
- Once you are happy with your selection, add a UVW map to the stack, select the gizmo, change the length and width dimensions to 7.0m and reorient the map as shown in fig. 11. Allowing space above this map for the previous three wing side maps.
- Congratulations! Complete the process by selecting the top UVW mapping in the stack to deselect the gizmo.
- With all the objects still selected we will prepare for exporting. If you choose to do the next part later, simply open GMax and use the named selection above to get you started.
- Part 3 of this tutorial will walk through the export, template creation, and GMax application of the texture.
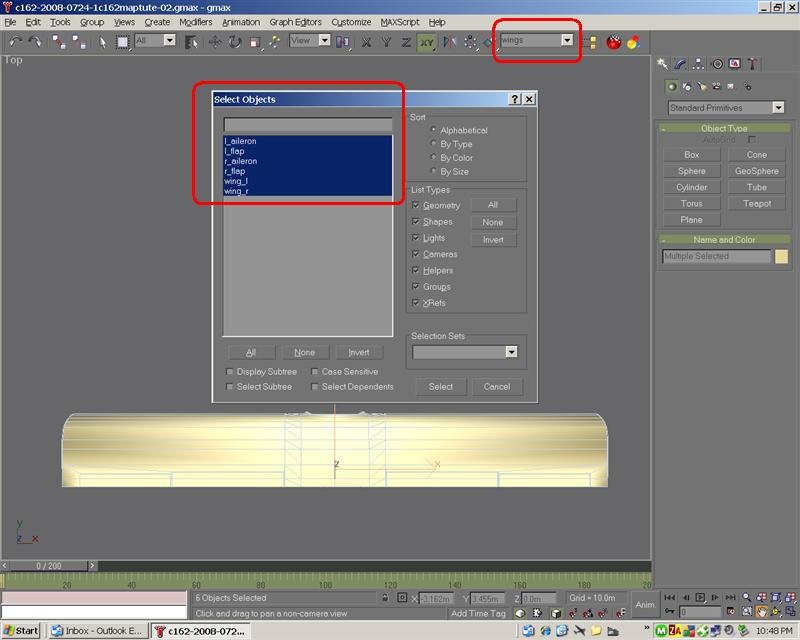
fig. 4 Select Parts
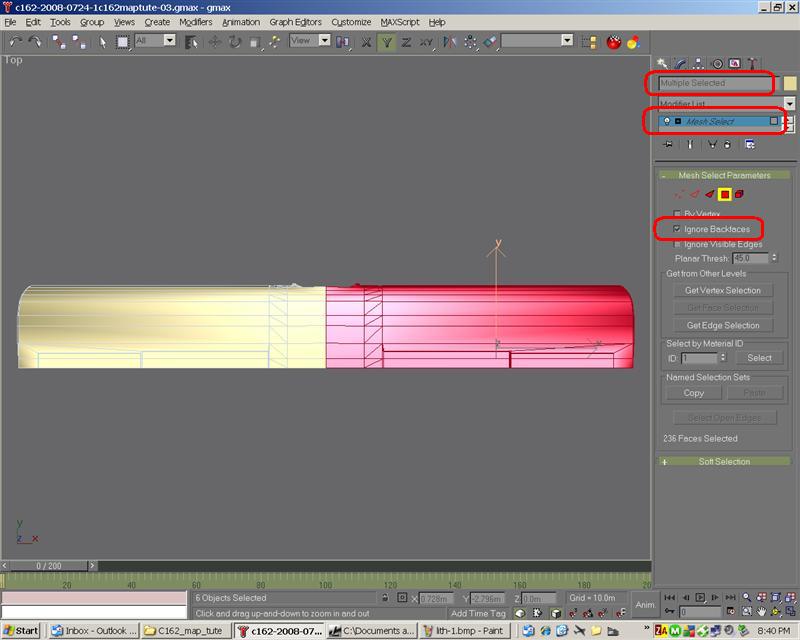
fig. 5 - the top side of the right wing - getting started
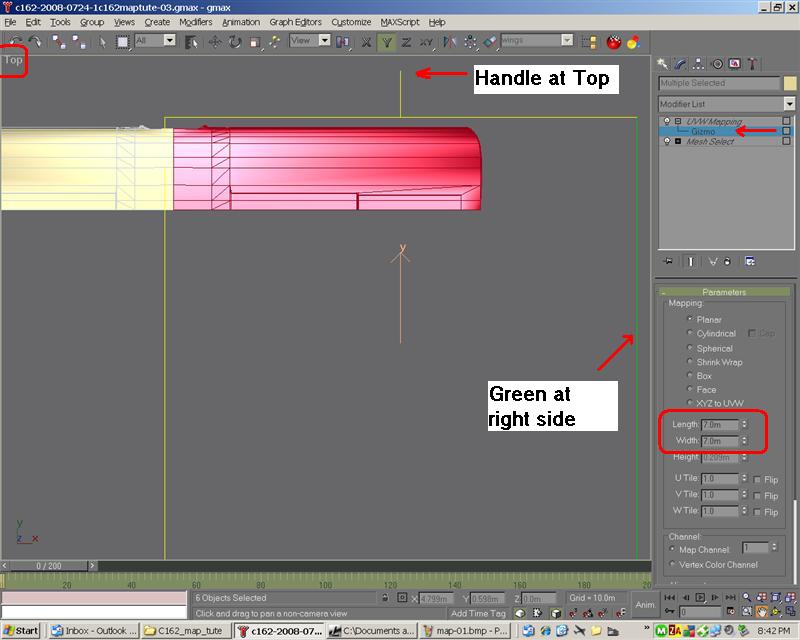
fig. 6 - adding, orienting, and sizing the UVW map modifier
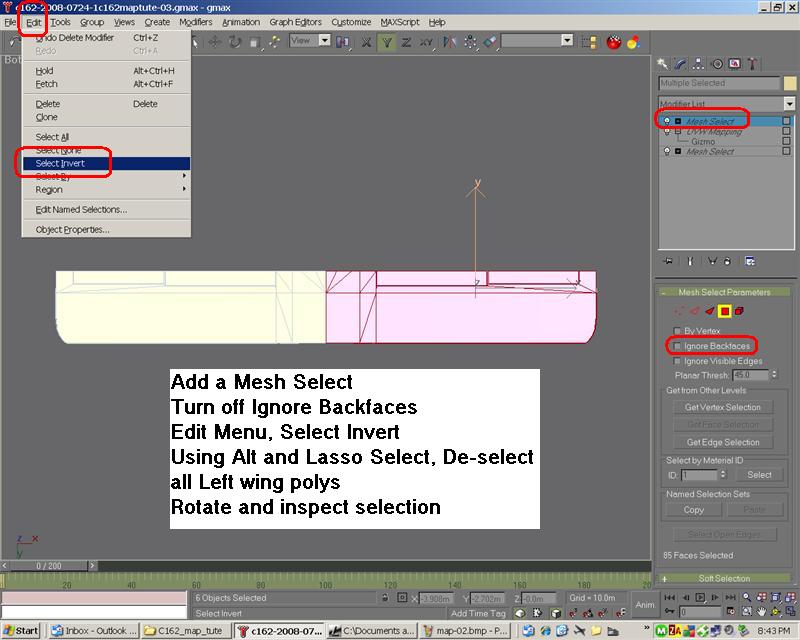
fig. 7 - adding a second mesh select to map the bottom of right wing
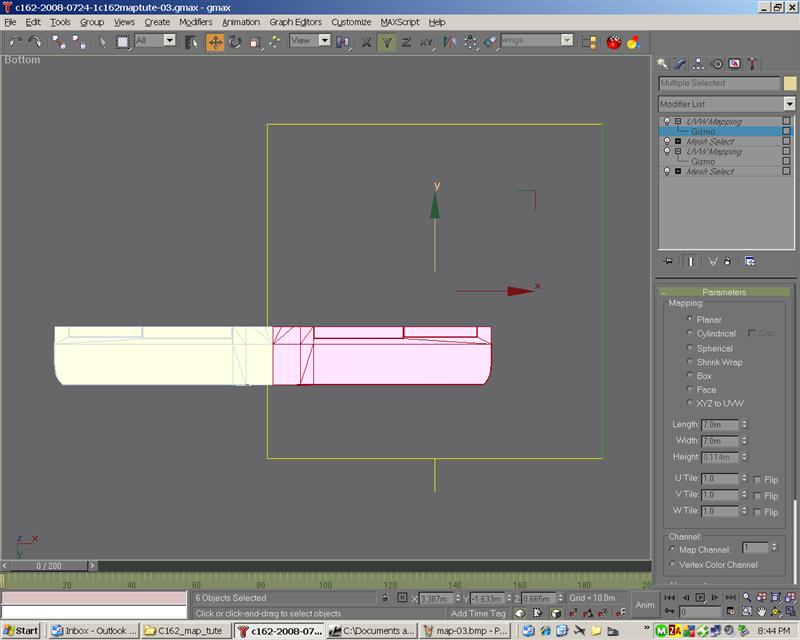
fig. 8 - adding a second UVW map to the stack for the bottom of right wing
We now have the right wing, flap and aileron mapped and will proceed to the left side wing.
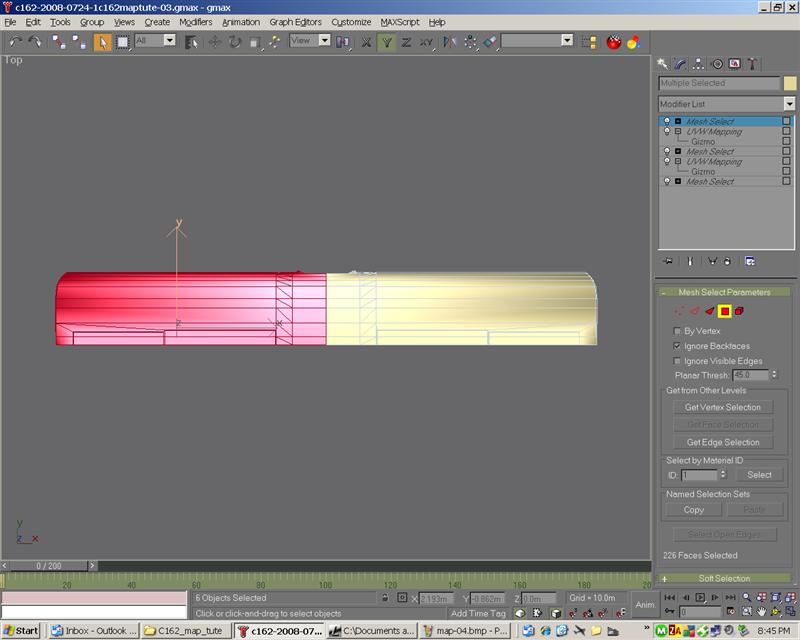
fig. 9 - Adding a mesh select to the stack for the top of the left wing
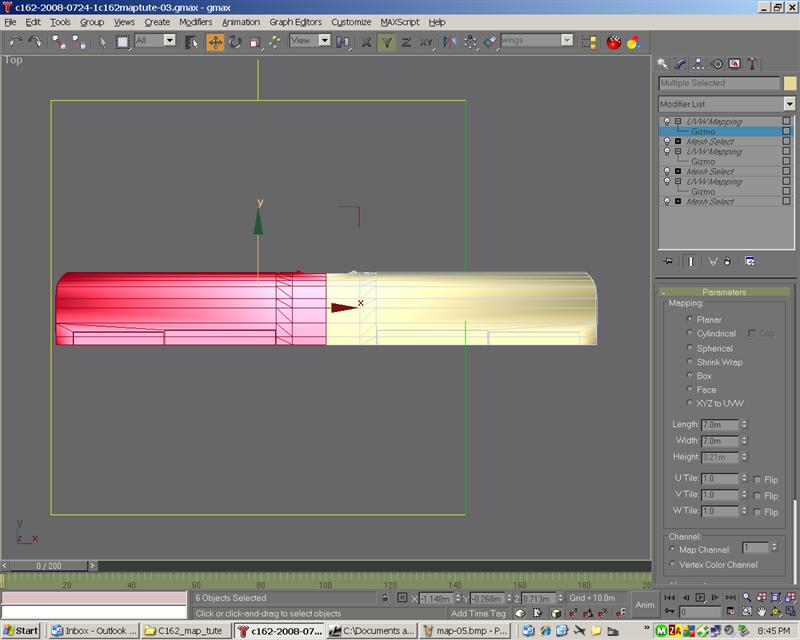
fig. 10 - adding a UVW map to the stack for the top of the left wing
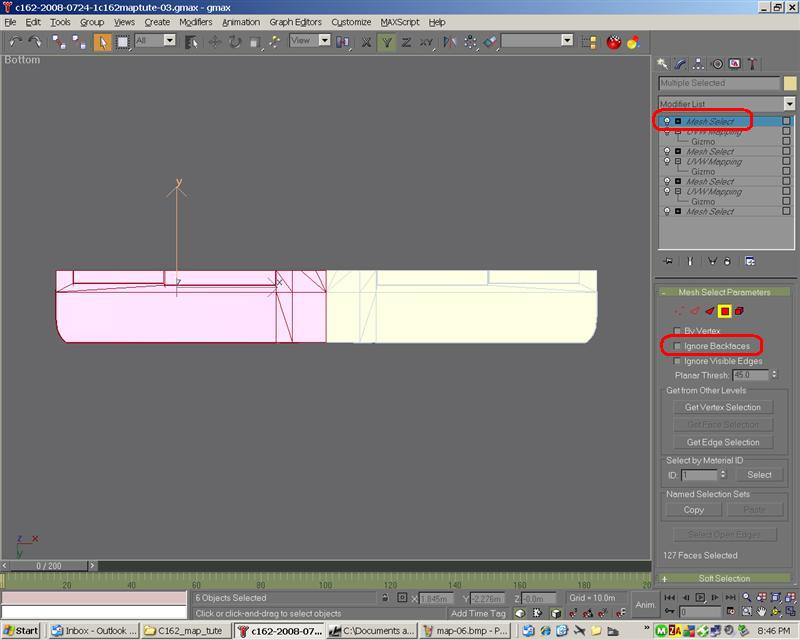
fig. 11 - Adding a mesh select to the stack for the bottom of the left wing
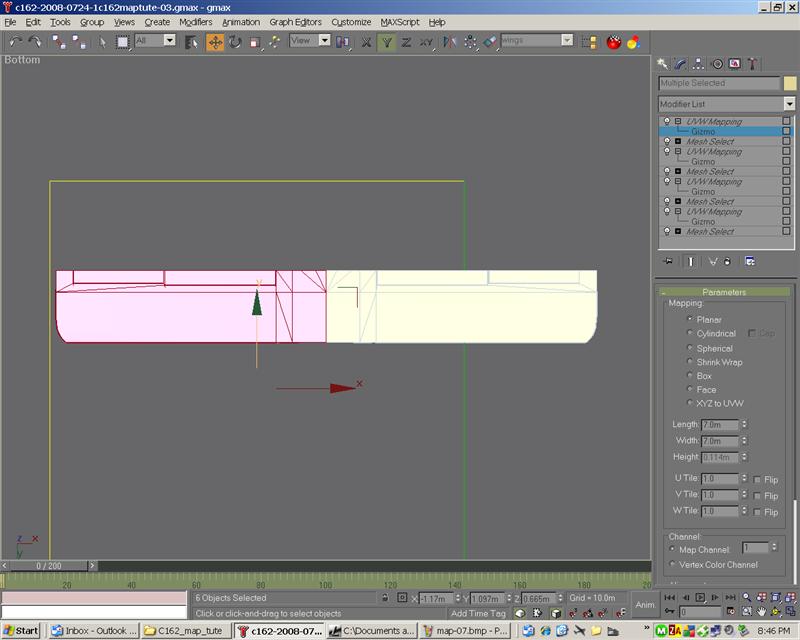
fig. 12 - Adding a UVW map to the stack for the bottom of the left wing
Have Fun
Milton Shupe
7/26/2008
Press on with the next step.