The detail is just amazing :salute::salute::salute:View attachment 32317
-
Please see the most recent updates in the "Where did the .com name go?" thread. Posts number 16 and 17.
-
IMPORTANT DOWNLOADING INFORMATION - ALL MEMBERS PLEASE READ
Please see this thread for updates. Update Thread
SOH ADMINISTRATION
You are using an out of date browser. It may not display this or other websites correctly.
You should upgrade or use an alternative browser.
You should upgrade or use an alternative browser.
P-51D - 'Cadillac of the Skies' Part2 - OUT NOW!
- Thread starter WarBert
- Start date
Bomber_12th
SOH-CM-2025
I just want to say to everyone who has posted in this thread, thank you very much for the feedback and support, it is very much appreciated by Albert and I and the rest of the Warbirdsim support team!!
DanyBoy - there isn't an option to load a passenger, but if you activate the fuselage fuel tank entry in the Aircraft.cfg file, and fill it with 200 lbs. worth of fuel, you can feel what it is like to carry a passenger in that area of the aircraft. I think it is around 230 lbs. is the usual max-weight that pilots feel comfortable with carrying a passenger in the back - any more weight, I don't know if the passenger could fit very well in the back anyway - it is quite snug.
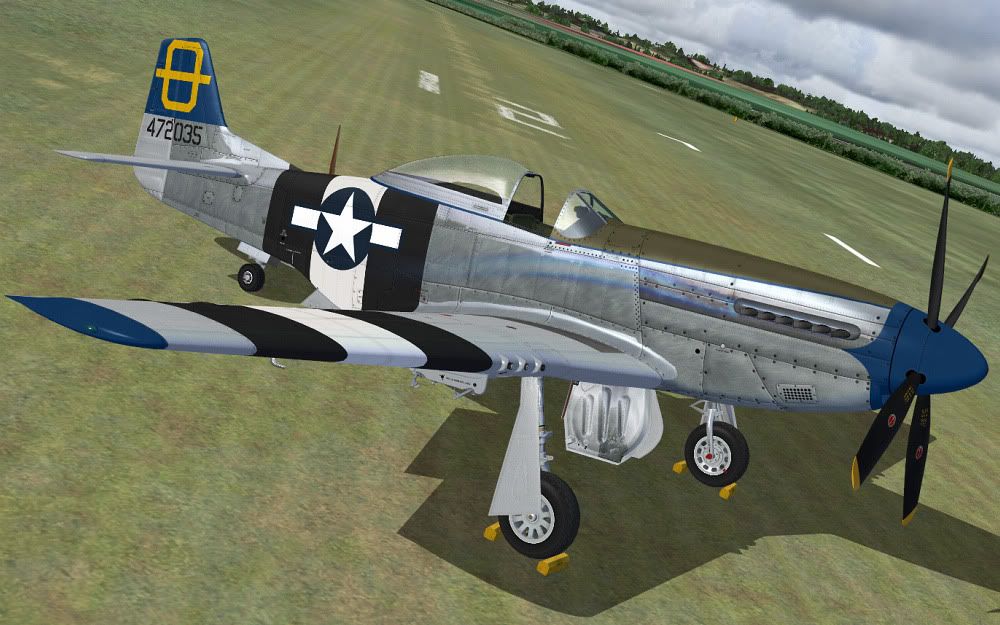
DVJ, it is great to see that you like the "Rebel"! It is one of my favorites. Here are some photos I took of it just this past summer. In 2009, the year I couldn't be at Oshkosh to see it, it had the replica 108-gal paper drop tanks fitted, as we have depicted.
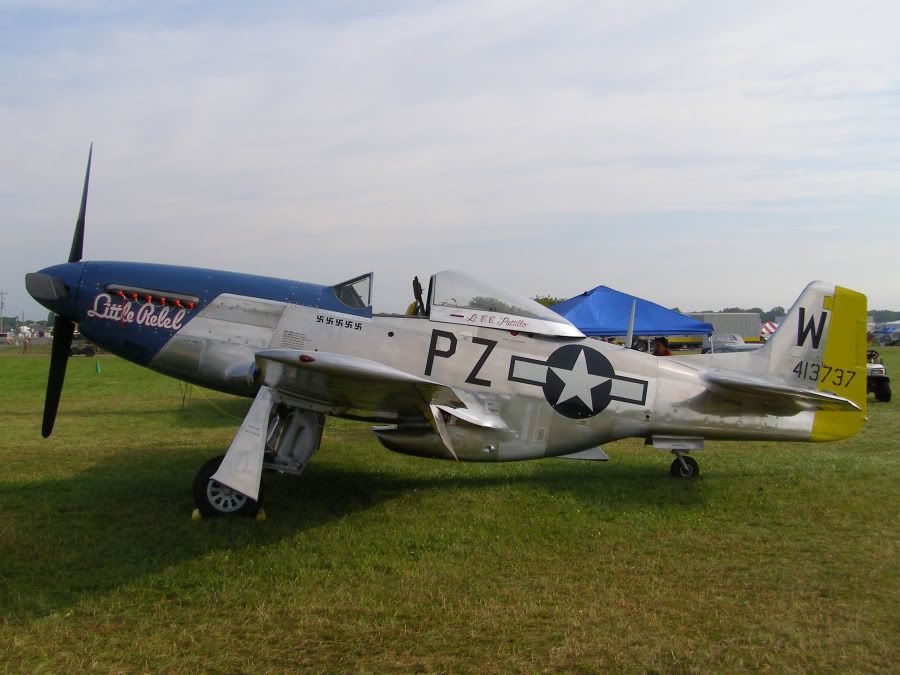
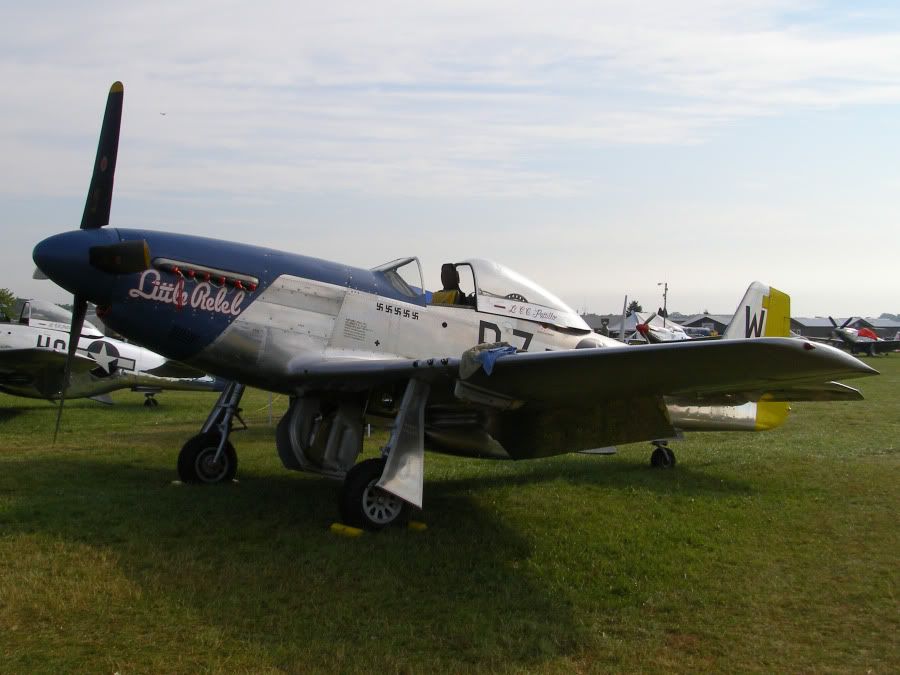
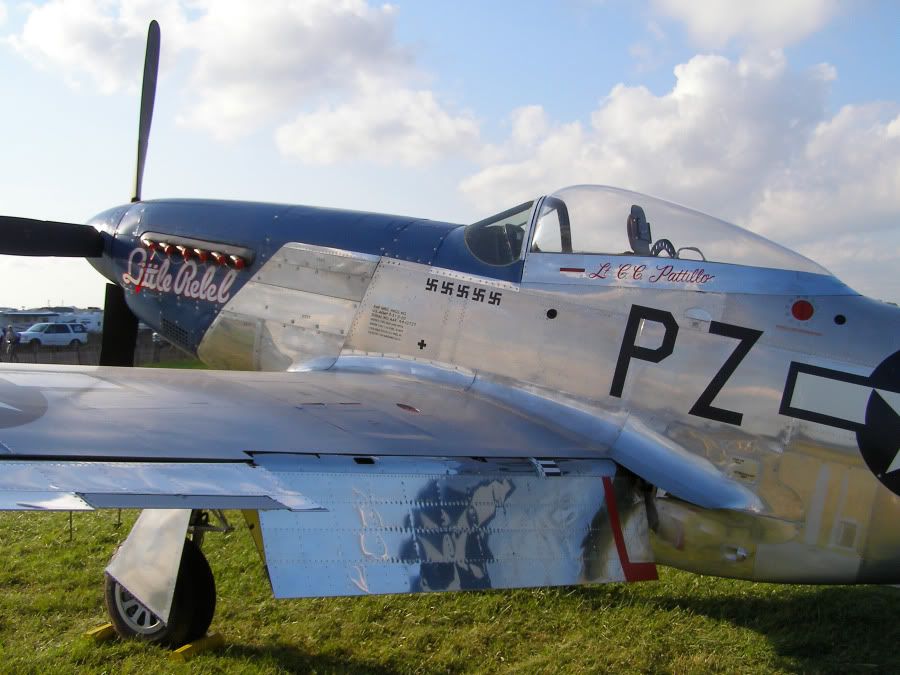
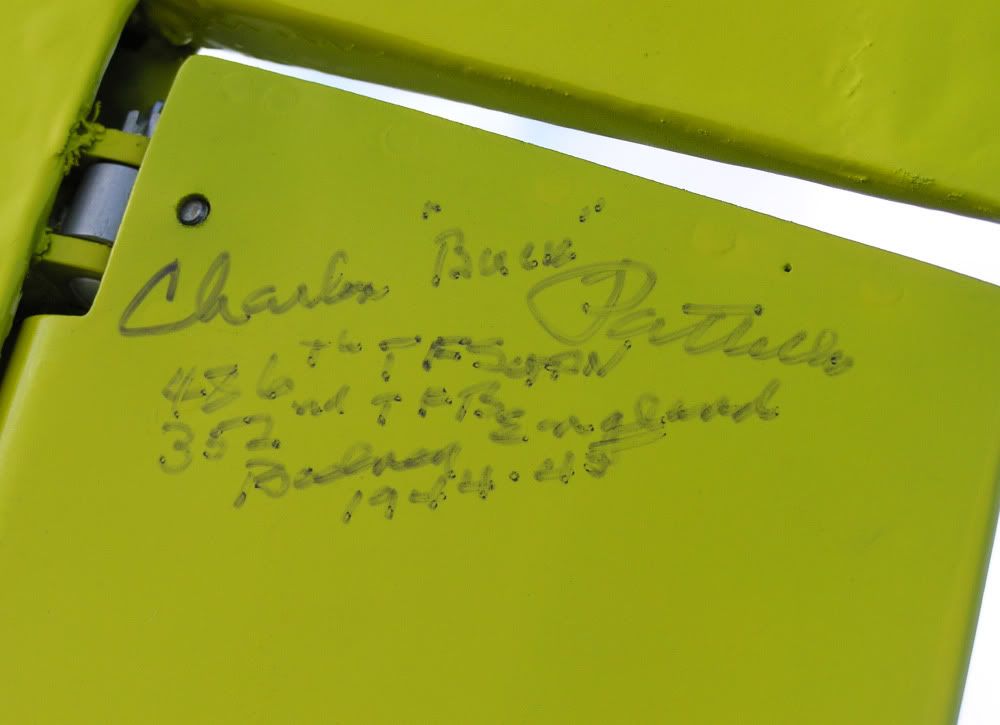
Buck's signature on the rudder trimtab was included in the Warbirdsim recreation of the aircraft as well.
DanyBoy - there isn't an option to load a passenger, but if you activate the fuselage fuel tank entry in the Aircraft.cfg file, and fill it with 200 lbs. worth of fuel, you can feel what it is like to carry a passenger in that area of the aircraft. I think it is around 230 lbs. is the usual max-weight that pilots feel comfortable with carrying a passenger in the back - any more weight, I don't know if the passenger could fit very well in the back anyway - it is quite snug.
DVJ, it is great to see that you like the "Rebel"! It is one of my favorites. Here are some photos I took of it just this past summer. In 2009, the year I couldn't be at Oshkosh to see it, it had the replica 108-gal paper drop tanks fitted, as we have depicted.
Buck's signature on the rudder trimtab was included in the Warbirdsim recreation of the aircraft as well.
Bomber_12th
SOH-CM-2025
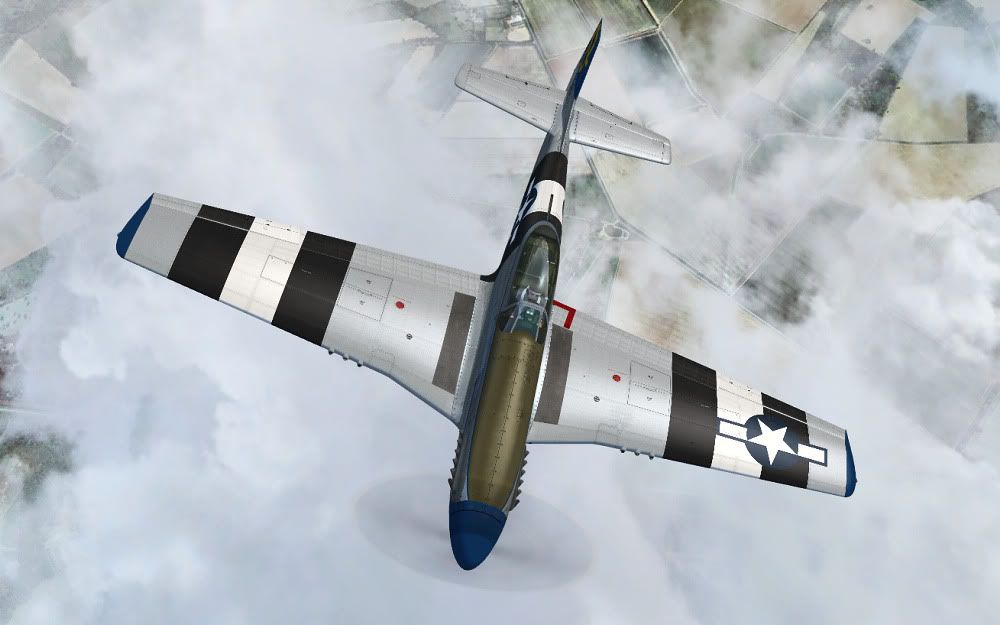
Some 'details' of Part 2:
The 'early' center electrical panel. This was the standard layout, that changed very little from the D-5, D-10, D-15, all the way to the late D-20's, when the wing was modified with the ability to carry rocket launchers, and rocket-launching controls were installed in the cockpit. Those familiar with the P-51A/B/C, you will note that this is a very similar setup to those earlier Mustangs as well. - Note how none of the exposed toggle switches are exactly alike.
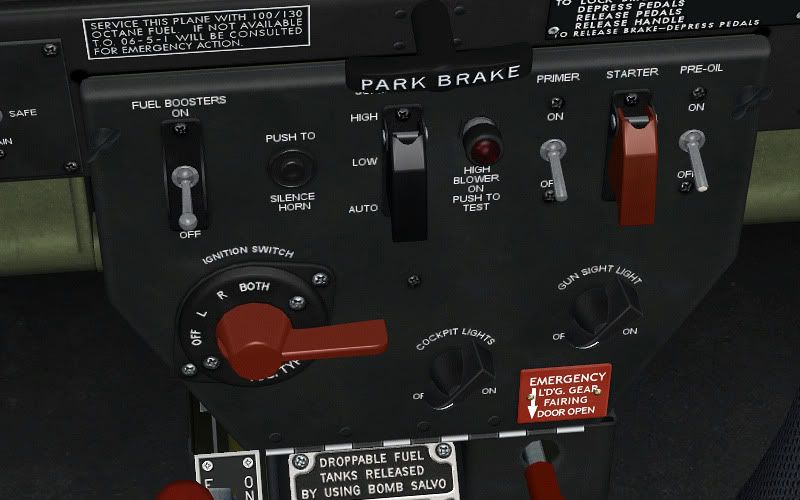
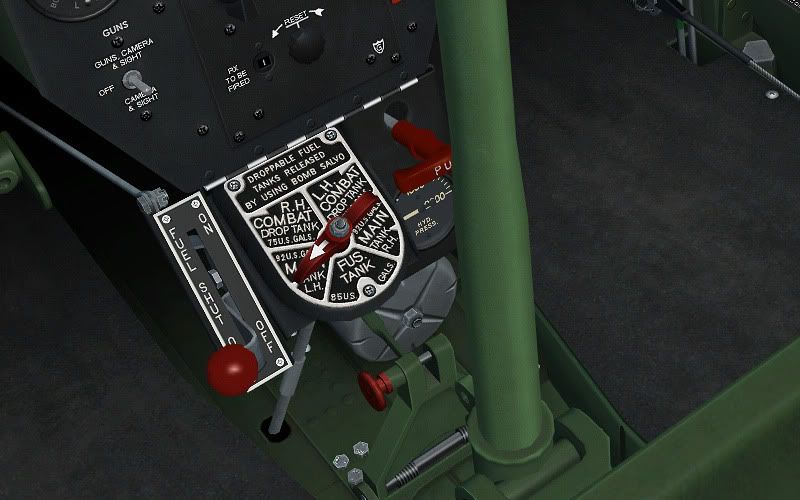
In this screenshot you can see the 'late' center electrical panel. Below it is the fuel cut-off lever (fully modeled and working on the backside, including a safety-wired bolt/nut), the fuel tank selector, and the hydraulic T-handle in the 'release' position. The large silver cylinder below the hydraulic T-handle is an air filter for the instruments. The large bolt in the upper right corner is one of the few main bolts that directly attach the fuselage structure to the wing structure.
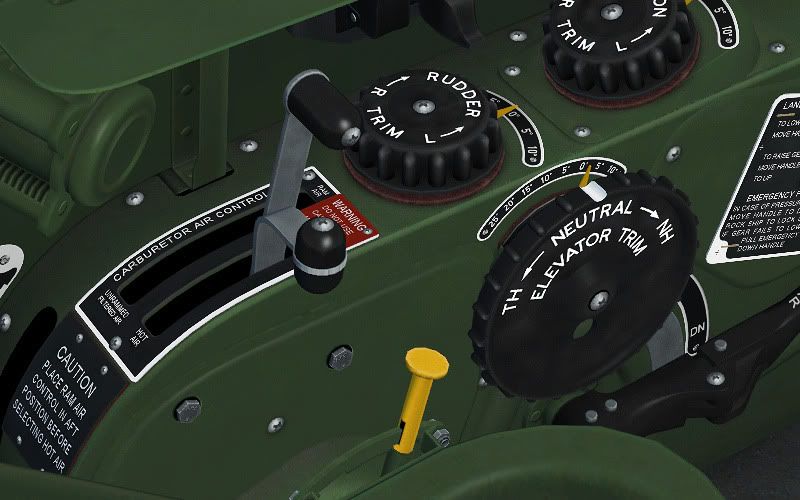
"Phenolic Resin" - there is quite a large use of phenolic resin throughout the cockpit of the P-51. Everything from the control knobs, to most of the placards, to the electrical backing-plates, to the trim wheels and trim wheel base-plates, were made from this early form of plastic.

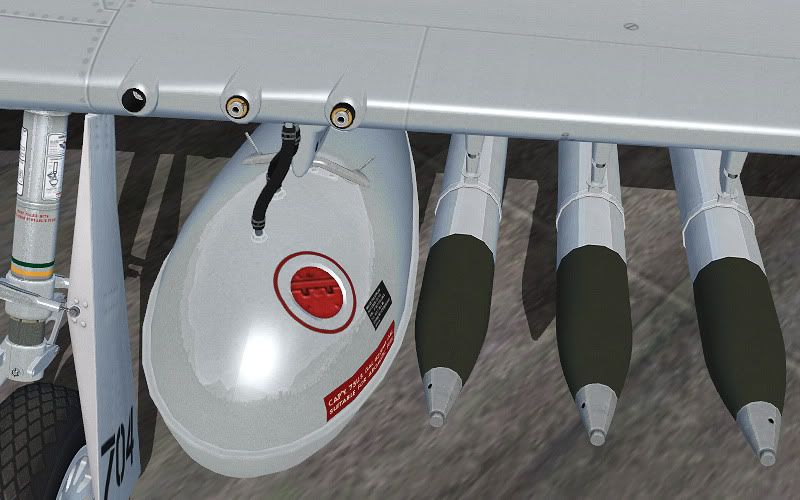
In this screenshot you can see the staggered machine guns, the all original placards, stencils, and markings on the Bendix/Menasco landing gear strut, the 75-gallon drop tank, with all original placards, stencils, pressure line and fuel line, three of the 5-in HVAR rockets with fuses, and on top of the wing, you can see the plug for the point in the wing used for jacking the airplane during maintenance.
The 'early' center electrical panel. This was the standard layout, that changed very little from the D-5, D-10, D-15, all the way to the late D-20's, when the wing was modified with the ability to carry rocket launchers, and rocket-launching controls were installed in the cockpit. Those familiar with the P-51A/B/C, you will note that this is a very similar setup to those earlier Mustangs as well. - Note how none of the exposed toggle switches are exactly alike.
In this screenshot you can see the 'late' center electrical panel. Below it is the fuel cut-off lever (fully modeled and working on the backside, including a safety-wired bolt/nut), the fuel tank selector, and the hydraulic T-handle in the 'release' position. The large silver cylinder below the hydraulic T-handle is an air filter for the instruments. The large bolt in the upper right corner is one of the few main bolts that directly attach the fuselage structure to the wing structure.
"Phenolic Resin" - there is quite a large use of phenolic resin throughout the cockpit of the P-51. Everything from the control knobs, to most of the placards, to the electrical backing-plates, to the trim wheels and trim wheel base-plates, were made from this early form of plastic.
In this screenshot you can see the staggered machine guns, the all original placards, stencils, and markings on the Bendix/Menasco landing gear strut, the 75-gallon drop tank, with all original placards, stencils, pressure line and fuel line, three of the 5-in HVAR rockets with fuses, and on top of the wing, you can see the plug for the point in the wing used for jacking the airplane during maintenance.
Aluminium, steel and paint.
This is my personal favourite from this package. I love the look of the light grey interior, but most of all I love it because it shows John incredible talent to make metal look like metal.
Highly polished aluminium really looks like highly polished aluminium. Stainless steel looks like stainless steel and aluminium dope painted parts really looks like aluminium dope.
When you compare the polished aluminium on this model with for instance the less polished aluminium on the model from Upupa Epops from the first set, you start to understand which efforts must have gone in the making of these models.
Cheers,
Huub
skyhawka4m
Charter Member
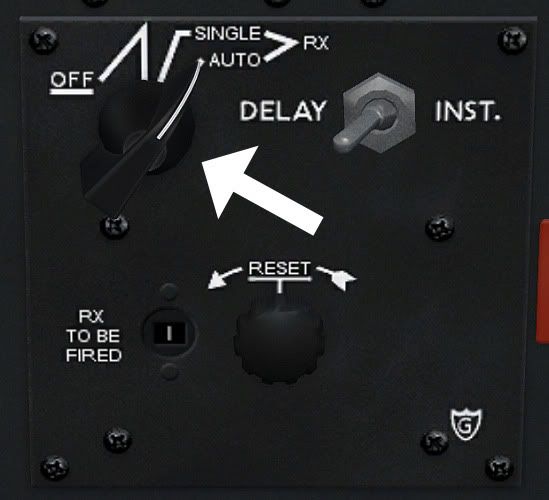
how do you get the rockets to show up?
how do you get the rockets to show up?
Use the switch on the console... (see below)
Cheers,
Huub
jankees
SOH-CM-2026
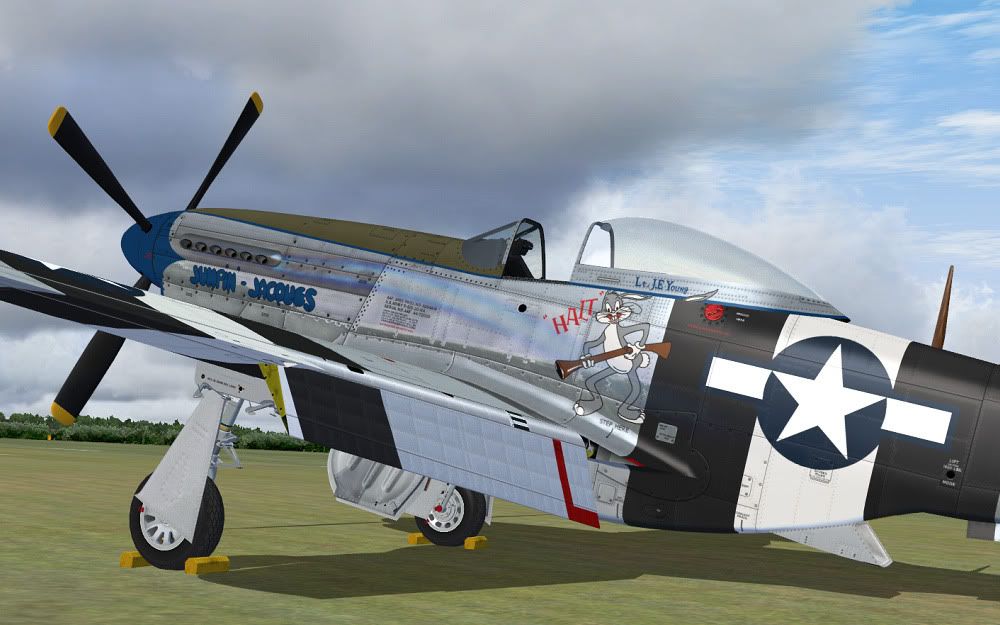
looking at the pictures of 'Jumpin'Jacques' above, I had the nagging feeling something was wrong, but did not know what. I did a paint of it for the A2A a while back, and so know my way around it a bit.
But I found it, on my paint, I gave it a colored hatch below the nose, like on this pic:

, but then I noticed that on other pics it was bare metal:

Was this changed recently?
The same is true for the prop, sometimes it has a black stripe in the yellow tip (first pic), some times not (2nd pic). In this pic:

it has no yellow on the rear of the blades, in other pics it has. Fun to see that even a modern warbird changes in details from time to time...
But I found it, on my paint, I gave it a colored hatch below the nose, like on this pic:
, but then I noticed that on other pics it was bare metal:
Was this changed recently?
The same is true for the prop, sometimes it has a black stripe in the yellow tip (first pic), some times not (2nd pic). In this pic:
it has no yellow on the rear of the blades, in other pics it has. Fun to see that even a modern warbird changes in details from time to time...
Bomber_12th
SOH-CM-2025
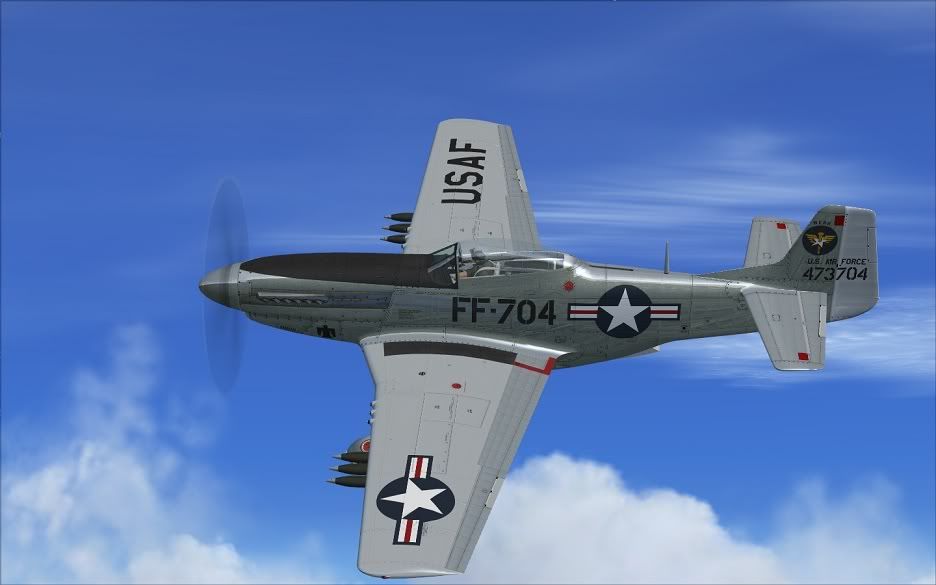
Good eye, Jan Kees! The entire aircraft was re-painted two years ago. Besides the markings being more accurate, they are also now matte, instead of gloss as before. Also, all original stencils were applied, the prop blades were given accurate markings, and the engine compartment was restored and properly detailed as per original factory spec. All of this was recreated in the Warbirdsim version. (A few of the stencils that were applied, are not original to WWII - but are of post-war USAF type - these were recreated to match on the Warbirdsim version - these being all of the 'NO PUSH' and 'INSP.' stencils on the trimtabs and inspection panels.)
Also, up until just this past year, the wingtip lights were located in the wrong positions - positioned far too aft along the wingtips. This was more recently corrected as well on the actual aircraft. You can also notice, just between the first two photos you posted, that the landing gear struts and landing gear door connectors were re-finished as well.
Peter Teichman and the Hangar 11 Collection, strive for as much originality in their aircraft as possible. Over the past few months, their combat-vet PR Spitfire Mk.XI, had its actual, original, wartime Merlin installed back into the aircraft, and it has also recently been re-painted as well, now in straight-accurate PR markings that it actually wore during WWII.
Furthermore I should add, that our presentation of "Little Rebel" is as it is now, rather than just a year ago. Over that amount of time, more details were added, and other details corrected.
Bomber_12th
SOH-CM-2025
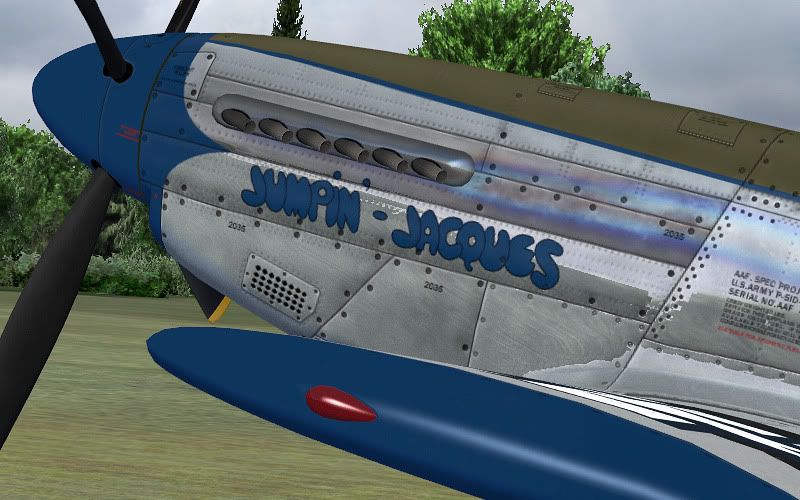
Some more screenshots of "Jumpin Jacques".

doublecool
Charter Member
This is my personal favourite from this package. I love the look of the light grey interior, but most of all I love it because it shows John incredible talent to make metal look like metal.
Highly polished aluminium really looks like highly polished aluminium. Stainless steel looks like stainless steel and aluminium dope painted parts really looks like aluminium dope.
When you compare the polished aluminium on this model with for instance the less polished aluminium on the model from Upupa Epops from the first set, you start to understand which efforts must have gone in the making of these models.
Cheers,
Huub
Huub, if ya zoom in on the prop cover or you can see yourself

doublecool
Charter Member
Just been have fun with each and everyone of these Beauties View attachment 32398View attachment 32399
Cleartheprop
Charter Member
Can't wait to be back home to grab this package! Very nice work indeed!
SpaceWeevil
SOH-CM-2026
..and there go the last shreds of my self control. Unfortunately I upset Paypal by removing the wrong credit card so even though my bank account is in credit (and I put the card straight back on) I have to wait until 4th March for an 'e-cheque' to clear. Ne'er mind, worse things happen at sea..Some more screenshots of "Jumpin Jacques".
WarBert
Charter Member
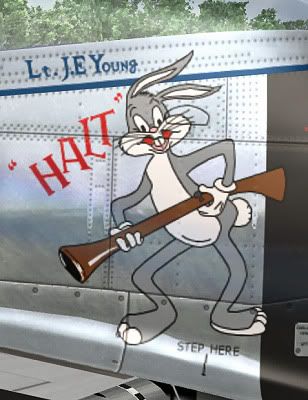
Jumpin Jacques Tip Lights
The original placement of the incorrect 'Jumpin' Jacques' Wing Tip Lights was as the result of a mid-air collision while the aircraft was in the ANG. Most of the wingtip was sheared off in the accident and a hasty rebuild resulted in what we saw.
One day Peter plans to return her to her original Tuskegee colours, but I think we have all grown very fond of her as 'Jumpin' Jacques!
Albert
www.warbirdsim.com
Bomber_12th
SOH-CM-2025
Jan Kees, believe me, if there was one flying today in that configuration, it would have been covered. But yes, there is a certain something in the pipeline that shall hopefully make you very happy! I've got some great resource material compiled together on "Uncle Dog". I'll try contacting you sometime this week.
This morning I did a quick flight over the fields of Wisconsin - but might as well be wartime England:
But yes, there is a certain something in the pipeline that shall hopefully make you very happy! I've got some great resource material compiled together on "Uncle Dog". I'll try contacting you sometime this week.This morning I did a quick flight over the fields of Wisconsin - but might as well be wartime England: