• There seems to be an uptick in Political comments in recent months. Those of us who are long time members of the site know that Political and Religious content has been banned for years. Nothing has changed. Please leave all political and religious comments out of the forums.

    If you recently joined the forums you were not presented with this restriction in the terms of service. This was due to a conversion error when we went from vBulletin to Xenforo. We have updated our terms of service to reflect these corrections.

    Please note any post refering to a politician will be considered political even if it is intended to be humor. Our experience is these topics have a way of dividing the forums and causing deep resentment among members. It is a poison to the community. We appreciate compliance with the rules.

    The Staff of SOH

  • Server side Maintenance is done. We still have an update to the forum software to run but that one will have to wait for a better time.

Some WIP preview...

As to transparency...

Congrats Captain Kurt, great prompt reply!

I wish modify some bmp gauges, as write before my peoblem is make a transparent section but i have try in the same way of the panel bmp but it remain black and visible.

If is possible, please, explain me the metod?

Thanks in advanced.

Best regards.

You need to be a bit deft with a program like PSP or Photoshop... and work in layers...
You play with relative transparency until you get what you want... unfortunately... gauge bmp files are all in 256 colors..
so one can create the illusion of transparency on the face of the gauge... BUT... the moving parts will be on top of it...
still, I think that it renders a better product than just opaque gauge faces...
You work on high def color (8 bit) and then put the final product on 256... as CPT Kurt mentioned... the pure black background gets
changed in the process... but there is a way around it... you take the final high-def product and superimpose it on a pure black
background in 256... it works for me...

:wavey::ernaehrung004:
G.
 
Hi John,

forgive us for writing few lines in Italian, it's always a pleasure discovering someone "in the basement" who lives a few miles away. We only exchanged greetings and thought about resolving this Italian attitude problem.......:biggrin-new: (pun very much intended, of course!)
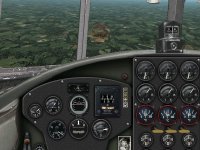

No worries. I enjoy it actually. I grew up listening to my Grandparents speaking French(Canadian). So don't mind me. If I want to know what you'll are saying, I'll just google it.

I'm glad you guys were able to change the guages.

CK, they look great.
 
One little addition...

I don't know exactly how the C++ (gau) gauges work, if they use 256 colors 8 bit or different types of bmps.
In XML gauges are used 256/8 bmps, in these gauges the "transparent" color is the BLACK.

Stefano, look at the colors table in Your paint program, for transparency the cursors for black MUST be at 0,0,0 (Red/Green/Blue) otherwise the transparency DOESN'T work, for example : if Your color is 0,0,1 You'll see a very dark grey, it seems black, but ISN'T (as a gauge's "black" quadrant) !!!

:wavey::wavey::wavey::wavey:

YOU MUST MAKE SURE THAT THE FIRST PIXEL... EXTREME UPPER LEFT (as you look at the bmp) is PURE BLACK...
Otherwise, the transparency is lost... and the rest of the background, of course is pure black...
It happens sometimes that in the process of changing color values down to 256.. there is a "wild pixel" of a color other than pure black (very close to it to the naked eye...
in the extreme upper left...
G.
 
Still a WIP... all comments or suggestions entertained... gun sight is separate bmp...
18974177779_edd08ec7f7_o.jpg

G.

Hi Carlos,
Sorry, but the gauges position in Your panel are completely WRONG. Take a look at the pictures I posted in this thread...... You'll find the panel drawing with the real gauges position and numbered references to the gauges list (also posted).

:wavey::wavey::wavey:
 
...The gauge presented here is made up of several layers... and can be used on an appropriately programmed gauge...
19162788635_f55f08eb1e_o.jpg

Hi Carlos,
The OMI-Cerini Artificial Horizon was ALWAYS mounted from the rear of the panel, You must remove the whole mounting flange leaving ONLY the round bezel, the knob and the four screws..... Take a look at the Captain Kurt's post, his gauge is correctly mounted.

:wavey::wavey::wavey:
 
Oh, boy......

Gentlemen,

I am awfully sorry, but I have.... :apologetic:....:barf: to spoil the party here.....

I tested the O.M.I.-Cerini - i.e. the historical manufacturer - attitude gauge posted by Capt. Kurt yesterday, when I saw it behaves the opposite of what it should, just like the one I had worked on so hard, my stomach sank to my feet. The attached image shows my test aircraft in a steep dive and the shape of it in the attitude gauge is displayed above the horizon line, while it should be below.

Please, Captain Kurt don't take it bad, your help is always greatly appreciated here, because you are very accurate and historically-minded in every thing you did for CFS2 and the community.

I think the problem is in every Artificial Horizon, or attitude, gauge ever developed for both MS civilian and combat flight sims.

A quick analysis about how attitude gauges work in MS flight simulation world explains the problem. Every gauge has a fixed 'frontal' aircraft shape with a horizon line 'behind' that moves according to the plane movements, showing the position of our aircraft in relation to the horizon line.

The O.M.I.-Cerini has, instead, a fixed frontal horizon line with a mobile aircraft shape behind. Now the concept behind this is totally opposite of the other. In this one, the aircraft shape has to duplicate our plane movements in relation to the horizon line exactly. All of the AH's available in the MS flight simming world I ever saw, work according to the former concept.
Caught at night, in bad weather or in a large cloud, with this AH we will not be able to determine where our aircraft is in relation to the ground. A bit dangerous, I'd say.

This is when strict historical details must yield to flight sim inborn limitations. All of Italian WWII gauges are developed by changing the 'face' of existing ones with suitable bitmaps. I already did a bunch of them together with Beepee, Chalachew, MVG and Peperez, some of them cannot be replicated exactly, because there's nothing available working the same way as the original counterparts. This OMI-Cerini replica is precisely one of them.
I will never upload, or take credit for, a flight instrument giving wrong readings.

Again, I am sorry. We'll have to live with the lookalike that I developed, which works with a fixed plane shape and a mobile horizon line, like all the others.

Cheers!
KH
:ernaehrung004:
 

Attachments

  • SM82_Dive.jpg
    SM82_Dive.jpg
    110.3 KB · Views: 1
Kelti! we have used an incorrect color for the italian cockpit. Only now i have remember that the ufficial color for the interior were the grey/blue light not green, as in the Guacho cockpit.

Instand of the position for the Ba.88 is no correct as write by mvg3d, but i have find an original image in which some instruments are in a different place, probably two version of the instruments panel for this bird.

Kelti when you upload someone of your fatique?
 

Attachments

  • ba88-cockpit.jpg
    ba88-cockpit.jpg
    71.5 KB · Views: 1
Kelti! we have used an incorrect color for the italian cockpit. Only now i have remember that the ufficial color for the interior were the grey/blue light not green, as in the Guacho cockpit.

Instand of the position for the Ba.88 is no correct as write by mvg3d, but i have find an original image in which some instruments are in a different place, probably two version of the instruments panel for this bird.

Kelti when you upload someone of your fatique?

Hi Stockplane,

I imagine instrument layout changed with different variants and even during production runs, like Serie 1, Serie 2 and so on. I too have found differences in pictures of the same aircraft cockpit. If you enter Macchi 202 in Google search field and select "pictures" you will find a beautiful one, probably taken during maintenance in an hangar, or even, at Aeronautica Macchi workshop in Varese, where there's a clock in place of the attitude gauge!

I am waiting for MVG to correct the bitmap of the Centauro, with the side panels angled as in the real bird. Right now he's busy helping Peperez with the conversion of Giuli's S.M. 82 Marsupiale, and I am helping both with new instruments and their layout.

Great novelties in store, especially with new conversions of Italian gauges!

Check below.......:mixed-smiley-010:

A touch of Manuele Villa's skills in producing fine details:

the three red small handles below the oil temp gauges are the exact replica of engine cutoff handles equipping all of multi-engined R.A. aircraft. And they work too...

Cheers!
KH
:ernaehrung004:
 

Attachments

  • SM82_nuova_disposizione_strumenti nuovi.jpg
    SM82_nuova_disposizione_strumenti nuovi.jpg
    105.4 KB · Views: 1
Kelti! we have used an incorrect color for the italian cockpit. Only now i have remember that the ufficial color for the interior were the grey/blue light not green, as in the Guacho cockpit.

Instand of the position for the Ba.88 is no correct as write by mvg3d, but i have find an original image in which some instruments are in a different place, probably two version of the instruments panel for this bird.

Kelti when you upload someone of your fatique?

Hi Stockplane,
The pic You uploaded is probably from "Ali d'Italia n.19 - Breda 88", I'm sure this pic is from the prototype's cockpit or from a pre-production plane.
All the pics I uploaded yesterday are from Manual & Part's Catalogue (respectively CA508 & CA500) that cover all the 88's production batches and it seems that the panel and the gauges were common for all the series. In CA500 is reported also the complete list of gauges (the AH was the Salmoiraghi-Sperry).
The color of the protective primer used for the cockpits RARELY was standardized by the Italian factories, they used indifferently light blue gray or light green primers. The light green primer (a kind of zinc-chromate enamel for alu surfaces) was widely used on metallic a/c (Breda, Macchi etc.), but it was used also in wooden Construction planes (C.R.D.A.). Don't worry, I think You can leave Your '88 cockpit in light green, a total of 149 Ba.88 were built by Breda (MI) and by I.M.A.M.(NA) in four different production batches and we Italians know the "philosophical" differences between us ......

:wavey::wavey::wavey::wavey:
 
Hi Carlos,
Sorry, but the gauges position in Your panel are completely WRONG. Take a look at the pictures I posted in this thread...... You'll find the panel drawing with the real gauges position and numbered references to the gauges list (also posted).

Now, you need to enlighten me....
my cockpit:

18974177779_edd08ec7f7_o.jpg


was based on this photo, purportedly labeled as a B88, to wit:
attachment.php


Now the gauges are not really very visible... but the positions are exactly those in the photo... what gives...?
and btw, the line drawing with the positions and names of the gauges you posted is really too small to read or interpret...

if you have a larger version that might help...

Carlos
 
if you have a larger version that might help...

Carlos

88_1C.jpg

Regarding the pic You used (uploaded by Stockplane) I answered him in another thread, this pic is from the prototype or from a pre-production plane, the above drawing is from the original manual that covered ALL the production batches.
The gauge's BEZELS positions (NOT their dimensions) in Your panel are right for the prototype, but wrong for the other planes, however COMPLETELY wrong is Your gauge's quadrants choice :
You CANNOT put a generic altimeter and TWO gyroscopic compass indicators in the engine's control panel (the left one), OK, Ba.88 had two altimeters (1000m & 8000m) and two ASI, but NOT there and, finally, Ba.88 NEVER had a Radio-Compass (You put it in the right panel instead the clock).....

:wavey::wavey::wavey::wavey:
 
Thanks a lot... now it makes sense...

Great info and better line drawing.... Thanks again
Can you include the writing describing each number?
G.
 
Back
Top