• There seems to be an uptick in Political comments in recent months. Those of us who are long time members of the site know that Political and Religious content has been banned for years. Nothing has changed. Please leave all political and religious comments out of the forums.

    If you recently joined the forums you were not presented with this restriction in the terms of service. This was due to a conversion error when we went from vBulletin to Xenforo. We have updated our terms of service to reflect these corrections.

    Please note any post refering to a politician will be considered political even if it is intended to be humor. Our experience is these topics have a way of dividing the forums and causing deep resentment among members. It is a poison to the community. We appreciate compliance with the rules.

    The Staff of SOH

  • Server side Maintenance is done. We still have an update to the forum software to run but that one will have to wait for a better time.

A new LFG Roland D6 is out

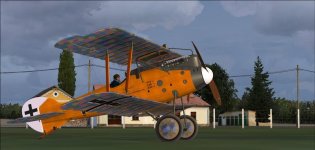
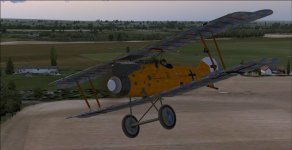
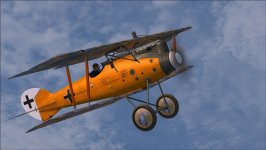
First time taking the aircraft out, after studying the user guide, and I'm even more infatuated with this aircraft - I love the attention to detail on the engine start and management of it all, and the details of the graphics are fantastic.

Olderndirt, there are a few more steps than that in order to start the engine and keep it running. This is what the user guide describes, and it works brilliantly for me:

Engine Start

1. Fuel Tank - STARTING TANK (bottom right position on fuel tank selector)
2. Pressure Selector - HAND-DRIVEN (bottom left position on pressure selector)
3. Fuel Pressure Pump - HAND PUMP (back and forth) Until Pressure Gauge Needle is at Red Line
4. Ignition Adjustment - RETARD (rear/"Spat" position)
5. Magnetos - BOTH
6. Click Starter Crank (turns prop/engine starts)
7. Pressure Selector - MOTOR-DRIVEN (bottom right position on pressure selector)
8. Ignition Adjustment - NORMAL (forward/"Fruh" position)
9. Fuel Tank - MAIN TANK (bottom left position on fuel tank selector)

After the engine starts, you'll notice some moments later, that eventually the smoke from the engine clears and the starter hand crank resets and you're good to go!

(If you don't switch to the motor-driven pressure pump, the pressure in the fuel system won't remain and thus the engine will run out of fuel and quit (the motor-driven pump is a nice feature in WWI aircraft - a few of the rotary-powered examples, like the Avro 504, requires the pilot to continue to hand pump pressure to the fuel system at various intervals throughout all operations/flight, in order to keep the system pressurized - and those types, as with most WWI types, have a "fine adjustment" that has to be played around with as well, for different throttle settings, and the engine will quit at the wrong setting (either causing a lean-cut or a rich-cut) - all of this essentially making the pilot the engine's carburetor).)

There is no mixture-related control in the aircraft, so to shut the aircraft down, you start by turning the ignition/magnetos off, then fuel off (bottom fuel tank selection) and finally air pressure off (bottom pressure selection) or to the purge/exit position (top left pressure selection) to bleed-out the air pressure.


I haven't experienced any issues with the engine in the air yet (have been making sure to keep the RPM's down to proper level), but the engine will begin puffing out smoke and causing the RPM's to fluctuate if I spend any real amount of time taxiing after landing, which clears up as soon as I shut the engine off.
 
Last edited:
Here are some great detail photos of the amazingly preserved original Roland D6 at the aviation museum in Krakow, Poland (as also seen in the user guide): http://www.wingnutwings.com/ww/productdetail?productid=3004&cat=2

This website is the model-side of The Vintage Aviator company, which restores original WWI aircraft and reproduces WWI aircraft to exacting original specifications/details. The flightsim model that Beercan has produced has the absolute appearance of one of the superb "Vintage Aviator" type restorations or accurate reproductions flying today.
 
Having done 2 short flights with this bird today, I can attest ... great modeling and such a treat for fans of rare WWI aircraft ... very well done ! Mike :ernaehrung004:
 

Attachments

  • 1.jpg
    1.jpg
    55.1 KB · Views: 0
  • 2.jpg
    2.jpg
    50.5 KB · Views: 20
  • 3.jpg
    3.jpg
    76.2 KB · Views: 0
  • 4.jpg
    4.jpg
    52.6 KB · Views: 0
  • 5.jpg
    5.jpg
    51.3 KB · Views: 0
Thanks to all for your feedbacks.

You know what? This plane made me buy a Track-IR ... I had doubts but it's fantastic!
 
Here are some great detail photos of the amazingly preserved original Roland D6 at the aviation museum in Krakow, Poland (as also seen in the user guide): http://www.wingnutwings.com/ww/productdetail?productid=3004&cat=2

This website is the model-side of The Vintage Aviator company, which restores original WWI aircraft and reproduces WWI aircraft to exacting original specifications/details. The flightsim model that Beercan has produced has the absolute appearance of one of the superb "Vintage Aviator" type restorations or accurate reproductions flying today.

John - started with a 'no undercarriage' install so did it again and, whether or not that helped with the start, your instructions certainly did. Thanks a lot.
Dave.
 
Thank you, Beercan! I am very interested in WWI and am very glad with this aircraft. When I finish setting up my oculus Rift I am going to enjoy this beauty!<o:p></o:p>
 
Just in case it's not common knowledge, 'Wingnuts' is owned by Peter Jackson, the man behind 'The Lord of the Rings' films.
He's a true aviation enthusiast and is very keen on the Great War in the air, and despite my general disdain of 'Plastic Model Kits' I admit to actually buying and building his superb subjects.
:encouragement:
 
And Peter Jackson is of course the owner of The Vintage Aviator Ltd as well:
http://thevintageaviator.co.nz/
https://www.facebook.com/thevintageaviator/?fref=ts


As I wrote earlier...no difficulties at all when manually starting the engine the way that it is outlined in the user guide (which recommends not using Crt+E):

1. Fuel Tank - STARTING TANK (bottom right position on fuel tank selector)
2. Air Pressure Selector - HAND-POWERED (bottom left position on pressure selector)
3. Air Pressure Pump - HAND PUMP (back and forth) Until Pressure Gauge Needle is at Red Line
4. Ignition/Spark Adjustment - RETARD (rear/"Spat" position)
5. Magnetos - BOTH
6. Click Starter Crank (prop turns/engine starts)
7. Air Pressure Selector - MOTOR-POWERED (bottom right position on pressure selector) - this needs to be done before the pressure that you had built-up manually in the system is all used up, otherwise the engine will be starved of fuel
8. Ignition/Spark Adjustment - NORMAL (forward/"Fruh" position)
9. Fuel Tank - MAIN TANK (bottom left position on fuel tank selector)

(This is essentially identical in every step to starting a real Albatros or Fokker D.VII as well. In reality, with all of these types, there would be a guy hand-propping as well, but as soon as the guy swings the prop through, it is the pilot's job to crank on the engine crank to keep the prop going around and get the engine started.)

Alternatively, however, if you don't want to go through all of those steps, the alternative option is to click on the right-side machine gun charging handle, which will cause all of the levers/switches in the cockpit to go to their correct positions, and then all you have to do is click on the starting crank, and once the engine is running, advance the ignition/spark adjustment to normal ("Fruh" position).

The user guide advises to not to start to taxi/takeoff until the engine smoke from start-up clears, as the engine will not be to proper operating temperature until the smoke clears.

For takeoff, the user guide suggests bringing the throttle up gradually to between 1100-1200 RPM until the tail is flying (I like to get the tail up early) and you have more control authority over the rudder, at which point you can more safely add more power. As the user guide states, if you simply go straight up to full power, the aircraft will be off on an uncontrolled adventure across the airfield.

1200 RPM is the standard cruise power setting. It is easy to overheat the engine, and if you're at enough altitude and if you catch the engine overheating early enough, it is suggested to reduce the power and begin a light descent to increase the cooling. If the engine temp has gone beyond this curable point, with the engine smoking and RPM's fluctuating, it is suggested to cut the throttle completely and wait for the symptoms to clear. The engine will overheat very easily if you have near to or full power and very little airspeed (can be a bit tricky to manage through aerobatics - best to use airspeed management, diving-in to maneuvers, than sheer power).

According to the user guide, the original pilot operating instructions for the Roland D.VI recommends landing at 100 kmh (54 knots) - where the red line is on the airspeed indicator - but that the stall speed is around 65 kmh (35 knots), so you can actually bring it in quite a bit slower, especially if you aim to three-point it on. What I've been doing so-far is making the approach at around 54-knots (100-kmh), keeping the needle at the red line, and just feeling it out through final approach and through the flare, rather than looking at the airspeed. Unfortunately, however, with a slow, long approach, the engine is more prone to overheating after landing.

To shut the engine down, the ignition/magnetos are turned off, the fuel tank selector is turned to off (bottom position), and the air pressure selector is turned to the purge/exit selection (top left position) and then to the off position (bottom position) once all of the air is out of the system.
 
John, great screenies. Where can one download that 2nd paint scheme you're showing for this dazzling bird? Looks great.

I think I'm finally getting it. I did not experience much of a problem starting the aircraft but kept running into overheating issues during flight.

One eventually develops a feel for airspeed and rpm management; matching one to the other to get the sweet spot. Hint: don't expect to climb
faster than 20 fpm or so or you'll overheat. Low and slow but strangely rewarding. I just did a tour of the Jamaican coast (Orbx treatment) at
800ft and not only had a blast but was left in disbelief that I actually stuck with it for so long! Way past my bedtime.

What a great freeware gift. Many thanks Beercan.
 
a lovely free-ware model that puts some pay ware in the shade.
An English language version of the pilot notes would be most welcome.

Mike
 
John, great screenies. Where can one download that 2nd paint scheme you're showing for this dazzling bird? Looks great.

It isn't a second repaint it is actually a completely different model. As The Frog already indicated it is the Aircraft Factory Albatros III. The repaint is fictional scheme by Lukasz Kubacki depicting The Old Rhinebeck Collection's Albatros D.Va replica in the scheme of Black Baron. Note that the Oeffag D.III was totally different plane from Albatros D.Va. This scheme was only inspired by the original one.
The repaint is available in the libary here at the SOH. http://www.sim-outhouse.com/sohforums/showthread.php?70768-Albatros-D-III-(Oeffag)-The-Black-Baron-zip

Cheers,
Huub
 
With regard to an English version of the pilot's notes/manual, about 90% of what is stated in the manual is contained in post #29 of this thread (all the exact same information). The only other things mentioned in the manual is the history of the Roland and an illustration of the radio/GPS features, which are pretty self explanatory if you just look at the images in the manual.

With the sim aircraft as is, I've found that the magic number to stay at or above is about 69-70 Kts in the climb, at 1300 RPM, to prevent the engine from overheating, but you still are flirting right on the edge of overheating after a considerable length of time at that combination. If when I'm at 1200 RPM in the cruise, and my airspeed slows up to the mid-60's or less, then the engine will begin overheating as well, at which point I just back off on the throttle a bit and descend to pick up airspeed to get me back to 70 kts or more. I would need to research the real aircraft/engine combination some more, to find if this is a normal level of behavior under mild-normal weather conditions/temperature (I've been flying at 57-degrees OAT, ground level), but I have a feeling it is a bit exaggerated (like the initial Accusim Spitfire release, prior to all of the updates) - for instance, Kermit Weeks has flown his authentically-accurate Albatros D.Va, powered by the same original Diameler-Mercedes D.IIIa engine as installed in the Roland, in the Florida weather, and hasn't had issues with it overheating (in-fact, in the videos of Weeks flying it in Florida, he's even been able to keep the radiator shutter closed through a whole flight).


If you want it so that the engine won't overheat so quickly, I modified the gauge that controls the engine systems a bit so that it will take a bit higher amount of temperature before causing the engine to overheat or fail (I'm sure the original engine temps stated within the gauge are accurate for causing the engine overheating in reality, but those temps are likely coming on too soon in the sim). I've only tested the changes through a few flights, but I like it, and it is a very, very small change (just a few degrees of difference). It keeps all of the other elements of the engine systems as is, and the engine will still overheat/fail, but it will require a bit more prolonged abuse before that will happen. Just slide the included folder, attached within the .zip file, into the panel folder, overwriting when prompted.

With this modification, I've been testing it by using the same power settings as used in the operation of the Albatros D.Va's flying today with the same original Diameler-Mercedes D.IIIa engines that also powered the Roland D.VI's, which are also the same settings as outlined in the Roland sim manual:

Warm-up at idle until exhaust clears
Takeoff: Gradually increase power to max power (1350-1400 RPM)
Climb: 1300-1325 RPM (with my slightly modified gauge, I've been establishing my climbs at about 60-65 kts)
Cruise: 1200 RPM
Maneuvering: 1200-1300 RPM (whatever gets you what you need, without overheating)
Landing: Approach at 54-kts (100 km/h)

With the slightly modified gauge, I've also been able to successfully taxi back from landing without the engine overheating.

(Be sure to back up the original file/folder, in-case you wish to revert to the original conditions)
 

Attachments

  • RolandD6_Gauge_Mod.zip
    560 bytes · Views: 10
Back
Top