-
Please see the most recent updates in the "Where did the .com name go?" thread. Posts number 16 and 17.
You are using an out of date browser. It may not display this or other websites correctly.
You should upgrade or use an alternative browser.
You should upgrade or use an alternative browser.
A new "Regia" baby
- Thread starter mvg3d
- Start date
Z
Z-PurpleBubble
Guest
Hi Pepe,
The "Orione", the I.M.A.M.Ro.58 and the others prototype planes You cited were indeed beautiful birds, BUT they never were used in combat.
I prefer to make planes that were really used in actions and not only in some flight trials. For this reason I'm making this Breda, extensively used by Regia Aeronautica during Spanish and North African operations, and after, when I'll finish the Ba.65 (February 2010), I'll probably start with the Reggiane Re.2000 (I'm just searching for original documentation and manuals) and with the conversion for FS9 I started a long time ago, of the beautiful CFS3 Italianwings FIAT CR.42 .....

Did you say CR.42?? *drools*
Looking forward to that one (and very much to this one of course)
Lovely, stunning work Manuele!!!

 ...back to topic
Shessi,
Spelling isn't my best point and the language is not really mine. Wouldn't the world be beautiful when everybody spoke Dutch") .
.
It definitely wasn't the Oranjeboom (does that still exist?) as I hardly drink any alcohol. And I have erased the taste of Oranjeboom from my memory!
Huub

Spelling isn't my best point and the language is not really mine. Wouldn't the world be beautiful when everybody spoke Dutch
. It definitely wasn't the Oranjeboom (does that still exist?) as I hardly drink any alcohol. And I have erased the taste of Oranjeboom from my memory!
Huub
Since Manuele has not replied let me reassure everyone that the Ba 65 project is still progressing at a steady pace. A revised beta version is being circulated weekly. A project of this complexity consumes thousands of man hours of free time and even with four team members publication may consequently take the best part of a year to achieve.
Most of the residual and ongoing work relates to 3D texturing the many components of the very detailed VC, along with creation of external 'skins'. There are a handful of remaining gauge and sound alpha test issues outstanding, but they should not be difficult to resolve.
'Construction' of the 'primary' MDL including VC is now complete. Manuele intends to create (at least) two MDLs prior to release. One with the bomb chute and operable bay doors, but no external pylons, which is how most Ba 65s were delivered, and one with the grenade launcher weapon pack and external pylons as fitted by field modification after delivery. The cockpit systems will differ (and work) accordingly. Most of the real systems will be present and operable. This is a simulation in which guns set to 'weapons safe' will not fire and munitions must also be armed prior to release if applicable. The system of interest must be armed and then aimed using the appropriate HUDWAS parallax compliance cue. This is a complex skills trainer, not an AI aircraft release with no new skills to learn and master.
The very extensive product documentation is almost complete. Only some illustrations await final texturing of MDL and VC parts. The documentation includes month by month summaries of the real combat missions allowing them to be simulated in detail over the real terrain in appropriate weather, along with the most detailed free history of this aircraft ever published, in order to put those combat missions on three continents into an appropriate timeline context. Fuel and payload planning are explained in detail as part of that history so by way of a 'taster';
>>>>>>>>>>>>>>>>>>>>>>>>>>>>>>>>>>>>>>>>
COMPARISONS OF COMBAT UTILITY.
When we fly the September 1938 (combat debut) vintage Ba 65 Series II in FS9 we must be careful not to attempt sorties it could not fly. It is time to study the combat utility and mission profile of the single seat Ba 65 Series II in detail.
Vmax = 229 KTAS
Typical equipped empty weight = 6306lbs
Maximum take off weight = 7960lbs
Crew = 200lbs (with flying clothing and parachute)
Useful load = 7960 - 6506 = 1454lbs
Maximum fuel = 1014lbs
Normal bombload = 440lbs (200 Kg)
Maximum bombload = 880lbs (provided fuel reduced to only 574 lbs)
Every combat mission requires a fixed and combined fuel reserve for taxi, take off, climb, combat, holding, circuit to land, and diversion. Not so much diversion to an alternate place of landing but 'diversion' around threats. A combat sortie is rarely a single straight line out and back. The reserve required relates to engine power and whilst TOGA power is neither war emergency power, nor design cruise power, for our purposes we can treat the necessary (nil wind) VFR fuel reserve as 30 minutes at TOGA power. The Fiat A.80RC41 was TOGA rated at 1000hp.
1000hp x SFC 0.5 x 0.5 hours = 250lbs.
During a Ba 65 sortie we expect to expend most of that reserve during taxi, take off, climb, dog legging around threats, and combat. We expect to land with much less than 250lbs remaining, but we cannot use the first 250lbs of fuel we put into the tanks of a 1000hp aeroplane as combat radius fuel.
The on screen handling notes explain the design cruise conditions.
***********************************
Tactical cruise phase - all levels:
COWL = CLOSED
C = 0.7
RPM = 1800
Yields 192 KTAS (FL150/4500M plan 280 PPH)
Yields 172 KTAS (low level plan 260 PPH)
***********************************
We have no significant idea what headwinds we will meet, (especially over enemy territory), and a tailwind in one direction does *not* cancel out a headwind on the other leg. Everything in aviation is 4D and relates to TIME.
.....See 2008 Propliner Tutorial from Calclassic.com/tutorials
We must factor in a 15% weather reserve which is a factor of the trip length.
If we load only the normal bombload of 440lbs we have 1014 - 250 lbs of route fuel = 764lbs, but 15% of that is weather reserve.
Our combat radius fuel (allowing for weather) is (764 * 0.85 / 2) = 325lbs
Our planned combat radius must not exceed 325lbs / 280 PPH = 1.16 hours at 192 KTAS = 223 miles
That is compatible with a solo 160 mile penetration of enemy airspace provided our base is no more than 63 miles behind the FLOT.
MEDIUM LEVEL versus LOW LEVEL.
To avoid interception by scrambled interceptors, and perhaps patrolling fighters, we will always penetrate at a minimum of 4500M altitude at a minimum of 192 KTAS, never at low level at 172 KTAS. Flying the sortie at low level makes little difference to our combat radius;
172 * 325 / 260 = 215 miles
but penetrating in thin high air instead of thick low air makes a significant (12%) difference to the time we must spend over enemy territory. In aviation everything is 4D and relates to TIME. In the absence of enemy radar we penetrate at design cruise level and we egress at design cruise level, whatever level we attack the target from, to make life harder for any scrambled interceptors trying to achieve interception. We 'divert' around enemy interceptor bases and any visible Jaeger CAP at higher level. In a properly designed Sturmkampf we can ignore Jaeger CAP at lower level with impunity.
Above all else, in a non radar environment, bombers should always climb above cloud if at all possible whilst over enemy territory to prevent detection and continuous tracking. Enemy CAP will be below cloud. Navigation should be by wireless means, according to the GPS plot being updated by the WO.
...See 2008 Propliner Tutorial from calclassic.com/tutorials
the strike package descends below cloud cover only when in the vicinity of the target, to acquire a fire control solution versus the target, before climbing above any available cloud cover to egress without being tracked.
Of course the single seat Ba 65 lacked that crucial advantage and consequently struggled to operate autonomously. The 65th Squadriglia soon had to be aggregated within a smaller Fiat B.R.20 Cicogna Gruppo so that their Wireless Operators could lead a mixed strike package above cloud postponing enemy detection.
The Polikarpov I-16 Rata was a real threat if scrambled early enough. Like the Series II Ba 65 the Fiat B.R.20 Cicogna (Vmax 232 KTAS) schnell bombers were powered by exactly the same high altitude optimised Fiat A.80RC41 engine as used in the Fiat G.18 Veloce airliner. When the Fiat SB pilots applied just less than 0.7C @ 1800 RPM at 4500M from two engines burning 560 PPH the big Fiats slowed to 192 KTAS in high thin air and the single engined Bredas could just keep up..........
>>>>>>>>>>>>>>>>>>>>>>>>>>>>>>>>>>>>>>>>>>>>>>>>>>>>>
Still subject to final revision the extensive tutorial 'How to survive flying the Breda Ba65.htm' explains the complex handling issues and will for the first time (in a flight simulation product) explain real world vintage era ground attack doctrine in sufficient detail for the real targeting parameters (abbreviated below) to be simulated by those who make the effort. The complex issues of parallax compliance which are at the heart of (combat) flight simulation will be explained and illustrated in full.
Handling notes explain what our operating targets are during simulation and how we must sequence our compliance. As a 'taster' here are the final on screen handling notes.
***************************************************
Breda Ba65 with Fiat A.80RC41 engine handling notes
***************************************************
The 1000hp Fiat A.80 RC41 engine drives a licence built Hamilton Standard constant speed airscrew. This engine has automatic mixture control and manually applied carb heat controls. The supercharger maximises rated power at 4100 metres. Design cruising altitude of the engine is 5500 metres, but Ba 65 design cruise altitude is only 4500 metres.
MAXIMUM RPM may be employed ONLY for TOGA and WEP........DO NOT EXCEED 2000 RPM in normal flight.
SUBJECT TO THIS RESTRICTION full throttle may be employed continuously at any altitude. The manifold pressure gauges of this aircraft are calibrated in Kg/Cm^2 abbreviated C. The A.80 engine is auto boost limited to 1.0 C which is less than 1.0 Ata = zero PSI boost.
Maximum and default fuel load is 460Kg (1,014lbs) of low lead 87 Octane AVGAS.
WARNING - CRITICALLY WEAK TAIL ... *NEVER EXCEED 450 KmIAS*.
WARNING - No airframe or airscrew de-icing or anti-icing. NOT AUTHORISED FOR FLIGHT IN KNOWN ICING.
The landing gear is approved for use from unpaved, (but not unprepared), surfaces.
Read 'How to Survive flying the Breda Ba65.htm' before flight and only then rely on the abbreviated handling notes below.
**************************************
HANDLING THE AIRCRAFT (phase by phase)
**************************************
Take Off Phase:
GOGGLES = DOWN
CANOPY = OPEN
LEAN OUT LEFT = CTRL+SHIFT+BACKSPACE
LEAN OUT RIGHT = CRTL+SHIFT+ENTER
FUEL TANK = FWD
COWL <= 40%
CARB HEAT = COLD
ELEVATOR TRIM = 1 Picchiare
RUDDER TRIM = NEUTRAL
FLAP = STAGE 1 (10 degrees)
FLAP = STAGE 2 (15 is OPTIONAL)
RPM = MAX
LINE UP
PARKING BRAKE = ON
THROTTLE = SLOWLY FULL
PARKING BRAKE = OFF
STICK = NEUTRAL
ROTATE = 155 KmIAS (all weights any flap)
Establish positive rate of climb
GEAR = UP
ACCELERATE = 200 KmIAS < 3 VSI
FLAP = UP
CANOPY = CLOSED
GOGGLES = UP
ACCELERATE = 235 KmIAS < 5 VSI
APPLY Climb Power
***********************************
Climb Phase:
METO, Combat and Climb Power:
COWL <= 40%
THROTTLE = FULL
RPM = 2000 (subject to)
OIL < 110C
Plan 470 PPH
Climb = 235 KmIAS
***********************************
Tactical cruise phase - all levels:
COWL = CLOSED
C = 0.7
RPM = 1800
Yields 192 KTAS (FL150/4500M plan 280 PPH)
Yields 172 KTAS (low level plan 260 PPH)
***************************
Emergency Power:
COWL <= 40%
THROTTLE = FULL
RPM = MAX (EMERGENCY & TOGA ONLY)
Subject to:
COWL <= 40%
OIL < 120C (EMERGENCY ONLY)
Engine will overheat quickly!
***************************
Descent phase:
*SET QFE*
COWL = CLOSED
RPM = 1800
C = 0.4
Sustain prior cruise IAS
*****************************
High Angle Attack Phase:
AAA = Avoid vertically
Wind direction = Determine (SHIFT+Z)
Target area = Identify
RPM = 2000
C = Reduce
KmIAS = Reduce
Height = 1000M above target
Convergence = 45 degrees
External Bombs = ARM
Reticule = Base of gun circle (for bombs)
Identify egress vector and landmark
Identify AAA threats
Identify primary target
Use parallax compliance to achieve IP
Cross IP = 220 KmIAS
Turn = 45 degrees to attack vector
Height = 1000M QFE throughout
After 20 seconds
THROTTLE = CLOSED
>>>>>>>>>>>>>>>>>>>>>>>>>>
DIVE = PITCH BAR TO ROLL CUE (-35 pitch)
HUD = achieve target parallax compliance
SLIP BALL = CENTRE
ROLL CUE = CENTRE
KmIAS > 400
*DO NOT EXCEED 450 KmIAS*
>>>>>>>>>>>>>>>>>>>>>>>>>>
BOMBS = RELEASE (P key)
WHILE paused review fire control compliance
Unpause (P key) then (/ key) to remove bomb drag
>>>>>>>>>>>>>>>>>
IF no valid fire control solution by 200M AGL OR
IF no valid fire control solution by 440 KmIAS
JETTISON EXTERNAL BOMBS (/ key)
>>>>>>>>>>>>>>>>>>
*******************************
Egress phase:
AT 200M QFE
ENGAGE = DEFENSIVE
ROLL < 90
PITCH TO SUSTAIN 4.5G
KmIAS TO SUSTAIN 4.5G
THROTTLE = FULL
JOYSTICK = FULL AFT
TERRAIN COLLISION = AVOID
TERRAIN MASKING = ACHIEVE
ROLL = 0 WHEN EGRESS VECTOR
WAIT = 30 SECONDS
CLIMB = 235 KmIAS
WEAPONS = SAFE
REMOVE BOMB WEIGHT using payload menu
COWL <= 40%
SET QNH (press B key)
ON REACHING 4500M QNH RESUME CRUISE
*****************************************
Before Joining Circuit - Arrival phase:
COWL <= 40%
BOMBS = JETTISON (*use payload menu*)
REDUCE < 250 KmIAS
GEAR = DOWN
REDUCE < 230 KmIAS
FLAP = STAGE 1 (10 degrees)
RPM = 2000
FLAP = STAGE 2 (15 degrees)
220 KmIAS
C=> 0.5 (until flare)
When safe descend to 300M *QFE*
*****************************
Circuit & Approach phase:
Downwind:
300M *QFE*
COWLS <=40%
FLAP = STAGE 2
Turn base and final = 220 KmIAS
Final:
CARB HEAT = COLD
FLAP = STAGE 3 (also causes slats to open)
Cross airfield boundary:
@ Vref = 160 KmIAS
C < 0.5 allowed (but high sink rate)
LAND on MAINWHEELS
*********************
After landing phase:
CORRECT DRIFT
PLACE TAILWHEEL ON RUNWAY
STICK FULL AFT
RPM > 1000 (for 'adequate' steering)
PARKING BRAKE = (cadence as required)
FLAP = UP (causes slats to close)
COWL = 100% OPEN
************
To Taxi:
GOGGLES = DOWN
LEAN OUT LEFT = CTRL+SHIFT+BACKSPACE
LEAN OUT RIGHT = CRTL+SHIFT+ENTER
COWLS = 100%
PARKING BRAKE = ON
RPM LEVER = MAX
RPM = 1500 (tight static turn)
BRAKE = OFF
RPM = 1800
Once Rolling
RPM <> 1300 for steering on grass
PARKING BRAKE as required
***********************
Lay Down Attack:
ATTACK PATTERN = 1000M QFE
10 seconds after IP
THROTTLE = CLOSED
>>>>>>>>>>>>>>>>>>>>>>>>>>
DIVE = PITCH BAR TO ROLL CUE
HUD = gun parallax 550M short of TARGET
PASSING 200M QFE in dive
ACHIEVE LEVEL FLIGHT 50M QFE
THROTTLE = As required for
KmIAS = 400 to 450
After 3 seconds
MUNITIONS = RELEASE (P key)
>>>>>>>>>>>>>>>>>>>>>>>>>>
WHILE paused review fire control compliance
Unpause then (/ key) to remove bomb bay drag
Engage = Defensive
Egress = as other doctrines
*************************************************
Ground handling of taildraggers with no wheel steering and no differential braking is modelled and explained in detail, but our earlier Ansaldo SVA 5 and SVA 9 release makes an ideal lead in ground handling trainer for those who are unfamiliar with the relevant techniques and who also like flight simulation releases which allow the learning of new skills rather than just repetition of old ones.
Those who only wish to operate non combat systems without attempting the skills of compliant flight or ground handling are well catered for too. Some aspects of VC operation are still subject to design change, but here by way of a third 'taster' are the *provisional* fuel handling and start up procedures from 'How to survive flying the Breda Ba 65'.
>>>>>>>>>>>>>>>>>>>>>>>>>>>>>>>>>>>>>>>>>>>>>>>>>>
FUEL DRAINING, SELECTION, TRIMMING and CUT OFF.
Aircraft with internal bomb bays must have bomb bays either side of neutral CoG either longitudinally, or laterally, or both. The bomb bays are at the location where the fuel would otherwise be. If the inner wings abeam CoG are too small to contain fuel tanks of sufficient size, then the fuel is displaced into two fuselage tanks fore and aft of CoG. Presence of a fuselage bomb bay then imposes a requirement to fuel trim as well as elevator trim the aeroplane.
The FUEL TANK SELECTOR quadrant is under the throttle and mixture quadrant. It has no OFF position. The options, as in real life, are FWD or BOTH or AFT. The FUEL COCK to turn fuel on or off is the yellow-brown handle below the spade grip of the joystick. The fuel gauges are at the top of the left cockpit sidewall with logical fore and aft placement. Due to the way that the fuel gauge code is written the FWD tank appears as a 'LEFT' tank in the on screen fuel menu, and the AFT tank appears as a 'RIGHT' tank. The cockpit tooltips describe them correctly, but it is not possible to make the FS9 menu describe the tanks as forward and aft so we must remember LEFT = FWD and RIGHT = AFT.
To the left of the FUEL TANK SELECTOR is the FUEL TRANSFER VALVE lever. In real life, in order to select both tanks it had to be positioned centrally to BOTH to match the central selection of BOTH by the FUEL TANK SELECTOR. Inside FS9 just moving the FUEL TANK SELECTOR to BOTH will open the transfer valve, and the FUEL TRANSFER VALVE lever is inoperative. As explained below BOTH is never an appropriate selection in the Ba 65 Series II even though *it is an available (pilot error) selection* in real life and in FS9.
Installation of the heavier Fiat A.80 engine in the Ba 65 Series II single seater caused it to be nose heavy. Even gross mismanagement of fuel trimming can be (elevator) trimmed out at all relevant IAS, (i.e. above Vref - see later), but failure to fuel drain and trim correctly increases spin propensity and delays spin recovery. This almost certainly contributed to the appalling Regia Aeronautica accident record, but the requirement is simple enough.
The engine is always started using the AFT tank to prove that the fuel line from it is not blocked, and that it has had all relevant water condensation drained before flight. As soon as that is certain the Ba 65 Series II pilot must switch to the FWD tank, (to test it), and must then almost empty the FWD tank in flight before reselecting the AFT tank. The BOTH position is *not* used in the Ba 65 Series II. We must always (almost) exhaust FWD fuel first and only then consume the aft fuel which balances the oversize engine of the Series II Ba 65.
For short range missions with minimal fuel, all of the fuel must be in the aft tank. Since FS9 must load maximum fuel by default, after we have done our fuel planning for the mission, *we* are responsible for draining fuel from the *forward* tank prior to flight, and all subsequent 'fuel trimming'. We must use the on screen fuel and payload menu to drain fuel *from the forward ('LEFT') tank*.
It is permissible to depart with the aft ('RIGHT') tank only part full, *but unless it is full the forward tank must be empty*. Fuel trimming in the Ba 65 Series II consists of doing no more than draining forward fuel first before flight and then using any remaining forward fuel first during flight. However we should never attempt an approach with more than a few kilos of fuel remaining in the forward tank, and the only way to remove it is to burn it off. An emergency return aside, only really dreadful fuel planning and trimming will cause significant fuel to still be present in the forward tank prior to landing.
In real life it seems that exceptionally bad fuel trimming was likely to be fatal during a poorly flown approach. Since most consumers will fail to fuel trim at all the supplied flight dynamics include the problem, but deliberately understate the problem.
Due to the limitations of FS9 if we employ automatic starting (CTRL + E) the FUEL TANK SELECTOR will be auto moved to 'BOTH'. It should be moved to 'AFT' manually and then 'FWD' as above, prior to flight.
The real Ba 65 has an emergency hand operated fuel pump used only if the mechanical pump failed. It is under the fuel gauges, but the mechanical pump will never fail in FS9 and the hand pump although present will not work in FS9.
FUEL AUTO MIXTURE.
The Fiat A.80 was an advanced and nearly foolproof combat engine. Even in 1938 it had excellent automatic overboost protection and equally good automixture capability. Aeroplanes which change altitude quickly, and which do not have a dedicated flight engineer, need automixture. The engine did have a manual mixture reversion capability, but manual control of mixture by pilot flying belongs in simulations of earlier phases of aviation history, or simulation of modern aeroplanes with simple low priced engines. There are only two positions of the mixture lever that are useful in this simulation. Full aft to starve the engine of fuel during engine shut down, or forward of the cut off position to invoke automixture. *This simulation overrides inappropriate mixture control choices in the FS9 realism menu*.
After a prior short period of idling, the engine is always shut down by pulling the *mixture* lever aft to the fuel cut off position causing a weak cut. The FUEL COCK is then moved to OFF. The FUEL TANK SELECTOR is not involved in the shut down procedure, but will normally be set to AFT anyway as above.
PARKING BRAKE.
The parking brake is toggled and its status monitored using the small switch top right of the spade grip.
ENGINE START UP.
In FS9 manual engine starting requires us to;
1) apply the parking brake (mouse click switch)
2) open the canopy (mouse click handle)
3) connect fuel to the engine as above
4) move the RPM lever to maximum (far left with mouse)
5) 'crack' the throttle open (desktop joystick)
6) prime the engine with three shots of fuel using the priming pump, (down by our right thigh - use mouse)
7) turn the magneto switch to BOTH (1/2 with mouse)
8) shout 'contact' loudly in the appropriate language
9) operate the compressed air valve, (left side high in cockpit), to turn the engine over (with mouse)
After start we check that oil pressure (O = Olio) is > 5 Kg/cm^2 and stable and that oil temperature is modest and rising (left panel), Fuel pressure should stabilise at 1 Kg/cm^2. Mag drop can be tested (use the keyboard), but will always be minimal and within parameters in FS9. We do *not* turn electrical systems on until the engine is running and stable and able to charge the battery.
GYROSCOPIC VACUUM (SUCTION) SYSTEM.
The vacuum (suction) gauge and the extraordinarily complicated real controls, (visually present but mercifully not simulated), are high on the right cockpit sidewall. It takes a few seconds for suction to reach operating pressure (3 Kg/cm^2) and for gyroscopes to erect after engine start, but thereafter any boost and RPM is sufficient to sustain working vacuum system pressure. There is no back up system, but it won't fail in FS9 unless you configure it to in your personal aircraft/failures menu.
MAGNETIC COMPARISON COMPASS.
The lower barrel of the comparison compass, (on the right hand panel), displays self assigned heading, (potentially flight plan track in nil wind). Mouse hot spots are at either end of lower barrel. Upper barrel displays current magnetic heading (at zero turn rate).
GYRO COMPASS
Is under the reflector sight and displays magnetic heading corrected for turn rate. Adjustment knob underneath. In FS9 this gyro compass cannot be caged, but will not topple.
ELECTRICAL SYSTEMS.
The status panel and all relevant switches are mounted low on the left cockpit sidewall. They indicate only ON - OFF status. There is no ammeter and no voltmeter. Battery charge and alternator status are evaluated via external testing by our ground crew only between flights. The Ba 65 has neither a radio nor any form of wireless navigation. The battery was not worked hard and alternator failure was of little consequence below the freezing level. Pitot heat (main panel) required battery power in the event of alternator failure.
HUD = REFLECTOR SIGHT.
Note that the reflector sight on / off switch is located on the electrical systems panel. The HUD won't work unless it is switched on!
The HUD-WAS = reflector sight is tested after engine start, but is then turned off to conserve battery power until the attack pattern. We need enough juice in the battery to power up the sight just long enough to cadena attack the target area several times even if the alternator has failed. With no ammeter and no voltmeter available alternator failure is very difficult to detect, but in FS9 this will not happen unless *you* configure electrical failures in the FS9 failures menu. The HUD-WAS is normally turned off after egress, but may be turned on again in the circuit to provide parallax compliance cues on final approach (see later).
LIGHTS.
All light switches are also on that left sidewall panel. NAV lights should be OFF in enemy airspace or anywhere that enemy air activity is suspected. The Ba 65 Series II has both cockpit lighting and a landing light, to allow take off before dawn for a short radius dawn strike, and / or emergency after dark landing in the event of late return from a late afternoon minelaying sortie which was poorly planned, but the Ba 65 has no means to navigate at night and most relevant bases had no runway or approach illumination at night, or in bad weather.
HYDRUALIC SYSTEMS.
The flaps are hand pumped with the big lever on the right hand side of the cockpit and they have their own hydraulic system with no pressure gauge. The position of the pump lever does *not* indicate flap position. For flap usage see later. The parking brake is hydraulic via a different system and its pressure gauge is mostly hidden behind the joystick. The gear system is also hydraulic and has its own motor to pressurise the third on board hydraulic system. The gear system is either fully pressurised or not. The relevant pressure gauge is within the Breda patent combined gear and flap (alerone) status indicator, high in the right hand panel. The gear travels slowly, is prone to jamming, and may not lock even though it travels, (two greens for locked down). The gear handle is on the right cockpit sidewall but during simulation we should use the keyboard or a joystick button to activate gear travel.
For our convenience, during simulation, flap travel can be invoked (in stages) by mouse using the 'ALERONE' status indicator within that combined gauge, or the keyboard. In real life the flaps had to be hand pumped.
OXYGEN SYSTEM.
The Ba 65 was designed for prolonged cruising at 4500M (FL150). The oxygen regulator and status indicator gauge are under the Breda patent gear and flap status gauge on the right panel. The oxygen system should be turned on each time we climb through 3000M. Once supplying oxygen to our mask the contents will diminish. Each time we descend through 3000M we should turn oxygen off to conserve supply. If the oxygen supply needle enters the red zone we must descend below 3000M altitude.
>>>>>>>>>>>>>>>>>>>>>>>>>>>>>>>>>
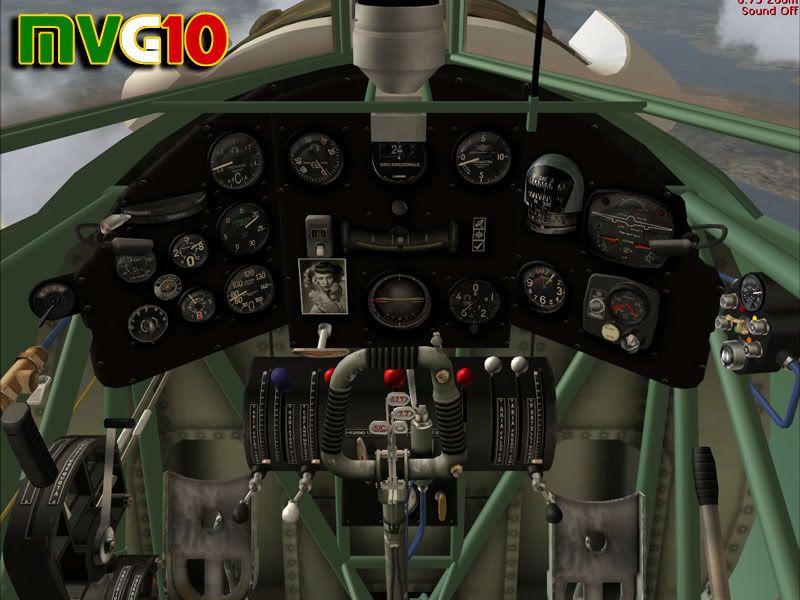
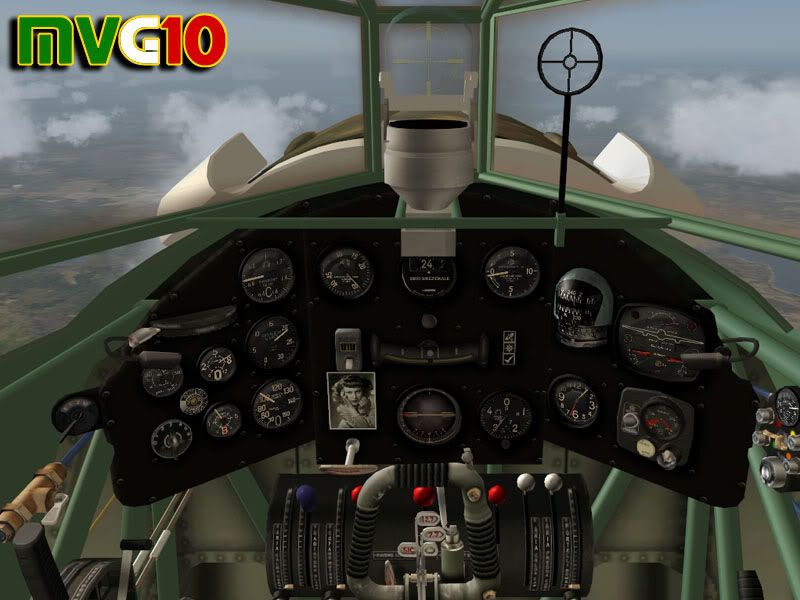
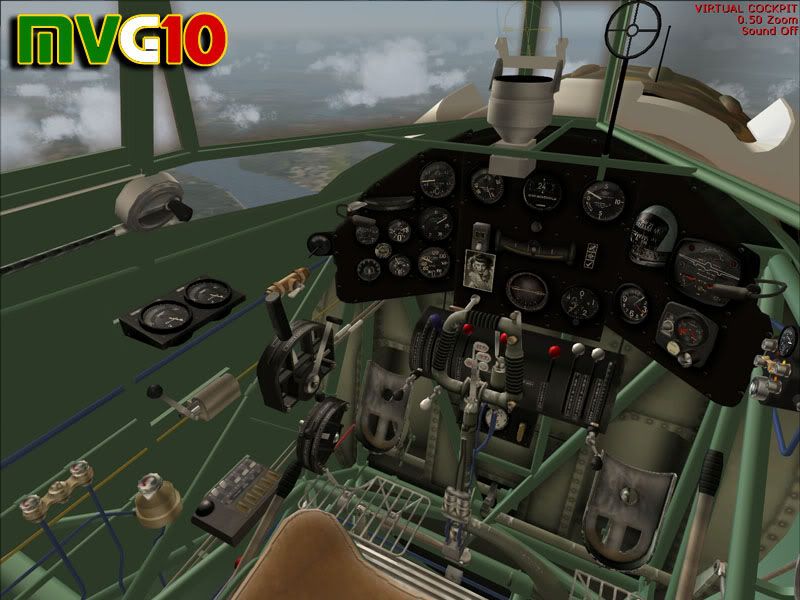
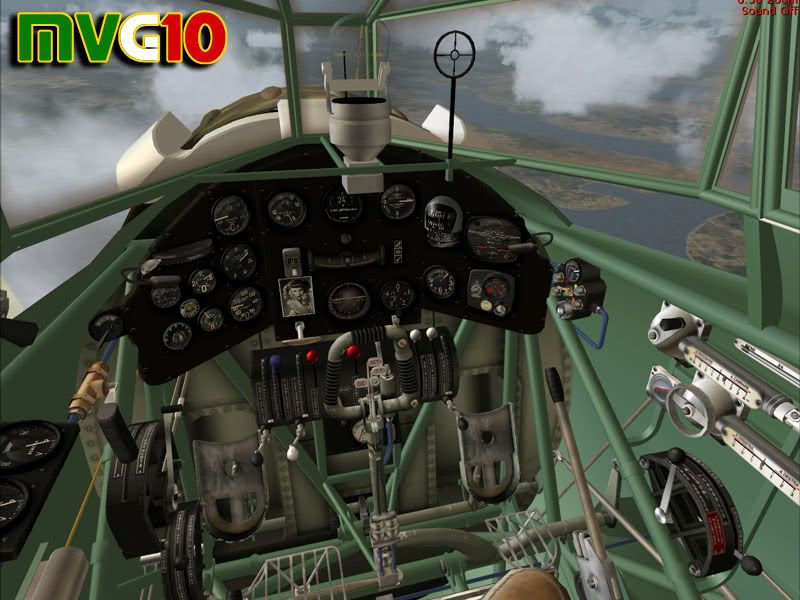
Many of those systems are visible (but untextured) in the jpgs which Manuele posted (above) in December. Be patient. This project will reach release only when it is ready and we have everything working realistically enough to allow us all to use it as a detailed ground attack skills trainer exhibiting simultaneous head down gauges / systems compliance and full head up parallax compliance when we operate it skilfully enough.
Only then can we understand and learn how to achieve the complex real world seven part fire control solutions that were required in the vintage phase of aviation history.
FSAviator.
Most of the residual and ongoing work relates to 3D texturing the many components of the very detailed VC, along with creation of external 'skins'. There are a handful of remaining gauge and sound alpha test issues outstanding, but they should not be difficult to resolve.
'Construction' of the 'primary' MDL including VC is now complete. Manuele intends to create (at least) two MDLs prior to release. One with the bomb chute and operable bay doors, but no external pylons, which is how most Ba 65s were delivered, and one with the grenade launcher weapon pack and external pylons as fitted by field modification after delivery. The cockpit systems will differ (and work) accordingly. Most of the real systems will be present and operable. This is a simulation in which guns set to 'weapons safe' will not fire and munitions must also be armed prior to release if applicable. The system of interest must be armed and then aimed using the appropriate HUDWAS parallax compliance cue. This is a complex skills trainer, not an AI aircraft release with no new skills to learn and master.
The very extensive product documentation is almost complete. Only some illustrations await final texturing of MDL and VC parts. The documentation includes month by month summaries of the real combat missions allowing them to be simulated in detail over the real terrain in appropriate weather, along with the most detailed free history of this aircraft ever published, in order to put those combat missions on three continents into an appropriate timeline context. Fuel and payload planning are explained in detail as part of that history so by way of a 'taster';
>>>>>>>>>>>>>>>>>>>>>>>>>>>>>>>>>>>>>>>>
COMPARISONS OF COMBAT UTILITY.
When we fly the September 1938 (combat debut) vintage Ba 65 Series II in FS9 we must be careful not to attempt sorties it could not fly. It is time to study the combat utility and mission profile of the single seat Ba 65 Series II in detail.
Vmax = 229 KTAS
Typical equipped empty weight = 6306lbs
Maximum take off weight = 7960lbs
Crew = 200lbs (with flying clothing and parachute)
Useful load = 7960 - 6506 = 1454lbs
Maximum fuel = 1014lbs
Normal bombload = 440lbs (200 Kg)
Maximum bombload = 880lbs (provided fuel reduced to only 574 lbs)
Every combat mission requires a fixed and combined fuel reserve for taxi, take off, climb, combat, holding, circuit to land, and diversion. Not so much diversion to an alternate place of landing but 'diversion' around threats. A combat sortie is rarely a single straight line out and back. The reserve required relates to engine power and whilst TOGA power is neither war emergency power, nor design cruise power, for our purposes we can treat the necessary (nil wind) VFR fuel reserve as 30 minutes at TOGA power. The Fiat A.80RC41 was TOGA rated at 1000hp.
1000hp x SFC 0.5 x 0.5 hours = 250lbs.
During a Ba 65 sortie we expect to expend most of that reserve during taxi, take off, climb, dog legging around threats, and combat. We expect to land with much less than 250lbs remaining, but we cannot use the first 250lbs of fuel we put into the tanks of a 1000hp aeroplane as combat radius fuel.
The on screen handling notes explain the design cruise conditions.
***********************************
Tactical cruise phase - all levels:
COWL = CLOSED
C = 0.7
RPM = 1800
Yields 192 KTAS (FL150/4500M plan 280 PPH)
Yields 172 KTAS (low level plan 260 PPH)
***********************************
We have no significant idea what headwinds we will meet, (especially over enemy territory), and a tailwind in one direction does *not* cancel out a headwind on the other leg. Everything in aviation is 4D and relates to TIME.
.....See 2008 Propliner Tutorial from Calclassic.com/tutorials
We must factor in a 15% weather reserve which is a factor of the trip length.
If we load only the normal bombload of 440lbs we have 1014 - 250 lbs of route fuel = 764lbs, but 15% of that is weather reserve.
Our combat radius fuel (allowing for weather) is (764 * 0.85 / 2) = 325lbs
Our planned combat radius must not exceed 325lbs / 280 PPH = 1.16 hours at 192 KTAS = 223 miles
That is compatible with a solo 160 mile penetration of enemy airspace provided our base is no more than 63 miles behind the FLOT.
MEDIUM LEVEL versus LOW LEVEL.
To avoid interception by scrambled interceptors, and perhaps patrolling fighters, we will always penetrate at a minimum of 4500M altitude at a minimum of 192 KTAS, never at low level at 172 KTAS. Flying the sortie at low level makes little difference to our combat radius;
172 * 325 / 260 = 215 miles
but penetrating in thin high air instead of thick low air makes a significant (12%) difference to the time we must spend over enemy territory. In aviation everything is 4D and relates to TIME. In the absence of enemy radar we penetrate at design cruise level and we egress at design cruise level, whatever level we attack the target from, to make life harder for any scrambled interceptors trying to achieve interception. We 'divert' around enemy interceptor bases and any visible Jaeger CAP at higher level. In a properly designed Sturmkampf we can ignore Jaeger CAP at lower level with impunity.
Above all else, in a non radar environment, bombers should always climb above cloud if at all possible whilst over enemy territory to prevent detection and continuous tracking. Enemy CAP will be below cloud. Navigation should be by wireless means, according to the GPS plot being updated by the WO.
...See 2008 Propliner Tutorial from calclassic.com/tutorials
the strike package descends below cloud cover only when in the vicinity of the target, to acquire a fire control solution versus the target, before climbing above any available cloud cover to egress without being tracked.
Of course the single seat Ba 65 lacked that crucial advantage and consequently struggled to operate autonomously. The 65th Squadriglia soon had to be aggregated within a smaller Fiat B.R.20 Cicogna Gruppo so that their Wireless Operators could lead a mixed strike package above cloud postponing enemy detection.
The Polikarpov I-16 Rata was a real threat if scrambled early enough. Like the Series II Ba 65 the Fiat B.R.20 Cicogna (Vmax 232 KTAS) schnell bombers were powered by exactly the same high altitude optimised Fiat A.80RC41 engine as used in the Fiat G.18 Veloce airliner. When the Fiat SB pilots applied just less than 0.7C @ 1800 RPM at 4500M from two engines burning 560 PPH the big Fiats slowed to 192 KTAS in high thin air and the single engined Bredas could just keep up..........
>>>>>>>>>>>>>>>>>>>>>>>>>>>>>>>>>>>>>>>>>>>>>>>>>>>>>
Still subject to final revision the extensive tutorial 'How to survive flying the Breda Ba65.htm' explains the complex handling issues and will for the first time (in a flight simulation product) explain real world vintage era ground attack doctrine in sufficient detail for the real targeting parameters (abbreviated below) to be simulated by those who make the effort. The complex issues of parallax compliance which are at the heart of (combat) flight simulation will be explained and illustrated in full.
Handling notes explain what our operating targets are during simulation and how we must sequence our compliance. As a 'taster' here are the final on screen handling notes.
***************************************************
Breda Ba65 with Fiat A.80RC41 engine handling notes
***************************************************
The 1000hp Fiat A.80 RC41 engine drives a licence built Hamilton Standard constant speed airscrew. This engine has automatic mixture control and manually applied carb heat controls. The supercharger maximises rated power at 4100 metres. Design cruising altitude of the engine is 5500 metres, but Ba 65 design cruise altitude is only 4500 metres.
MAXIMUM RPM may be employed ONLY for TOGA and WEP........DO NOT EXCEED 2000 RPM in normal flight.
SUBJECT TO THIS RESTRICTION full throttle may be employed continuously at any altitude. The manifold pressure gauges of this aircraft are calibrated in Kg/Cm^2 abbreviated C. The A.80 engine is auto boost limited to 1.0 C which is less than 1.0 Ata = zero PSI boost.
Maximum and default fuel load is 460Kg (1,014lbs) of low lead 87 Octane AVGAS.
WARNING - CRITICALLY WEAK TAIL ... *NEVER EXCEED 450 KmIAS*.
WARNING - No airframe or airscrew de-icing or anti-icing. NOT AUTHORISED FOR FLIGHT IN KNOWN ICING.
The landing gear is approved for use from unpaved, (but not unprepared), surfaces.
Read 'How to Survive flying the Breda Ba65.htm' before flight and only then rely on the abbreviated handling notes below.
**************************************
HANDLING THE AIRCRAFT (phase by phase)
**************************************
Take Off Phase:
GOGGLES = DOWN
CANOPY = OPEN
LEAN OUT LEFT = CTRL+SHIFT+BACKSPACE
LEAN OUT RIGHT = CRTL+SHIFT+ENTER
FUEL TANK = FWD
COWL <= 40%
CARB HEAT = COLD
ELEVATOR TRIM = 1 Picchiare
RUDDER TRIM = NEUTRAL
FLAP = STAGE 1 (10 degrees)
FLAP = STAGE 2 (15 is OPTIONAL)
RPM = MAX
LINE UP
PARKING BRAKE = ON
THROTTLE = SLOWLY FULL
PARKING BRAKE = OFF
STICK = NEUTRAL
ROTATE = 155 KmIAS (all weights any flap)
Establish positive rate of climb
GEAR = UP
ACCELERATE = 200 KmIAS < 3 VSI
FLAP = UP
CANOPY = CLOSED
GOGGLES = UP
ACCELERATE = 235 KmIAS < 5 VSI
APPLY Climb Power
***********************************
Climb Phase:
METO, Combat and Climb Power:
COWL <= 40%
THROTTLE = FULL
RPM = 2000 (subject to)
OIL < 110C
Plan 470 PPH
Climb = 235 KmIAS
***********************************
Tactical cruise phase - all levels:
COWL = CLOSED
C = 0.7
RPM = 1800
Yields 192 KTAS (FL150/4500M plan 280 PPH)
Yields 172 KTAS (low level plan 260 PPH)
***************************
Emergency Power:
COWL <= 40%
THROTTLE = FULL
RPM = MAX (EMERGENCY & TOGA ONLY)
Subject to:
COWL <= 40%
OIL < 120C (EMERGENCY ONLY)
Engine will overheat quickly!
***************************
Descent phase:
*SET QFE*
COWL = CLOSED
RPM = 1800
C = 0.4
Sustain prior cruise IAS
*****************************
High Angle Attack Phase:
AAA = Avoid vertically
Wind direction = Determine (SHIFT+Z)
Target area = Identify
RPM = 2000
C = Reduce
KmIAS = Reduce
Height = 1000M above target
Convergence = 45 degrees
External Bombs = ARM
Reticule = Base of gun circle (for bombs)
Identify egress vector and landmark
Identify AAA threats
Identify primary target
Use parallax compliance to achieve IP
Cross IP = 220 KmIAS
Turn = 45 degrees to attack vector
Height = 1000M QFE throughout
After 20 seconds
THROTTLE = CLOSED
>>>>>>>>>>>>>>>>>>>>>>>>>>
DIVE = PITCH BAR TO ROLL CUE (-35 pitch)
HUD = achieve target parallax compliance
SLIP BALL = CENTRE
ROLL CUE = CENTRE
KmIAS > 400
*DO NOT EXCEED 450 KmIAS*
>>>>>>>>>>>>>>>>>>>>>>>>>>
BOMBS = RELEASE (P key)
WHILE paused review fire control compliance
Unpause (P key) then (/ key) to remove bomb drag
>>>>>>>>>>>>>>>>>
IF no valid fire control solution by 200M AGL OR
IF no valid fire control solution by 440 KmIAS
JETTISON EXTERNAL BOMBS (/ key)
>>>>>>>>>>>>>>>>>>
*******************************
Egress phase:
AT 200M QFE
ENGAGE = DEFENSIVE
ROLL < 90
PITCH TO SUSTAIN 4.5G
KmIAS TO SUSTAIN 4.5G
THROTTLE = FULL
JOYSTICK = FULL AFT
TERRAIN COLLISION = AVOID
TERRAIN MASKING = ACHIEVE
ROLL = 0 WHEN EGRESS VECTOR
WAIT = 30 SECONDS
CLIMB = 235 KmIAS
WEAPONS = SAFE
REMOVE BOMB WEIGHT using payload menu
COWL <= 40%
SET QNH (press B key)
ON REACHING 4500M QNH RESUME CRUISE
*****************************************
Before Joining Circuit - Arrival phase:
COWL <= 40%
BOMBS = JETTISON (*use payload menu*)
REDUCE < 250 KmIAS
GEAR = DOWN
REDUCE < 230 KmIAS
FLAP = STAGE 1 (10 degrees)
RPM = 2000
FLAP = STAGE 2 (15 degrees)
220 KmIAS
C=> 0.5 (until flare)
When safe descend to 300M *QFE*
*****************************
Circuit & Approach phase:
Downwind:
300M *QFE*
COWLS <=40%
FLAP = STAGE 2
Turn base and final = 220 KmIAS
Final:
CARB HEAT = COLD
FLAP = STAGE 3 (also causes slats to open)
Cross airfield boundary:
@ Vref = 160 KmIAS
C < 0.5 allowed (but high sink rate)
LAND on MAINWHEELS
*********************
After landing phase:
CORRECT DRIFT
PLACE TAILWHEEL ON RUNWAY
STICK FULL AFT
RPM > 1000 (for 'adequate' steering)
PARKING BRAKE = (cadence as required)
FLAP = UP (causes slats to close)
COWL = 100% OPEN
************
To Taxi:
GOGGLES = DOWN
LEAN OUT LEFT = CTRL+SHIFT+BACKSPACE
LEAN OUT RIGHT = CRTL+SHIFT+ENTER
COWLS = 100%
PARKING BRAKE = ON
RPM LEVER = MAX
RPM = 1500 (tight static turn)
BRAKE = OFF
RPM = 1800
Once Rolling
RPM <> 1300 for steering on grass
PARKING BRAKE as required
***********************
Lay Down Attack:
ATTACK PATTERN = 1000M QFE
10 seconds after IP
THROTTLE = CLOSED
>>>>>>>>>>>>>>>>>>>>>>>>>>
DIVE = PITCH BAR TO ROLL CUE
HUD = gun parallax 550M short of TARGET
PASSING 200M QFE in dive
ACHIEVE LEVEL FLIGHT 50M QFE
THROTTLE = As required for
KmIAS = 400 to 450
After 3 seconds
MUNITIONS = RELEASE (P key)
>>>>>>>>>>>>>>>>>>>>>>>>>>
WHILE paused review fire control compliance
Unpause then (/ key) to remove bomb bay drag
Engage = Defensive
Egress = as other doctrines
*************************************************
Ground handling of taildraggers with no wheel steering and no differential braking is modelled and explained in detail, but our earlier Ansaldo SVA 5 and SVA 9 release makes an ideal lead in ground handling trainer for those who are unfamiliar with the relevant techniques and who also like flight simulation releases which allow the learning of new skills rather than just repetition of old ones.
Those who only wish to operate non combat systems without attempting the skills of compliant flight or ground handling are well catered for too. Some aspects of VC operation are still subject to design change, but here by way of a third 'taster' are the *provisional* fuel handling and start up procedures from 'How to survive flying the Breda Ba 65'.
>>>>>>>>>>>>>>>>>>>>>>>>>>>>>>>>>>>>>>>>>>>>>>>>>>
FUEL DRAINING, SELECTION, TRIMMING and CUT OFF.
Aircraft with internal bomb bays must have bomb bays either side of neutral CoG either longitudinally, or laterally, or both. The bomb bays are at the location where the fuel would otherwise be. If the inner wings abeam CoG are too small to contain fuel tanks of sufficient size, then the fuel is displaced into two fuselage tanks fore and aft of CoG. Presence of a fuselage bomb bay then imposes a requirement to fuel trim as well as elevator trim the aeroplane.
The FUEL TANK SELECTOR quadrant is under the throttle and mixture quadrant. It has no OFF position. The options, as in real life, are FWD or BOTH or AFT. The FUEL COCK to turn fuel on or off is the yellow-brown handle below the spade grip of the joystick. The fuel gauges are at the top of the left cockpit sidewall with logical fore and aft placement. Due to the way that the fuel gauge code is written the FWD tank appears as a 'LEFT' tank in the on screen fuel menu, and the AFT tank appears as a 'RIGHT' tank. The cockpit tooltips describe them correctly, but it is not possible to make the FS9 menu describe the tanks as forward and aft so we must remember LEFT = FWD and RIGHT = AFT.
To the left of the FUEL TANK SELECTOR is the FUEL TRANSFER VALVE lever. In real life, in order to select both tanks it had to be positioned centrally to BOTH to match the central selection of BOTH by the FUEL TANK SELECTOR. Inside FS9 just moving the FUEL TANK SELECTOR to BOTH will open the transfer valve, and the FUEL TRANSFER VALVE lever is inoperative. As explained below BOTH is never an appropriate selection in the Ba 65 Series II even though *it is an available (pilot error) selection* in real life and in FS9.
Installation of the heavier Fiat A.80 engine in the Ba 65 Series II single seater caused it to be nose heavy. Even gross mismanagement of fuel trimming can be (elevator) trimmed out at all relevant IAS, (i.e. above Vref - see later), but failure to fuel drain and trim correctly increases spin propensity and delays spin recovery. This almost certainly contributed to the appalling Regia Aeronautica accident record, but the requirement is simple enough.
The engine is always started using the AFT tank to prove that the fuel line from it is not blocked, and that it has had all relevant water condensation drained before flight. As soon as that is certain the Ba 65 Series II pilot must switch to the FWD tank, (to test it), and must then almost empty the FWD tank in flight before reselecting the AFT tank. The BOTH position is *not* used in the Ba 65 Series II. We must always (almost) exhaust FWD fuel first and only then consume the aft fuel which balances the oversize engine of the Series II Ba 65.
For short range missions with minimal fuel, all of the fuel must be in the aft tank. Since FS9 must load maximum fuel by default, after we have done our fuel planning for the mission, *we* are responsible for draining fuel from the *forward* tank prior to flight, and all subsequent 'fuel trimming'. We must use the on screen fuel and payload menu to drain fuel *from the forward ('LEFT') tank*.
It is permissible to depart with the aft ('RIGHT') tank only part full, *but unless it is full the forward tank must be empty*. Fuel trimming in the Ba 65 Series II consists of doing no more than draining forward fuel first before flight and then using any remaining forward fuel first during flight. However we should never attempt an approach with more than a few kilos of fuel remaining in the forward tank, and the only way to remove it is to burn it off. An emergency return aside, only really dreadful fuel planning and trimming will cause significant fuel to still be present in the forward tank prior to landing.
In real life it seems that exceptionally bad fuel trimming was likely to be fatal during a poorly flown approach. Since most consumers will fail to fuel trim at all the supplied flight dynamics include the problem, but deliberately understate the problem.
Due to the limitations of FS9 if we employ automatic starting (CTRL + E) the FUEL TANK SELECTOR will be auto moved to 'BOTH'. It should be moved to 'AFT' manually and then 'FWD' as above, prior to flight.
The real Ba 65 has an emergency hand operated fuel pump used only if the mechanical pump failed. It is under the fuel gauges, but the mechanical pump will never fail in FS9 and the hand pump although present will not work in FS9.
FUEL AUTO MIXTURE.
The Fiat A.80 was an advanced and nearly foolproof combat engine. Even in 1938 it had excellent automatic overboost protection and equally good automixture capability. Aeroplanes which change altitude quickly, and which do not have a dedicated flight engineer, need automixture. The engine did have a manual mixture reversion capability, but manual control of mixture by pilot flying belongs in simulations of earlier phases of aviation history, or simulation of modern aeroplanes with simple low priced engines. There are only two positions of the mixture lever that are useful in this simulation. Full aft to starve the engine of fuel during engine shut down, or forward of the cut off position to invoke automixture. *This simulation overrides inappropriate mixture control choices in the FS9 realism menu*.
After a prior short period of idling, the engine is always shut down by pulling the *mixture* lever aft to the fuel cut off position causing a weak cut. The FUEL COCK is then moved to OFF. The FUEL TANK SELECTOR is not involved in the shut down procedure, but will normally be set to AFT anyway as above.
PARKING BRAKE.
The parking brake is toggled and its status monitored using the small switch top right of the spade grip.
ENGINE START UP.
In FS9 manual engine starting requires us to;
1) apply the parking brake (mouse click switch)
2) open the canopy (mouse click handle)
3) connect fuel to the engine as above
4) move the RPM lever to maximum (far left with mouse)
5) 'crack' the throttle open (desktop joystick)
6) prime the engine with three shots of fuel using the priming pump, (down by our right thigh - use mouse)
7) turn the magneto switch to BOTH (1/2 with mouse)
8) shout 'contact' loudly in the appropriate language
9) operate the compressed air valve, (left side high in cockpit), to turn the engine over (with mouse)
After start we check that oil pressure (O = Olio) is > 5 Kg/cm^2 and stable and that oil temperature is modest and rising (left panel), Fuel pressure should stabilise at 1 Kg/cm^2. Mag drop can be tested (use the keyboard), but will always be minimal and within parameters in FS9. We do *not* turn electrical systems on until the engine is running and stable and able to charge the battery.
GYROSCOPIC VACUUM (SUCTION) SYSTEM.
The vacuum (suction) gauge and the extraordinarily complicated real controls, (visually present but mercifully not simulated), are high on the right cockpit sidewall. It takes a few seconds for suction to reach operating pressure (3 Kg/cm^2) and for gyroscopes to erect after engine start, but thereafter any boost and RPM is sufficient to sustain working vacuum system pressure. There is no back up system, but it won't fail in FS9 unless you configure it to in your personal aircraft/failures menu.
MAGNETIC COMPARISON COMPASS.
The lower barrel of the comparison compass, (on the right hand panel), displays self assigned heading, (potentially flight plan track in nil wind). Mouse hot spots are at either end of lower barrel. Upper barrel displays current magnetic heading (at zero turn rate).
GYRO COMPASS
Is under the reflector sight and displays magnetic heading corrected for turn rate. Adjustment knob underneath. In FS9 this gyro compass cannot be caged, but will not topple.
ELECTRICAL SYSTEMS.
The status panel and all relevant switches are mounted low on the left cockpit sidewall. They indicate only ON - OFF status. There is no ammeter and no voltmeter. Battery charge and alternator status are evaluated via external testing by our ground crew only between flights. The Ba 65 has neither a radio nor any form of wireless navigation. The battery was not worked hard and alternator failure was of little consequence below the freezing level. Pitot heat (main panel) required battery power in the event of alternator failure.
HUD = REFLECTOR SIGHT.
Note that the reflector sight on / off switch is located on the electrical systems panel. The HUD won't work unless it is switched on!
The HUD-WAS = reflector sight is tested after engine start, but is then turned off to conserve battery power until the attack pattern. We need enough juice in the battery to power up the sight just long enough to cadena attack the target area several times even if the alternator has failed. With no ammeter and no voltmeter available alternator failure is very difficult to detect, but in FS9 this will not happen unless *you* configure electrical failures in the FS9 failures menu. The HUD-WAS is normally turned off after egress, but may be turned on again in the circuit to provide parallax compliance cues on final approach (see later).
LIGHTS.
All light switches are also on that left sidewall panel. NAV lights should be OFF in enemy airspace or anywhere that enemy air activity is suspected. The Ba 65 Series II has both cockpit lighting and a landing light, to allow take off before dawn for a short radius dawn strike, and / or emergency after dark landing in the event of late return from a late afternoon minelaying sortie which was poorly planned, but the Ba 65 has no means to navigate at night and most relevant bases had no runway or approach illumination at night, or in bad weather.
HYDRUALIC SYSTEMS.
The flaps are hand pumped with the big lever on the right hand side of the cockpit and they have their own hydraulic system with no pressure gauge. The position of the pump lever does *not* indicate flap position. For flap usage see later. The parking brake is hydraulic via a different system and its pressure gauge is mostly hidden behind the joystick. The gear system is also hydraulic and has its own motor to pressurise the third on board hydraulic system. The gear system is either fully pressurised or not. The relevant pressure gauge is within the Breda patent combined gear and flap (alerone) status indicator, high in the right hand panel. The gear travels slowly, is prone to jamming, and may not lock even though it travels, (two greens for locked down). The gear handle is on the right cockpit sidewall but during simulation we should use the keyboard or a joystick button to activate gear travel.
For our convenience, during simulation, flap travel can be invoked (in stages) by mouse using the 'ALERONE' status indicator within that combined gauge, or the keyboard. In real life the flaps had to be hand pumped.
OXYGEN SYSTEM.
The Ba 65 was designed for prolonged cruising at 4500M (FL150). The oxygen regulator and status indicator gauge are under the Breda patent gear and flap status gauge on the right panel. The oxygen system should be turned on each time we climb through 3000M. Once supplying oxygen to our mask the contents will diminish. Each time we descend through 3000M we should turn oxygen off to conserve supply. If the oxygen supply needle enters the red zone we must descend below 3000M altitude.
>>>>>>>>>>>>>>>>>>>>>>>>>>>>>>>>>
Many of those systems are visible (but untextured) in the jpgs which Manuele posted (above) in December. Be patient. This project will reach release only when it is ready and we have everything working realistically enough to allow us all to use it as a detailed ground attack skills trainer exhibiting simultaneous head down gauges / systems compliance and full head up parallax compliance when we operate it skilfully enough.
Only then can we understand and learn how to achieve the complex real world seven part fire control solutions that were required in the vintage phase of aviation history.
FSAviator.
magoo
SOH-CM-2013
Verrrry interesting read, thankyou Zmike/FSAviator. This should be a most interesting release. The hard work and detail (both model and data) are already most obvious. What I love most about flightsim is the educational time warp.....when it exists. This looks like it will be most convincing, most imersive, most enlightening.....most enjoyable.
I think we owe a big thanks already just for the info and screenshots!!
I think we owe a big thanks already just for the info and screenshots!!
 That looks stunning Manuele!!!
Cees

Corsair 14F
Charter Member
Superbe magnifique splendide....!!!!!