-
There seems to be an uptick in Political comments in recent months. Those of us who are long time members of the site know that Political and Religious content has been banned for years. Nothing has changed. Please leave all political and religious comments out of the forums.
If you recently joined the forums you were not presented with this restriction in the terms of service. This was due to a conversion error when we went from vBulletin to Xenforo. We have updated our terms of service to reflect these corrections.
Please note any post refering to a politician will be considered political even if it is intended to be humor. Our experience is these topics have a way of dividing the forums and causing deep resentment among members. It is a poison to the community. We appreciate compliance with the rules.
The Staff of SOH
You should upgrade or use an alternative browser.
British/LW gauge illumination
- Thread starter mongoose
- Start date
MajorMagee
SOH-CM-2022
For the cockpit or gauge texture you can create a dds file with the proper suffix to define it's behavior.
Available codes area:
+lrgb => colored light map, rgb channels.
+lr, +lg, +lb, +la => grayscale light map (i.e. just the brightness) in one of the channels, i.e. "+lr" is light map in red channel.
+sr, +sg, +sb, +sa => specular map in one of the channels.
+gr, +gg, +gb, +ga => glossiness map in one of the channels (black - "rough" surface, white - extremely sharp highlights)
So, if you want to have both specular and glossiness maps you need to name your texture like this: main_texture_name.+sr+gg.dds
This will tell the shaders to look for specular map in red channel and for glossiness map in green channel.
For some odd reason the previous implementation of self-illumination textures (+lrgb) worked as if the original texture was lit by external light source instead of actually emitting the light.
This means that if you had absolutely black original texture, then no matter how bright the lightmap is you would still get the black color as a result.
To fix it AnKor introduced a new suffix for textures: +light
These will actually add the lightmap on top of original texture, so even black surfaces will appear "emitting" the light (think windows in buildings that look black during the day being lit at night).
In addition to the ones listed above there are now two new suffixes for such emitting textures:
+nlight -- these are only active at night
+clight -- these are for cockpit use and only active when cockpit light is switched on
Keep in mind that only ONE additional texture of this kind can be used, i.e. you can't specify +light and +nlight for the same original texture.
Using the P-61 cockpit light effect as a starting point:
In the TextureMagic.ini there is an entry to define the Cockpit light and you can set that to look like the dim UV black-light sheen if you want.
light_uv.dds=Spot|130026|2.0||||30|30
In effects.xml you'll need to add (you'll also need to create a light_uv.DDS file):
<cockpit_light_uv ClassName="Shockwave" PullOnGround="0" CountCycles="1" Pulse="0" InitialDelay="0" Duration="99999" FadeInTime="0" FadeOutTime="0" Pause="0" PosX="0" PosY="0" PosZ="0" InitialSize="0.0001" FinalSize="0.0001" Texture="light_uv.DDS" BlendMode="QuadSprite"/>
In the aircraft xpd you'll need something like: (the position will need adjustement for each specific cockpit other than the P-61 in this example)
<Effect Type="Track" EffectName="cockpit_light_uv" PosX="-0.475" PosZ="3.3" PosY="0.375" Pitch="110" Heading="20" MinVel="-999999" MaxVel="999999"/>
<Effect Type="Track" EffectName="cockpit_light_uv" PosX="0.475" PosZ="3.3" PosY="0.375" Pitch="110" Heading="-20" MinVel="-999999" MaxVel="999999"/>
In the SJT+P61_shared_textures\VC_texture_files you can rename the files to switch on with the cockpit light. For example:
a_gauges_1_no_alpha.+lrgb.dds becomes
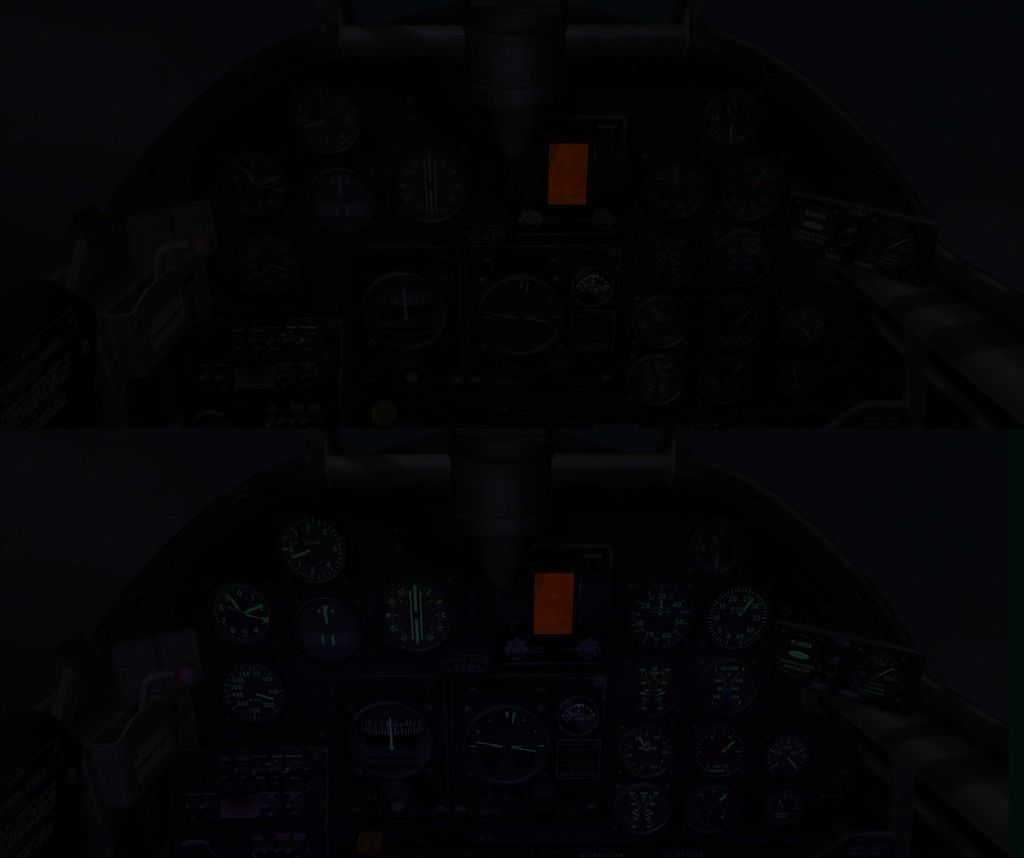
a_gauges_1_no_alpha.+clight.dds, but I also had to boost the green channel at least 50% to get the phosphor/radium glow look.
The only unintended side effect I noticed was that the gear lock indicator lights still change colors, but only light up brightly when the cockpit light is turned on.

MajorMagee
SOH-CM-2022
MajorMagee
SOH-CM-2022
I've settled on a green that is RGB 10, 50, 10 (a little brighter than the picture above, but not as bright as the museum photo).
MajorMagee
SOH-CM-2022
This can be implemented progressively once the first 4 steps are completed. Like adding contrails and dynamic reticles to the effects section of your aircraft xdp files, you can turn on the +clight.dds image effect whenever you have time to make the edit, and your other aircraft will remain unaffected until you're ready to do them.
MajorMagee
SOH-CM-2022
2. In the TextureMagic.ini add an entry to define the Cockpit light and you can set that to look like the dim UV black-light sheen by using:
light_uv.dds=Spot|130026|2.0||||30|30
3. Create a light file for each gauge texture to designate what you want to glow when the cockpit light turns on. For example, a_gauges_1.dds needs a file called a_gauges_1.+clight.dds
4. In effects.xml you'll need to add:
<cockpit_light_uv ClassName="Shockwave" PullOnGround="0" CountCycles="1" Pulse="0" InitialDelay="0" Duration="99999" FadeInTime="0" FadeOutTime="0" Pause="0" PosX="0" PosY="0" PosZ="0" InitialSize="0.0001" FinalSize="0.0001" Texture="light_uv.DDS" BlendMode="QuadSprite"/>
5. In the aircraft xpd you'll need something like: (the position will need adjustment for each specific cockpit to illuminate the dash panel)
<Effect Type="Track" EffectName="cockpit_light_uv" PosX="-0.475" PosZ="0.0" PosY="0.5" Pitch="110" Heading="20" MinVel="-999999" MaxVel="999999"/>
<Effect Type="Track" EffectName="cockpit_light_uv" PosX="0.475" PosZ="0.0" PosY="0.5" Pitch="110" Heading="-20" MinVel="-999999" MaxVel="999999"/>
MajorMagee
SOH-CM-2022
Thinking about runway lights, I also did run a test with doing this using +clight to see if the city lights might turn on and off using the L keyboard command, but they just stayed off. Assigning +nlight to the appropriate texture file would work for lighting airfields, but it looks like it they would have to stay on all night.
I thought that WOFF may already be using this functionality, but I couldn't find any dds files using the xxx.+nlight.dds functionality in my install.
View attachment ETO Building Light Test.zip
MajorMagee
SOH-CM-2022
MajorMagee
SOH-CM-2022
I was seeing display problems with the instrument light overlay when I zoomed out in the cockpit. The key is that the +clight.dds file needs to be saved with a MipMap.
I've settled on a green that is RGB 10, 50, 10 (a little brighter than the picture above, but not as bright as the museum photo).
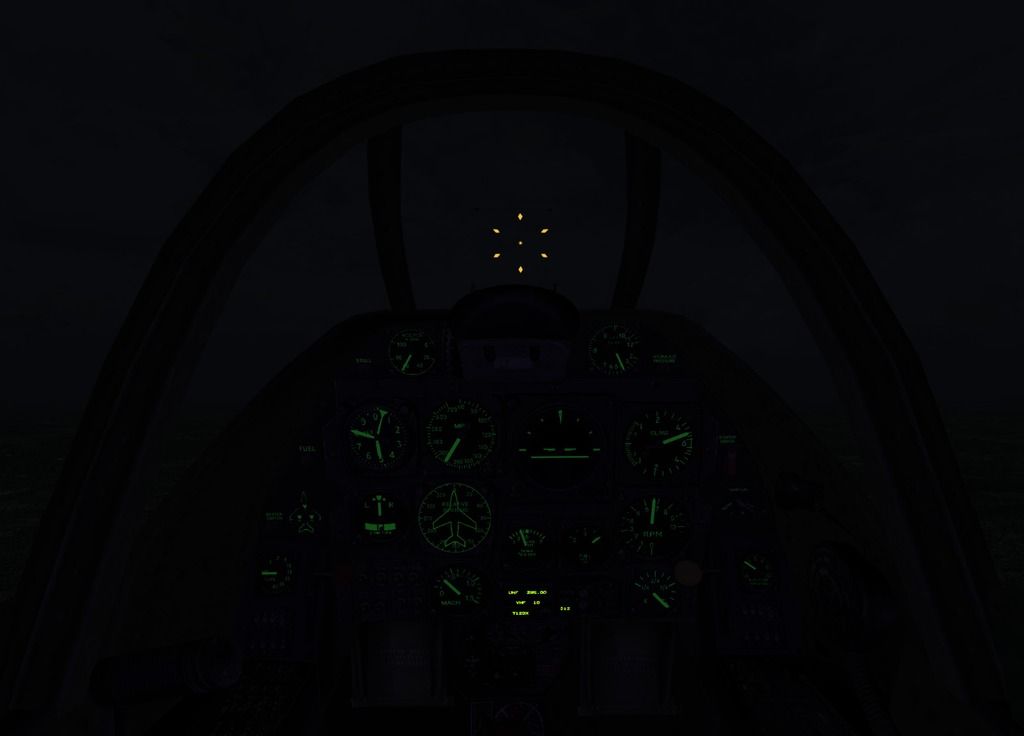
As I continue to work on setting up each aircraft I've decided that the glowing green effect needed to be a bit brighter than what I started with. My current standard is RGB 15, 79, 15. I then use a Gaussian Blur set a 0.8 pixels to slightly soften the edges into the black background.
In comparing this new UV & Green lighting effect versus the original bright red cockpit light, I'm finding that my ability to spot targets outside the cockpit is much better.
MajorMagee
SOH-CM-2022
For aircraft where I've already figured out the dynamic reticle positioning, finding the location for the uv light is pretty easy. Just place the z position a little more negative (aft) than the reticle and you're there. The UV Light effect follows the same rules as the dynamic reticle in that if you try to place it too far distant from the eye view point in the cockpit, the effect won't activate.
Night pictures posted here never look quite the same as they do in game since they don't fill the whole screen. The white surrounding space makes it hard for your eyes to see details in the dark picture. Using the alternate style with the dark grey background helps when viewing pictures, but makes reading the text a problem. (The style selector is at the bottom left of the webpage - SOH is Black on White, CombatFS is White on Grey)
MajorMagee
SOH-CM-2022

Daiwilletti
Charter Member
MajorMagee
SOH-CM-2022
http://www.sim-outhouse.com/sohforums/local_links.php?catid=13&linkid=22572
I you do not have AnKor's February 2017 shaders successfully running this Mod will not work.
I tried to make the install process as simple as possible (5 steps), but included all the technical tips I could in the instruction sheet (Clight_List.txt). Since it has no effect on the game if you are not running AnKor's shaders, I would hope that this capability could be incorporated into any future aircraft projects by their development teams prior to their release.
Like the Dynamic Reticle implementation, it takes a bit of time to customize it to the hundreds of different aircraft cockpits that are out there, but it is well worth the effort to upgrade to this new standard. Feel free to ask for help with finding the proper aircraft xpd values, but if I do not happen to have the specific model you're working on I won't be able to do much more that give you encouragement.


