• There seems to be an uptick in Political comments in recent months. Those of us who are long time members of the site know that Political and Religious content has been banned for years. Nothing has changed. Please leave all political and religious comments out of the forums.

    If you recently joined the forums you were not presented with this restriction in the terms of service. This was due to a conversion error when we went from vBulletin to Xenforo. We have updated our terms of service to reflect these corrections.

    Please note any post refering to a politician will be considered political even if it is intended to be humor. Our experience is these topics have a way of dividing the forums and causing deep resentment among members. It is a poison to the community. We appreciate compliance with the rules.

    The Staff of SOH

  • Server side Maintenance is done. We still have an update to the forum software to run but that one will have to wait for a better time.

Fort Frank

Do you have the vtp1fix programme that Rhumba developed back in 2007?

There's a problem with the vtp1 assembly source. The VTPPointXYUV can never be "0". Dick created a net2.0 exe to alter any "0" found in the asm file to "1". In case you don't have it, I've attached it.

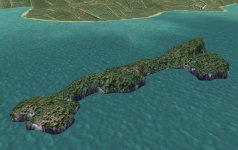
That said, I don't see many artifacts with the coastlines. What I do see is some bleed through effects at the edges of the landmass, as you've tried to overlay each _3 landmass with a _7 vtp1 poly.

In general:

I would place all these in a single "scenery" folder.

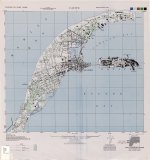
I would make the _3 watermask polys much larger around each island. This should help with covering any bleed through from the standard terrain underneath.
There's also a small island that doesn't have any _3 watermask poly at all.
I wouldn't use a vtp1 poly if you want to use standard textures - it's easier to get EZ landclass2 by Russell Dirk & create a partial landclass (or waterclass) to cover the area.
If you want a particular look, then use vtp polys by all means, but at least rename the texture you're using
 

Attachments

  • VTP1Fix.zip
    464.9 KB · Views: 8
Thanks - I'll have a look at that. - The small island (Monja) was about the first thing I managed to get to work at all with G2K - and I didn't use any water mask as there was no land there to start with, which seemed to be the purpose of the initial watermask (I tried to follow the SC_CFS2_Ground2k_tutorial). Is it better to put a watermask in?

The polygon/texture I tried as a way to get some reasonable texture on Fort Frank, which is one the areas (after installing the improved mesh) that just has a non-texture brown appearance that seems fairly common. - I've not been able to make much sense of things like EZ Landclass yet, and as with much of CS2 it's a case of just trying to get something to work. - A big step for me has been realising that G2K was reading lines from my bitmaps and trying to generate scenery directly from these!!
 
UncleTgt
Should the VTP1fix be applied to the xxx_8.bgl that is created by Ground2k, (I've tried this and it results in the coastline completely disappearing)?
or
Should I apply it to the G2K xxx.LWM file and then open G2K and generate the new xxx_8.bgl files?
 
Each time you compile scenery using G2K it generates a series of .asm files. These are the assembly files.

You want to take the file called Ground2K$VTP1Line.ASM. This is your _8 vtp1 line assembly file. You can open it using Notepad if you want to.

Take this file & copy it into the vtp1_fix/vtp1fix folder. Rename it to match the name you're using in your scenery.
Now run Rhumbas fixer. A window will open & ask you to select a file. Select the one you've just renamed.
It works quite quickly, it will generate a file with "Fixed_....asm" as its name.
Move this into the vtp1fix/asm folder.
Pick it up & place it over the bglc application in this location. The compiler will run & create the bgl.
I usually then rename the bgl by moving "fixed" to the end, otherwise your scenery file folders will be full of files that start "Fixed..."!
 
Great, it worked! I did something stupid and tried it with a poly file (xxx_7.bgl), and it seemed to fix that as well!!
 
Glad it helped.

Yes, although I've never noticed any issues with vtp polys _7.bgls), I guess the assembly error is present for them too, so I just got into the habit of running any vtp polys through the fixer as well. I should've mentioned that...
 
Somehow I managed to create my first ever .bgl of the Fort Frank model that appears in CFS2!! - It has no textures yet and I've got to add the various buildings etc which I've just about done as well as refining the surface mesh quite a lot compared with this version, and I chucked any old .dp file in with it to start with. - It's a bit shiny and plain green, and can be flown through at the moment. - Attached if anyone wants a quick look.
I managed to follow the CFS2_Exploting_Objs_Using_FS2002 tutorial which initially got stuck half way through but worked ok the 2nd time. -Also managed to get G2K running on my main Windows10 PC - I've been trying for ages and realised that I kept forgetting the extra Ground2k_dll that needs to be added!! Also installed Gmax on the same machine after testing it out on my older win7 pc. The main difference seems to be constantly having to remember to do things as administrator. So now I've got to learn how to add some textures, and also redo the basic Fort-Frank terrain/coastline to better match the bgl model! View attachment Fort_Frank.zip
 
Well done RW! I have yet to learn UV Mapping - doing the textures.

Here is your new Fort Frank object superimposed on Carabao Island with Corregidor in the background.

Do you have MaskRider's Philippines airfields installed? Bataan, Cabcaben and Mariveles airfields are located on the mainland near Corregidor. The stock water masks are needed for them to display correctly. These will create double coastlines around your new islands.


Attachments

  • Fort Frank.jpg
    Fort Frank.jpg
    284.4 KB · Views: 147
Yes, I've got the MR Phillipines scenery installed with the (modified!) Bataan Campaign, along with the updated mesh/watermasks and find it useable, unlike some of the other airfields which can be completely under water! From memory, I may have nudged the airfields (take off point etc) back a bit from the water. I've added some basic runways at Pilar/Orani as the Mission Builder scenery/infrastructure runways always seem to get lost by CFS2 and don't show up.

Interestingly it's looking like I might be able to do a fair bit of texture work in Rhino that can be exported via .3ds into Gmax.

I think it's going to be best to have separate models for most of the buildings on Fort Frank, if only to give a range of attack points (otherwise any bombers will all attack the 0,0,0 point of the island). My main concern with having separate models of the buildings is whether CFS2 will consistently place them correctly relative to each other. Probably the solution is to have enough separate models to encourage good AI attacking behaviour, placed in among other buildings that can be part of the island model. The other thought is whether to add a "beach"/shoreline to the model which could then be textured to create the waves/coast instead of having to get everything lined up perfectly. I'm guessing as well, that a multi LOD model may appear into view from further away/more smoothly.

attached may be of use?
 

Attachments

  • txu-pclmaps-oclc-6527758-cavite.jpg
    txu-pclmaps-oclc-6527758-cavite.jpg
    303.2 KB · Views: 146
Thanks very much for the map - it's excellent. I can refine the shoreline and add infrastructure to Sangley Point, which I was lacking in photos.

I think you will have to have a specific elevation for each object you place on Fort Frank. It sounds interesting.
 
my first attempt at one of the 12" gun batteries (Crockett etc) on Corregidor. This was partly a test to see if the more complex materials/textures survive to process from Rhino - .3ds -Gmax - .bgl, and it looks like at the moment only the basic object/layer colours survive the entire process. I've extended the model down, well below it's 0,0,0 so that it works on steep slopes, and at the moment it's a really basic .dp file with just left and right boxes. It probably doesn't need any proper textures, and maybe just needs the basic colour to be a bit lighter around the sides, and less white/glossy on top? One thing I can confirm is that the CFS2_Exploting_Objs_Using_FS2000 process I followed, once again stopped half way through, saying it couldn't find the file (that it had created), or GuidMaker, but when I shut it down and restarted the Make my object.bat process, it ran fine.
 

Attachments

  • Battery_Corregidor.zip
    216.5 KB · Views: 11
A problem I encounter is Model Converter abbreviating long texture names with a tilde ~. This has happened to the texture name for your Corregidor battery. Before making the object I always check the asm file and hand edit the texture name if necessary.

Perhaps the model making is stalling because of the size of the object.

Thanks for the link to the ONC charts - they take me back to my paid work days.
 
Managed to add a texture (used the 025h2su1.bmp for now to see how it looks/works with textures from the main world texture folder) to the top surface of the island, also added the 2 main batteries and the dock are to see how they look.
Also enlarged the .dp boxes, but still only have 2 boxes. Will probably need a dozen boxes at least to work ok. - The mesh in this version is also my most up-to-date version.View attachment Fort_Frank_v2.zip

I didn't do the usual CFS2 mapping that most(all?) models use but instead left the Gmax settings to place the texture/tile(s) as is usual for most CAD/rendering (more like the way the textures are laid onto the terrain mesh).
 
Good work Aussie - thanks for that!

RW, as you can see, I removed the underlying island which you made. I did the same for Fort Drum.
 

Attachments

  • Fort Frank 2.jpg
    Fort Frank 2.jpg
    402.9 KB · Views: 128
Aussie/kdriver, Looks good. It took me a while to get the cliffs/rocks to look at all ok.
The proper/applied textures seem to take the harsh shine off as well, especially for the concrete buildings.

I think I need to go around the cliff edge (top and bottom) and make it a bit more jagged - (the original NURBS surface that I used to make the model, and then got the mesh from obviously makes the mesh a bit too smooth).

Around the larger buildings (batteries) I'm thinking of raising the mesh a few m to represent the tree/foliage line rather than the ground elevation.

Thinking ahead, it might be good to build in the barracks and a couple of the more fragile buildings, as damaged/wrecked so they sit underneath a separate model of each building. That way when a building gets destroyed it could just disappear (?) revealing the damaged version?

The other thing I need to do is try to find out what the 3" AA battery layout etc was like at the northern end. Maybe for now I'll just model some AA on small platforms that can be easily moved around/adjusted for height etc later if better information comes up. - similar for the 0.50 mgs .
 
Looks good RW.
Here are a couple of files which get rid of the stock Caballo Island, along with its and Corregidor's stock shorelines.
 

Attachments

  • Corregidor-Caballo.zip
    510 bytes · Views: 8
I had to use separate files for the 12" mortars on Fort Frank - as the file became too big using what I have to make the .bgl. - they seem to place well enough though and in the same place each time (so far!) relative to the mortar pits. - the 3" aa I've made models that are 17.5m above the terrain mesh, and the mortars are 45m and 47m up to align with the mortar pits. Also made a quick model to add the Caballo that seems to work nicely. -I'll post the files after I've sorted t a few better file names. Caballo_v2.jpg Caballo_v2-1.jpgCarabao_19-2-2023.jpg
 
Back
Top