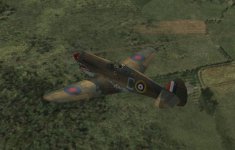
New P40-B uploaded

Just more or less thinking out loud here, but what if the CFS3 main texture sheet was mapped to the entire paint kit without editing it? The CFS3 sheet size could be 4096x2048 and then the whole template could just simply be resized to these dimensions without cutting it up. BorekS did this with his Lippisch P13A.

????
 
Guys,

The AVG repaint in the package by AF Scrub is a repaint done by me for the A2A WOP II P40, which as included in the package without my permission.

When these textures fit the CFS3 conversion, than the other repiants I did for this P40 should fit as well.

You can find the US package here:

http://www.sim-outhouse.com/sohforums/showthread.php/77086-Curtiss-P-40-C-USAAF-versions

aAlEi8c.jpg


And the RAF version with (authentic) alternative sharkmouths can be found here. One livery shows a 112 squadron P40 in its original Dupont scheme and the other shows a P40 after the under surface was painted Azur blue and the Dark Green was repainted Middle Stone.

http://www.sim-outhouse.com/sohforums/showthread.php/77066-Curtiss-P-40-Tomahawk-RAF-112-Squaron

5DtJwR2.jpg


When somebody wants to convert them in something which can be used in CFS3 he has my blessing.

Cheers,
Huub
 
Just more or less thinking out loud here, but what if the CFS3 main texture sheet was mapped to the entire paint kit without editing it? The CFS3 sheet size could be 4096x2048 and then the whole template could just simply be resized to these dimensions without cutting it up.

It could be but it's a lot of work and I don't much fancy doing it at the moment. :0)

When these textures fit the CFS3 conversion, than the other repiants I did for this P40 should fit as well.

Hey Huub, thanks for those! :encouragement:
 
When somebody wants to convert them in something which can be used in CFS3 he has my blessing.

Cheers,
Huub[/QUOTE]

Is there a tutorial on how to do this ?
 
Thank you, Huub Vink!:jump:

No problems Clive. Thanks for your hard work getting this into CFS3!:ernaehrung004:

@Gosd - It's just a matter of taking the original bitmap and copying/cutting/cropping/resizing bits of it. Then placing them to the corresponding part on the CFS3 texture sheet to make it fit.
 
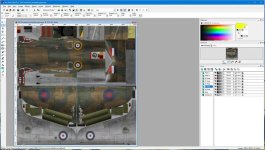
After many, many hours of frankensteining pieces of textures together, I believe I have a workable solution to marrying the Catney template to the CFS3 model.

What I did was take the original Catney Photoshop template and reduced it by 2048 to make it more manageable on my PC. After making a skin, I saved it as a BMP and cut pieces from that BMP to port over to the CFS3 texture. Those pieces were then resized/repositioned to match the model. It ain't perfect but everything stitches together nicely.

More to come.

I believe a P-40C was mentioned?
 
Sorry for being redundant. My point that I forgot to make was: Once you have the scale formula then it's just a matter of pasting bits of an image over the original Tomahawk texture. Twelve parts in all (wings, fuselage, rudders, . . .), very, very time consuming but the results are very, very good.

The bottom flaps/ailerons and rudders are proving to be a little difficult due to the texture mapping, will have to work around them somehow.

Some WIP's:


Would like to get in deeper at some point with effects/gun_grps/ammo for different B's and C's.
 
Hi All,

Looking very good Barry, your right its a time consuming thing working out the positioning. I have started a simple Paint Shop Pro template which I set to 2048x2048 pixels and then imported each of the 4 base sheets for a given repaint and labelled the layer to match. After trial and error aligning the images it gave me the X and Y co-ords for each section and now it shouldnt be too hard to convert the rest of the repaint skin set by dropping each sheet into its corresponding place in the template.
The hardest part being the resizing of the elevator and tail plane area. its by no means perfect but a good starting point if people want to take it further. I can upload to SOH if interest is there. Gimp, PSD will both open a PSP format file.

Hi Clive,
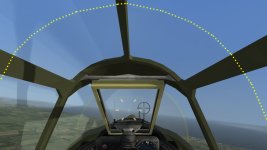
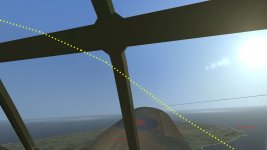
great job mate, I did notice two small issues. the air speed gauge is not working and when using TrackIR I can see a grey semi transparent circle moving about the point of axis. its linked to the cowling/canopy, if I open the cowling/canopy it slides back out of the way and you don't see it anymore. I attached two picks and put a yellow line just above the edge of it in each.

regards Rob.
 

Attachments

  • Shot12-10-18-19-28-32.jpg
    Shot12-10-18-19-28-32.jpg
    38.8 KB · Views: 0
  • Shot12-10-18-19-28-27.jpg
    Shot12-10-18-19-28-27.jpg
    29 KB · Views: 0
  • tomahawk_II.jpg
    tomahawk_II.jpg
    68.3 KB · Views: 0
  • template.jpg
    template.jpg
    69.4 KB · Views: 0
I can see a grey semi transparent circle moving about the point of axis. its linked to the cowling/canopy, if I open the cowling/canopy it slides back out of the way and you don't see it anymore. I attached two picks and put a yellow line just above the edge of it in each.

if I am getting it right, it could be the part of moving canopy is external model related, still is not excluded from VC view - to be invisible there. such things are fixable at the gmax project, cockpit vs cockpit_virtual also f_canopy vs vc_canopy items hierarchy.

Ive had such problem with my latest project - Ive just forgot to put the f_canopy stuff under the main cockpit node :)
 
Wow! Great work Barry!

Would like to get in deeper at some point with effects/gun_grps/ammo for different B's and C's.

I already have the pylon positions so various B's and C's are do-able. Let me know what you need.


I did notice two small issues. the air speed gauge is not working and when using TrackIR I can see a grey semi transparent circle moving about the point of axis. its linked to the cowling/canopy, if I open the cowling/canopy it slides back out of the way and you don't see it anymore. I attached two picks and put a yellow line just above the edge of it in each.

Thanks Rob, I'll get that sorted. :)
 
Sorted the gun_grp's out in the M3D and XDP. Now has two 50cal's in the nose and four 30cal's in the wings.


Alignment of the tail textures is proving to be difficult but not impossible I think.

If someone with the appropriate knowledge would come forward and have a look at the scrape points and maybe add bent prop parameters to the flight model, that would be icing on the cake. I'm afraid I would just make a mess of it all.

@Capt. Winters - Upload it! You can never have too many templates:) The tail appears to be one left and right section but is really two for each side. Threw me off at first.

Clive did such an excellent job converting the A2A P-40, I am ashamed for having bypassed this without going beyond the initial texture issue.

 
First crack at converting Huub Vink's skins. Overall a very good fit, wings need some adjusting. In time, all will be converted:)
 
Back
Top