Seahawk72s
SOH-CM-2023
Nice choice of color..
"It brings out her eyes"...
"It brings out her eyes"...
Please see the most recent updates in the "Where did the .com name go?" thread. Posts number 16 and 17.
Please see this thread for updates. Update Thread
SOH ADMINISTRATIONHi Marty, thanks very much. Assuming you are talking about the "wrinkled skin" effect on the fuselage just aft of the cockpit and perhaps the bomb bay door area, I'm still using my FS9 techniques. That is, very subtle shades of light and dark with many trial and error adjustments in size and transparency % until it "looks" right to me. These are not in the bump files, I'm not that good with bump files.
Back at you with regard to the way your glass looks. I very much like the adjustments you made to your exterior glass areas, cockpit and bombardier glass in particular. Can you share how you made those adjustments because I like the way you have yours and would like to have mine look that way as well.
Thanks,
Steve
Hello Duckie,
I do not understand your question about the glass could you show me what you are talking about
Thanks,
Marty
Hello Duckie,
I do not understand your question about the glass could you show me what you are talking about
Thanks,
Marty
Marty,
If I understand correctly, Duckie thought your glass settings had been modified from what I distributed as default.
Your glass has a better appearance than his default glass and he would like his glass to be more like your glass in appearance.
See the side by side comparison attached. Is it just the angle of the sun?
Duckie I got your message and will respond. Truth be told I did write out a lengthy response last night with an explanation, but the forum timed out and erased my message upon hitting the back button!
Sorry everyone, I thought I had posted this but realized I never hit submit! 3rd times the charm!
Ok, so here's the deal with reflection:
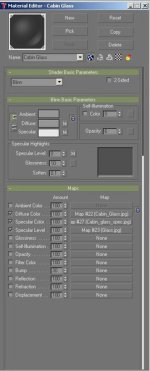
The model file contains all the information about what materials the surfaces are made of. If it is reflective how much etc. The Exterior has 2 reflective type surfaces, the glass and the rest of the exterior. Without getting into too much detail, but we do need a little bit or you'll be swimming in confusion, here we go.
In order to alter the reflectivity of a surface, in this case the glass texture, we can do a few different approaches.
1. Global Environment texture: I currently use Bananabob's Alternate GlobalEnv map. This is a high contrast cube map (or reflection map) that gives a nice image to be reflected in the exterior surface. The default one is much less vibrant and toned way down and very plain. it's a poor reflection map for use with bare metal. But, using the default will drastically decrease the perception of reflection. See if you are using the default or Bananabob's. Chances are you might be using Bananabob's. An easy way to limit this to a single aircraft is by simply placing the default (or bananabob's) texture directly into the texture folder of the repaint you want to test. It will override the use of the main P3D/FSX texture in this way.
2. The next simplest method, would be to alter the glass texture alpha channel to a lighter side of the greyscale (making it whiter). The closer to pure black the more reflective the texture will become. P3D/FSX does this on a per pixel basis. So the alpha channel mirrors the texture per pixel in a monochromatic way. We need the inverse of the alpha, so the closer to black the pixel the more reflective that pixel. The closer to pure white, the less reflective it will be. Edit this as second attempt at reflection control.
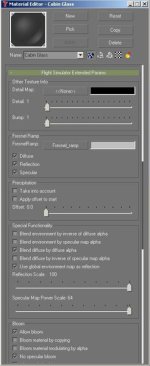
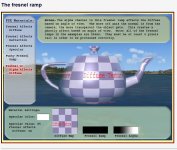
3. Both of these previous actions edit the reflection, but do NOTHING to change the reflection angle. To do this you need to edit the corresponding Fresnel texture. The B-26 incorporates 2 fresnels. One is for the exterior. The second is for the Glass. You'll need to see which one is which. explaining how it's used is a little complex. Essentially, It's a single gradient from right to left. The Left Side represents head on viewing angle, while the going further to the right represents greater and greater off angle viewing. Playing around with the fresnel will give you all kinds of cool effects and things can be done DEPENDING on how it is coded in the model file. It can used to affect Diffuse which would make the texture transparent (which it is not on the B-26), Reflection only (which I don't think it is), Specular only (I believe this is the setting for ours), BOTH Reflection and Specular (which it is not on the B-26, and this is a bad setting as it blends the alphas of both....bad idea and WAYYYY less control as a repainter) or all three, which makes things look really funky. Unfortunately or Fortunately, however you choose to look at it. I don't think our adjusted the reflection. But I wanted to include this info as it helps to understand overall, in other situations how things work.
I would try the the first 2, and see what you get.You can try no. 3 as well, but I can't remember if it affects reflection or not. So it may do nothing for the angle of viewing. Just as a disclaimer.
Happy trails!
Well, after a few hours of trial and error testing, the only thing that affects the reflectivity is of the exterior glass is the "glass_fresnel_red.dds" texture. no amount of transparency or opacity adjustment to the "cabin_glass.dds" diffuse or alpha makes any difference on the reflectivity. However, by deleting the "glass_fresnel_red.dds" the reflectivity totally goes away. The glass still has "tint" (still visible) and transparency but no reflectivity.
So, guess I'll just live with the glass the way it is originally designed. Thanks, Milton and Rick, for the help.
Steve
Steve, not sure what your "glass_fresnel_red.dds" looks like.
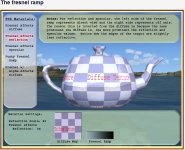
Is it a solid shade, or is it from right to left, a gradient from black to white.
For reflectivity to change, you can shift that gradient (left or right) or find a common mid-color in that gradient that allows the degree of reflectivity you want. Be aware that it will also slightly affect specular and diffuse, but that may be what you want.
Milton, the "glass_fresnel_red.dds" is one that came with the original textures and is located in the common texture folder. I do not know how to edit this file. DXTBmp will not open it. Image tool will open it and shows a solid gray rectangle 4 x 256, not a gradient. You should have a copy of it with your originals. If not, here's a copy of the dds in the attached zip.
View attachment 52667