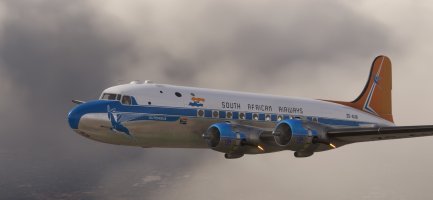
DC-4 Skymaster

I use all of them still from 2000 up along with any other flight, combat flight, car, train, farm, space or what ever sim you can think of.

I was really wanting to stick with 2020 but there are a few things that bothered me about it, so of course when 24 went on sale for the second time I caved, extreme curiosity got the better of me, then again I'm a sim nutcase lol.

Needless to say the things that bothered me in 20 are not present in 24, so for my own personal reasons it was a good step up for me. I will of course keep the basic install of 20.
 
I'm an "out with the old, in with the new" kind of simmer, which of course means putting up with "teething troubles" in the short term, but the long term benefits are well worth it.
From the developer's point of view however, it's a long term royal pain and I have the utmost respect and admiration for Didier who codes for both sims at once.
Monsieur, vous êtes formidable!
 
I’ve got them both installed. I love the visuals in 2024 (although they aren’t too shabby in 2020, either!!!). I fly both, although in my opinion, the flight models seem much smoother to me in 2020. To each his/her own…YMMV.
 
View attachment 191819

Starting engines in SFO. This livery is from Gary Harp over at flightsim.to brought into FS2024. Didier is doing a great job with this project and looking forward to spending many hours in the cockpit of the C-54!
Question:
Is it much work to bring over the liveries from the old Skymaster version to this new one in 24? What all do I need to do? Rename files, edit texture.cfg and/or use the MSFSLayoutGenerator tool?
 
Currently, I have not modified the UV mapping or if you prefer the paintkit so currently it's yet possible.
Nevertheless, in the future, I may change some maps, especially the fuselage, because the upper and lower parts, when projected onto a 2D plane, are too distorted; ideally, the fuselage should be divided into four parts: upper, lower, and both sides, thus, each area of the fuselage will have the same precision.
Why hasn’t this been done yet: because I always process the textures at the end of the process, since a 3D model can still evolve, change during development, and so if that’s the case, the textures will have to be redone, so it’s as much as processing them at the end

For personnal purpose I have rename textures files according to my following principles (to respect my usual workflow):
- spec files are not longer used but they can help to create metallic/roughtness textures for the comp textures creation
- glow files are not longer used

For the cockpit, ns_*_l.* (l for light) are rename in dc4_*_emis.*. In fact, almost all the needles of the gauges were in duplicate: one had the diffuse texture and another used the ns_*_l texture. * and the latter was displayed only at night or when cockpit lighting was requested.
Under MSFS, we handle things differently, since each material can have 4 subtextures: albd, comp, nrm, emis. Emissivity can be managed by the value of a potentiometer or by appropriate XML code lines.

The main files used for exterior repaints are :
- ns_fuselage.* (i.e. the diffuse file) in dc4_fuselage_albd.*
- ns_fuselage_bump.* in dc4_fuselage_nrm.*
- ns_wing_l.* (i.e. the diffuse file) in dc4_wingl_albd.*
- ns_wing_l_bump.* in dc4_wingl_nrm.*
- ns_wing_r.* (i.e. the diffuse file) in dc4_wingr_albd.*
- ns_wing_r_bump.* in dc4_wingr_nrm.*

In the basic repaints provided in the addon, a texture.cfg file is yet created to make reference to the others textures needed. You only need to copy/paste in your files.

For your repaint, you can make a Projects file structure inspired by the SDK examples, populate your png files and compile with fspackagetools to have the necessary json files and dds.

The Paintkit files provided byt Flight Replicas homesite are always valuable and you can download them for new repaints.

Currently, the only repaint which is correct according to my point of view, it is that of Air France.
The others were quickly transferred from P3D to MSFS and the COMP files will need to be improved as well as the NRM files (this is a beta version).
For the next version, I will try to improve the NL repaint that is close to my heart for Javis who had sent me a lot of photos and images of the DC-4, which is near his home in Holland.
 
Last edited:
I absolutely LOVED the DC-4/C-54 when it was initially released. I really like seeing the upgrades being worked. Love this airframe!
 
Hydraulic and Brakes systems :

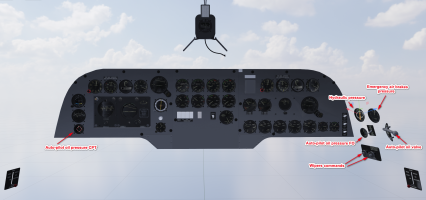
By studying the 3 gauges (on some aircrafts it seems taht there are only 2, but no simplification: DC-4 and C-54 will be provided with 3 gauges) that remained to be completed on the side console to the pilot’s right, I was able to clarify the situation:

1783243057445.png

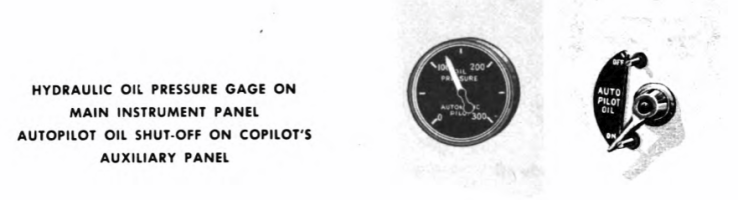
- the bottom gauge is the oil pressure in the circuit managing the autopilot; this circuit is powered according to the ON-OFF switch located slightly back: now the switch controlling the oil circuit is modeled and programmed, and the gauge also (the oil pressure gauge for the autopilot is also duplicated on the left side of the main panel for the pilot). For the auto-pilot circuit, the working pressure is 125 psi, + or - 5 psi
1783236086037.png
- above this gauge is the one showing the fluid pressure in the hydraulic circuit : this hydraulic system manage brakes, wing flaps, landing gear, cowl flaps, carburetor air filter (not modelized) and windshield wipers.
Reading carefully the Flight Manual for the C-54G and the C-54E, some details "could/should" be modified .
  • C-54E: a hydraulic reservoir gauge added on the upper instrument panel (overhead ?)
  • according the C-54G manual : the main hydraulic system is supplied by two engine-driven pumps (engine n°2 and n°3), the auto-pilot is operated by a separate hydraulic system, and an other engine driven pump on engine n°2
  • reading the the C-54E manual : 3 engine-driven pumps (n°2, n°3, n°4) supply hydraulic fluid at 2700 to 3050 psi pressure, the hydraulic reservoir capacity is 5.4 gallons (with a reserve of 2.5 gallons whicth is available only for hand pump operation)
  • brakes operate under a reduced pressure of 390 to 410 psi whih brakes fully applied.
Modifications in the system.cfg in brakes and hydraulic sections
[BRAKES]
parking_brake = 1
auto_brakes = 0
toe_brakes_scale = 0.5
differential_braking_scale = 0
hydraulic_system_scalar = 1
gear_warning_available = 1

[HYDRAULIC_SYSTEM]
normal_pressure = 3000
electric_pumps = 3
engine_map = 0,1,1,1,0,0,0,0,0,0,0,0,0,0,0,0
min_pct_rpm_for_max_pressure = 0.2
ailerons_require_hydraulics = 0
rudder_require_hydraulics = 0
elevator_require_hydraulics = 0
spoilers_require_hydraulics = 0

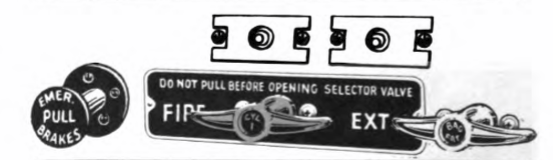
- finally, the last gauge is the emergency air brake pressure : emergency air brake control handle is managed at each end of the main instrument panel, just under the glare-shield by red handles.
1783238643573.png

PS: For the hydraulic hand pump operation, perhaps I will study how this has been mode in the DC-3 and if it is possible to add to this add-on ... but later in the development.
 
Last edited:
Version v0.52

Yesterday, I have push a new version with minors improvments, this version cancels and replaces the previous one on the link #187 / page 10 :
- Fix the duplicate object on the navigator desktop behind the copilot
- Revision of the right side console of the copilot: hydraulic pressure gauge, hydraulics for the auto-pilot command and de-icing controls
- Oil dilution switch are animated and XML coded
- Deicer commands are now functional on the overhead
- Contrails are implemented (work in progress)

{EDIT] I have find a better solution to activate the contrails in MSFS. Reading the xML code provided in a PMP A330 addon, I have discover a new AVar which can bring a quick solution:
<FX_CODE>(A:CONTRAILS CONDITIONS MET:1, Keyframe) 0 &gt;</FX_CODE>
In the engines.cfg, verify that you have:
max_contrail_temperature = -39.724
 
Last edited:
Back
Top