Getting Buffed.

BTW, this is something I really like about Dan's Castle scenery. :encouragement:

When you taxi-in after flying touch-and-goes or if you're just getting back from an IR route, always request to taxi to a GATE. Both of Castle's gates are located in front of the Bomb Wing building. Castle has good ground crews along with some prime movers and tow bars. Let those guys park the bird on the flight line. You've just finished a long haul. You aren't in the best condition to be parking a BUFF on a crowded flight line.
 
Sound folder for the B-52G or any of the earlier models (A thru F).


Headphones are recommended, the interior sound environment of the B-52 is notoriously LOUD. :loyal:
I set this up so it won't damage your hearing, but it will "feel" a little over-powering. The real crews wear headphones or hearing protectors if they aren't wearing a helmet.

The sound of a B-52 with turbo jets taking off with the throttles firewalled and water injection turned on has been likened to "ten thousand squirrels being fed into a wood chipper, feet first". I got it as close as I can. This sound folder doesn't have the "scream" of the engines, even a really good sound set for a Vulcan doesn't do it justice. :indecisiveness:

If anyone has a better sound set, by all means get in touch. I'd like to check it out. :wiggle: I included the cartridge starters from one of Mike Hambly's FS2000 sound sets.

I'll be posting the sound set for the B-52H (turbo fan engines) later.
 
By now, you should be getting aware that the B-52 is a beast to taxi. :dizzy:

Stick with it, what you're doing now will pay off later.

I was going to hold off on this for later when I upload the full "conversion kits", but this may help a little.

Copy my contact points and paste them into the aircraft.cfg files, over-writing the default values:

static_pitch = 0
static_cg_height = 14.42
tailwheel_lock = 0
gear_system_type = 1
max_number_of_points = 9

point.0 = 1, 45.25, 5.5, -14.53, 3000, 2, 2.1, 40, 0.2, 4, 0.9, 10, 10, 2, 220, 305
point.1 = 1, -3, 5.5, -14.67, 3000, 2, 2.1, 0, 0.8, 1, 0.8, 10, 10, 2, 220, 305
point.2 = 1, 45.25, -5.5, -14.53, 3000, 1, 2.1, 40, 0.2, 4, 0.9, 10, 10, 3, 220, 305
point.3 = 1, -3, -5.5, -14.67, 3000, 1, 2.1, 0, 0.8, 1, 0.8, 10, 10, 3, 220, 305

point.4 = 5.000, 0.000, 0.000, 0.000, 0.000, 0.000, 0.000, 0.000, 0.000, 0.000, 0.000, 1.000, 1.200, 0.000, 0.000, 0.000

point.5 = 2.000, -10.000, 75.000, -5.500, 1500.000, 0.000, 0.000, 0.000, 0.000, 0.000, 0.000, 0.000, 0.000, 6.000, 0.000, 0.000
point.6 = 2.000, -10.000, -74.822, -5.500, 1500.000, 0.000, 0.000, 0.000, 0.000, 0.000, 0.000, 0.000, 0.000, 5.000, 0.000, 0.000
point.7 = 2.000, 79.770, 0.000, -8.369, 1500.000, 0.000, 0.000, 0.000, 0.000, 0.000, 0.000, 0.000, 0.000, 9.000, 0.000, 0.000
point.8 = 2.000, -68.437, 0.000, -2.607, 1500.000, 0.000, 0.000, 0.000, 0.000, 0.000, 0.000, 0.000, 0.000, 4.000, 0.000, 0.000


This should help a little bit, but its still going to be a beast. You need to really bend the throttles to get the thing rolling.
Once you start to roll, pull the throttles back to around 75% until you get close to 25 knots.
For turns, try giving the brakes a quick tap, this will shift more weight on to the forward landing gear.
Tap the breaks and then start the turn. A little more throttle at this point will also help.
Tap, turn, power. Keep practicing and you'll get the hang of it. :wiggle:
 
While you're working on how to taxi the beast, let's take a moment to look at what you'll be flying. :wiggle:

Shift to your external view and pan around so you can see the tops of the wings. For starters, there are no ailerons on the B-52 G and H models.
Try shifting your stick/yoke left and right. What you've got are spoilerons. Leaning left on the stick will deploy the left spoiler. Same in reverse for the right side. The B-52 banks by having the spoiler dump some of the lift which lowers the correct wing. The spoiler also provide some of the turning force.
Now, pan back to the tail. Throw in some rudder and watch what happens. While the actual rudder has a lot of surface area compared to normal aircraft, it looks incredibly small. The tail surfaces of the B-52, compared to other aircraft, have as much surface area as most aircraft's wings.

Now, try hauling back on the stick. Just like the rudder, you don't have a lot of area. Hit your Trim buttons. Now you'll see some deflection.
BTW, if you don't have buttons assigned for Trim this would be a good time to add them. The B-52 is a "trim monster" and you'll find yourself almost constantly making small trim adjustments as you fly manually. You'll get to the point where you won't even notice how often you hit the trim buttons. On the real plane, both the AC and the CO have trim buttons on their yokes.

YOUR TRIM POSITION IS FAIRLY CRITCAL WHEN TAKING OFF AND LANDING DEPENDING ON YOUR GROSS WIEGHT.

My panel changes that you'll get in the Update Kit will add a small numeric display next to the Trim Wheel in the THROTTLE (2D) sub panel.

Speaking of the Throttle panel, click back to the 2D cockpit and open it. Near the top-right side you'll see the Spoiler (Manual) Control. Aim for the bottom of the Spoiler Handle and hover over it. You should see a pop-up text window that shows the Spoiler setting. Its important during the final approach and landing to set the Spoilers to "60 percent deployed". This gives you some breaking force and stability when you're on final. To set the Spoilers, tap the lower half of the Spoiler control THREE times. This will set them to 60 percent.

Your B-52 has an animated drag chute. To see it, the gear MUST be down and the gear must be in contact with the ground. Depending on your landing weight, the chute may not need to be deployed (we'll get to that later). To see the chute animation, get the beast rolling and select full spoilers ("/" key). Since you've already set the spoilers to 60 percent for landing, you'll need to hit the "/" key TWICE if you want to look good during your roll out. :wiggle: On the real aircraft, the chute goes out as soon as the wheels touch down and it doesn't look like you'll have to abort the landing. It takes about two seconds to deploy the chute (the CO has control of the chute deployment). The chute stays with the plane until you pull off the runway on to a taxi way. Then hit the "/" key to drop the chute. Another crew dog on Ground Duty gets to muscle the 300 pound chute into the back of their pick-up truck, so be mindful of where and when you cut it loose.

Next up are the Flaps. On the B-52, the flaps only have two positions. Fully deployed or fully retracted. Alphasim had to use six flap positions because it is supposed to take 60 seconds for full deployment or full retraction. The flaps are the Fowler Type and are moved using electric motors turning jack screws. In the real plane's Dash 1 manual, Boeing states in bold text that the intermediate positions of the flaps HAVE NO EFFECT on performance. Take that as Gospel. The only time the flaps are down is for take off, pattern work, and landing. MAXIMUM flap speed is 200 knots (IAS). Speaking of landing, leave the flaps down for your taxi back to the ramp and shut down. The plane's crew chief will want to inspect them as part of your sign-off before you head back to the squadron building for de-brief and burgers. :very_drunk: Its also normal to cycle the Bomb Bay Doors OPEN prior to shut down. Just use the <shift> W key.
 
Last edited:

My upgrade kit for the B-52G and H has been uploaded. :wiggle:

READ the entire readme file prior to install.
This upgrade adds some small changes to the FD and gets rid of some of the goofy elements of the 2D panels.
Also included, some cool (better) gauges and effects files.

I've got some medical stuff to deal with (no big deal just a pain in the neck) and I should be back by later in the week.
If you want to try some touch and go's at Castle, MAKE SURE you don't try to take off with a high fuel load (defiantly NOT at 100%).
Also, make sure you have your Trim Up and Trim Down buttons assigned for your joystick/yoke.

We'll get into some pattern work next week. Be sharp and take some notes, you'll need them.
Otherwise, keep working on how to taxi and check out some of the new stuff in the 2D panels.
Once you get a good feel for the pattern, I have some low level training route flights you might enjoy. :wiggle:

From here on out, DO NOT USE <ctrl>L to turn on the lights. Get in the habit of using the light switches on the electrical panel. The CENTER light switch (Logo light) on the B-52H is now the AC's PAL (permissive action link) switch. Bad things WILL happen if you move it.
 
Couldn't believe my eyes, thank you for keeping my (released by Alphasim) B-52G/H alive - that was a fun project many many moons ago - I think it was before the B-58 and after my first SR-71s in terms or project release order, so must've been 2004-2005 or thereabouts - can't believe you're still using it after 20 years!

Anyway, thank you for keeping it alive. I know the flight dynamics chap Jay spent a lot of time getting the flight model as realistic as possible. We even had a couple of B-52 crew members assisting with various aspects of the project that we couldn't find reference material for. I had always hoped for crabbing landing gear, but it simply wasn't possible as far as we could tell.

David Bushell
ex Alphasim/Virtavia and more recently my own Glowingheat label - however creating days are pretty much over.
 
David, can you tell that I'm a fan of what your team created? :ernaehrung004:
Pound-for-pound, its still the best FD of anything that's flown in FS9 (IMHO).
About the crosswind crab on the gear, I also played around with it but couldn't figure out a way to get it to work (without using 18 different .cfg files). :dizzy:

One thing I've wondered about, back in the good old days I had the opportunity to pal around with Sam Chin at Freeflight Design Shop while we were working on how to decode everything in the FD and .air files. I always thought I could "feel" some of Sam's work in your FD. Did he help you folks out or did he already join the Army?

BTW, why didn't you release a version for FS2002? It only took me a couple hundred hours to convert it. ;)

BTW2, have you ever checked out the Haynes "Owners' Workshop Manual" for the B-52? They include the actual Gross Weight/Stall Speed curves diagram. Its scary how close you got it. :loyal:

:ernaehrung004:
 
Last edited:
Well, I'm pretty much back to normal. :wiggle: :ernaehrung004:

I wanted to throw out some random numbers you'll want to write down.
We'll dive a little deeper into this stuff and make some check lists before I cut you loose for pattern work.

Take off trim is pretty important but it isn't a deal breaker.
Depending your gross weight, you'll want somewhere between +5 to +12 degrees of Up trim set prior to take off.
Those numbers are also a pretty good ballpark for when you're on final and getting ready to land.
Try to avoid going over +15 degrees of trim when the gear and flaps are down.
You don't want impress the folks in the tower by going vertical and then nosing over into a dive before you create a new pond near the runway.
Likewise, you should set the trim to -25 degrees prior to engine shut down.
SAC learned this lesson the hard way when a tornado touched down at Carswell AFB and they almost lost the entire fleet of B-36 Peacemakers.

Try to keep an eye on your trim settings during your flights.
Too much trim can ruin your day. Having the trim set too low (-) can mean you're driving too fast. Likewise, having trim set too high can be fixed by adding some thrust/air speed.

Which brings up Pattern Speed. When you're in the pattern near Castle, you should be shooting to hold a speed of about 150 knots. Depending on your gross weight, you may notice that the nose is pointed DOWN by 2 to 5 degrees. Believe it not, this is normal. You're in a very unique aircraft that has massive wings and amounts of lift. It also gives you a good view of the ground. :wiggle:

Making the transition between pattern speed and landing speed just takes experience. You'll need to know your stall speed (which, again, is based on your weight). Once you get lined up with the runway and intercept the glide slope, USE YOUR THROTTLES TO CONTROL YOUR DECENT. Try to keep the ADI glued to ZREO degrees once you're lined up with the glide slope. This is mainly why I swapped in the FSD ADI. Its accurate, its easy to read, and it has the glide slope cross hairs. Your speed on Final should be about ten knots faster than your stall speed. If you're dealing with gusty or cross winds, try to keep your speed a little higher (figure 12-15 knots above stall speed).

As you get ready to touch down, raise the nose slightly (something like 1-3 degrees). You ALWAYS want the REAR main gear to touch first. The difference between having the rear mains and front mains touch down might be one to two seconds, but always touch the rear mains first.

What ever you do, DO NOT USE THE AUTO PILOT/SPEED HOLD/ILS HOLD once you have the flaps and gear down. The plain truth is that takeoffs, landings, and pattern work MUST be flown using the seat of your pants and your brain. This is why you'll be doing so much pattern work at Castle and at your home base. It takes a lot of practice to build (and hang on to) that experience. One last thing to remember, pattern work is NEVER the same. There will ALWAYS be something a little different, be it traffic, weather, your weight, what you had for breakfast, who won the game last night, etc. The ONLY thing that lands the plane in one piece is YOUR experience. :wiggle:

Another fun number to write on the back of your hand is 2,000 feet AGL. Remember those folks on the lower deck? Their ejection seats fire downward. If you hit the BAILOUT alarm below 2,000 feet, all you'll do is drill those folks into the ground. :dizzy: Two thousand feet AGL is also your minimum launch altitude for those cruise missiles on the pylons and in the bomb bay.

The last special number for today is 60 Knots. This is the fastest speed you can be travelling if you want to hit those wheel brakes. Above 60 knots, you'll melt the wheels and the landing gear before you'll get the plane to stop. You are ALWAYS carrying a massive amount of weight which generates a LOT of momentum.

If you've installed my Update Kit (and everything is working), you may have noticed that your NAV now talks to you. :wiggle: That "60 knots" callout is CRITICAL. It means DON'T touch the wheel breaks above this speed. You'll hear this callout on both ends of the runway, as you accelerate and then slow down. If you don't hear the "60 knots" callout, let me know and we'll get it fixed.
 
Last edited:
David, can you tell that I'm a fan of what your team created? :ernaehrung004:
Pound-for-pound, its still the best FD of anything that's flown in FS9 (IMHO).
About the crosswind crab on the gear, I also played around with it but couldn't figure out a way to get it to work (without using 18 different .cfg files). :dizzy:

One thing I've wondered about, back in the good old days I had the opportunity to pal around with Sam Chin at Freeflight Design Shop while we were working on how to decode everything in the FD and .air files. I always thought I could "feel" some of Sam's work in your FD. Did he help you folks out or did he already join the Army?

BTW, why didn't you release a version for FS2002? It only took me a couple hundred hours to convert it. ;)

BTW2, have you ever checked out the Haynes "Owners' Workshop Manual" for the B-52? They include the actual Gross Weight/Stall Speed curves diagram. Its scary how close you got it. :loyal:

:ernaehrung004:

As far as I'm aware no, Jay created the FD himself with lots of help from the real world pilots manuals which had the performance data within - both available online since the aircraft are now so old - very useful for creating the flight models. Jay really enjoyed getting stuck into those, and he did the same for the B-58 Hustler and SR-71 models - I think the SR-71 flight model nearly pushed him over the edge as he strived to get it as close to real world performance as possible.

As for FS2002 - I think you answered that question - no seriously I think there were some technical reasons relating to the .air aircraft.cfg and FS2004 was pretty good and a step forwards in terms of the SDK and features available and so it didn't cross our minds at the time.
 
He did an outstanding job with the Blackbird.
He proved it was always a "one trick pony". :loyal:

Oh, in case anyone wants the FS2002 B-52 conversion, just let me know. :ernaehrung004:
 
Getting back to that Castle traffic BGL I posted..

I did notice a "Doomsday Cycle", where the four bombers on the alert pad start up, taxi to the runway, and take off. :eek:
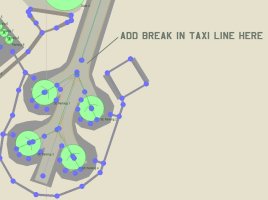
The ONLY way to fix this is to install a "break" in the taxi path between the alert pad (and only the alert pad) and the runway.
You would need to edit AFX_KMER_FS9.bgl to install this break. If you try to add the break using AFCAD, you'll lose some of the scenery.

KMER2.jpg

The last time I checked, AFX should still be available from Flight Sim Developers for about $30. My screenshot came from AFCAD2 and I'm in no hurry to fix it. :indecisiveness:

The other thing I glossed over is how to change the AI traffic models and textures. :wiggle:

This is pretty easy, just double and triple check your work.
You'll need to have TRAFFIC TOOLS (TT) installed. You can install TT anywhere, my install sits in a folder on my desktop.
I included a copy of the AIRCRAFT text file but you can easily generate your own by dragging a copy of the Castle Traffic BGL into your TT install.
Select the BGL in TT and hit the DECOMPILE button. This will generate the three text files.

The AIRCRAFT text file is deceptively easy to modify. I'll use one of the stock FS9 Cessna's as an example.
Note that your new AI MUST be installed in your main AIRCRAFT folder.

Open the Aircraft.cfg file using NOTEPAD.
Find the airplane you want in the [fltsim.XX] entries.
COPY the text highlighted below and PASTE this into your TT Aircraft.txt file:

[fltsim.2]
title=Cessna Skyhawk 172SP Paint1
sim=Cessna172SP
model=
panel=
sound=
texture=1
kb_checklists=Cessna172SP_check
kb_reference=Cessna172SP_ref
atc_id=N729WM
ui_manufacturer=Cessna
ui_type="C172SP Skyhawk"
ui_variation="White with blue"

You should wind up with a line that looks like this:

AC#12,456,"Cessna Skyhawk 172SP Paint1"

Note the " stuff and that traffic BGL's don't care what you use as long as it has a unique "title=" entry.
Save your edit, again ONLY using NOTEPAD, then fire up TT and select the three text files then hit COMPILE.

Nothing to it. :wiggle:
 
Well, who saw this post coming? :wiggle: :loyal:

Before I cut you loose for Pattern Work, we REALLY need to talk about your weight. :eek:
There's no easy way around this topic. So, get some coffee, stab your thigh with your protractor if you start nodding off, and TAKE A SEAT. :wiggle:

This is what used to drive people crazy with the Alpha B-52.

Gross Weight is really a very serious topic. The real plane isn't just a bomber or a flying tanker truck, its more like a flying gas refinery with bombs.
From here on out, we refer to fuel in terms of POUNDS. Get used to it. Specifically, we'll be talking about fuel in THOUSANDS of pounds, or "K".
You can take off, fly to the other side of the planet without a tanker, loiter for hours (and hours and hours) if needed and drop your bombs.
Getting home again might be tricky but you'll still have a good chance to put your target way behind you.

This is why there were several bombers specifically designed to replace the B-52 and NONE of them could cut the mustard. :pop4:

So, let's dig in to this topic:

For starters, the buck-naked-empty airplane weighs *about* 173K pounds. That "173" is a good number to write down.
You can take off at a MAX gross weight of 488K.
Your MAX gross LANDING WEIGHT is 325-330 K.

It's rarely done, but once the plane is airborne above 250 KTS, you could re-fuel to a total gross weight of 588K.
Which equates to a 100% fuel load, which is why a LOT of people got frustrated. :wiggle:

FS has a bad habit of loading this plane with 100% fuel.
Either get used to adjusting the fuel load prior to taxi and take-off or set up a Flight with a good, stable amount of fuel.
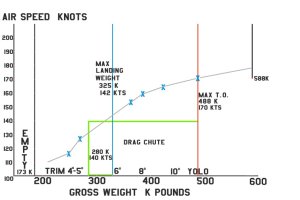
I've included a handy chart (Geez, the things I'm willing to do for this thread..) which is good news.
The BAD news is that these are only BALLPARK numbers and your mileage WILL vary.
We all fly a little differently and we all have our favorite yoke or stick. Weather, winds, temp, and humidity can also play a role.

Without further adieu, let's check this thing out:

B52weightstall.jpg

I've included a slightly larger BMP in the ZIP file if you'd like to check it out.
This is really a pre-take off weight chart showing the UNSTICK speed (the gray line) with FULL flaps.
Its also handy when you want to compute your STALL speed for landing.

The RED line shows your MAX TAKE OFF weight.
The BLUE line is your MAX LANDING weight.
The GREEN box is for your DRAG CHUTE. At weights to the left of the green line, the DRAG CHUTE is optional.
Note the take off TRIM settings. I don't advise setting TRIM to more than 10 degrees for take off. Its much easier to stall at low speed.

So, for starters I would advise you to CREATE YOUR OWN WEIGHT GRAPH. Or, make a table, or a different kind of graph. Whatever works better for YOU is what's important.

Setting up your flight is pretty easy, write down the TOTAL FUEL WEIGHT and add 173K to it.

So, what's keeping you? Get out there and start flying some circuits. Practice your take offs, get used to the handling in the pattern, shoot some touch-and-gos before you try your first landing.

Congratulations, YOU MADE IT. :ernaehrung004:
 

Attachments

  • B52Gross Weight.zip
    41.8 KB · Views: 3
Last edited:
About now, you'll need some suggestions on take offs, cross winds, and landings. :wiggle:

Taking off- Start by pre-setting the Trim (throttle panel) to the calculated value in the graph, above.
While you're at it, calibrate the Radalt gauge to "zero", you'll need to do this for each flight.
Once the wheels are off the ground, it will be impossible to calibrate the gauge. If you hover your mouse over the gauge, you'll see a pop-up telling you how far its "off".
Make a final check of the fuel load. The 2D Co panel now has a nifty RKG Fuelstat gauge near the bottom of the panel to cover most of the Co's responsibilities. For now, what's important is the total fuel weight. You can also monitor things like Time To Empty and Range once you get airborne. Take the fuel weight (in thousands of pounds) and add it to 173K, this will give you the gross weight.
Check your barometer is zeroed by hitting the B key. Turn ON the beacons and nav lights prior to engine start.
Engine starting sequence on the real plane is engine #3, followed by #5 then the other six engines as directed by the ground crew.
In FS (there are only four engines split into pairs), the order would be #2, #3, then #1 and #4. As long as you planned ahead for it, you can take your time with this stuff. Its normal on the real thing to spend 15 minutes or more getting everything on line.
Now is a good time to hit the GPS icon and bring up the Nav gauge. Cycle through the waypoints to make sure you have the correct flight loaded then "park" your Nav gauge by moving it with your mouse. I sized this gauge to fit nicely over the HSI or CRT, but I usually park mine over some of the engine gauges. Hit the GPS icon again to hide the Nav gauge. Once you park the gauge, it will come back at the spot you chose to park it. BTW, flight data on the real deal is stored in DTUC modules that get plugged in to the BNS (bombing and nav system). If you really want to simulate some reality, store your flight program on a memory stick/flash drive and load that into your Nav gauge. The actual DTUCs were a heavy outer case that protected...a hard drive. :biggrin-new: How's that for a sim reflecting reality?
Prior to requesting taxi to the active runway, turn on the EVS turrets and displays (on the later B-52G and H models). If you cycle your views quick enough, you can watch and hear the turrets "roll out" to their deployed position. One turret contains a TV camera while the other (red outline) contains a gallium arsenide FLIR camera. The turrets operate independently and can be steered (fought over) by multiple crew stations. Now is a good time to set the Level Line on the CRT displays. On the older models, turn on the CRTs and set the line. This is also a good time to cycle the bomb bay doors. Either hit "<shift> w" or click the second-from-the-left (orange) indicator light. Finish up your pre-taxi routine by pre-setting the auto pilot. Set the Alt to ground level plus 2,000 feet (remember why?), IAS to 245, but hold off on setting the Heading bug for now.
Now you're ready to taxi out. Request taxi to the active. Set the HSI Course to the correct runway and start moving out after you turn the TAXI LIGHTS on. The beacons and taxi lights tell everyone else that you're going places. :wiggle:

As you taxi to the hammer head, hit "<shift>z" a couple of times and note the wind direction and speed. Set this wind direction into the Heading Bug (we'll cover this in more detail when we get into Cross Winds). A wind speed over 10 knots usually spells trouble if its a cross wind. Now is also a good time to set your Clock to ZULU, although you can do this at any time. Since you're looking at the clock, look more to the left on the AC's panel. Find the Sim Icons and, well, what the heck is that??
If you're in either the OG or newer B-52G, that is the Water Injection switch. Like all of the non-H model B-52s, spraying water into the engine intakes increased the mass of the air which increased engine thrust. The water was stored in a 200 gallon tank (this is the ONLY time we measure a liquid in gallons) and would last for about two minutes. The B-52H doesn't have water injection because those TF33 turbofans don't need water injection. Just make sure you know where the switch is located. As you move along on the taxi way, extend the flaps. You'll need to hit your Flaps button 5 or 6 times to extend them fully. ALWAYS check your Flaps indicator to make sure you have them fully extended.

By now, you should be getting close to the hammer head and that 180 degree turn to Glory. Take a minute or two before you request your take off to check everything one last time. As this process becomes more familiar, it gets easier to forget that one little detail that WILL bite you in the ###. In my case, its usually setting the Radalt to zero or setting that level line in the CRT.

(con't in next post)
 
Its time to roll on to runway after you request your take off.
I'll cover the cross wind stuff later, for now get set up and get ready.
In the best of cases, taking off in a B-52 will feel like being a referee at a cat fight. There's just too much stuff you have to watch out for. :dizzy:

Try timing your take off for "about" two minutes prior to your planned "wheels up" time. Brakes off, throttles (B-52G) all the way forward in the YOLO position and......... Its like that scene in Austin Powers where the guy gets run over. It sure SOUNDS like something's going on but you're still not moving. :indecisiveness: Give it some more time and she'll start to creep forward. Once you start moving, hit the Water Injection switch. The switch does nothing in terms of flight dynamics BUT I set you up with some REALLY thick black smoke. :wiggle: Cycle your views really quick, see it?

OK, back to work. Regular large aircraft use the "V1, V2, Vref, Rotate" routine. We're doing something similar, only different.

As you get to 60 kts, you'll hear the "60 knots" call out. That tells you the ASI is off the peg and its time to move your feet away from the toe brakes. Next up, you'll hear "70 knots, clock running". This is kind of a combination of V1 and V2. You aren't fully committed yet but its getting close.
In the real world, your Co has calculated a set time based on gross weight, over-all local conditions, and the length of the runway. This time is usually between 20 to 30 seconds. When the Nav called out "70 knots", you took a look around and noticed where you are on the runway. Our version of Castle doesn't have thousand foot markers so its only going to be make-believe. When the timing runs out, the Nav will say "Hack!" (and ONLY "Hack!") and you'll need to quickly figure out where you are on the runway. Your speed at this point is also supposed to be REALLY important. If you're too slow, the idea is to immediately dump the throttles back to idle then wait until you get below 60 knots before you stomp on the brakes. Pulling the handle on the brake chute is also a REALLY good idea and that's up to the Co. Otherwise, you're now committed to taking off.
Along the way, something else also happened. Your rudder (finally!) becomes effective somewhere between 80-90 knots. Remember when I wanted you to check out the tail and move the rudder? Same deal, its like a T-Rex looking at his arms. :dizzy: Again, this will be important when we get into cross wind take offs and landings. At this point IF, for example, you lose one or more engines you're ONLY option is to press on and get the beast in the air. As long as you can make it to 2,000 feet, you can hit the BAILOUT light for the folks in the basement. If not? I'm sure the base will hold a respectful memorial service.
But, its good news and things are moving along. As you get close to your pre-comp Unstick speed, don't panic but be careful. Your gear is still in contact with the ground but its really just along for the ride. There's no longer enough weight on the tires to matter and its going to feel like you're rolling on wet ice.
Now is a good time to look at this Unstick concept again. Boeing designed the B-52 with wings that are permanently mounted at an upward angle. The B-52 doesn't need to rotate to take off, the wings are already set at the correct angle. Instead, as long as the plane is going fast enough, it will rise up like riding on an elevator. You take off and begin to climb with the attitude nailed at zero degrees. Why do it this way? In order to lift that much weight, its critical for the wing to not stall at slow(ish) speeds. Rotate the nose too far up (even only a couple of degrees) and wing WILL defiantly stall.

So, you are closing in on your Unstick speed. Once you get there (and give it an extra knot or two to play it safe), give your yoke/stick a quick tug backwards. This should be enough to notice the tires coming off the runway. You want to be REALLY smooth for this part. Watch your CLIMB indicators, they should start to move upward. Once you've given that tug, allow your controller to come back to neutral. Nice and easy and as your speed continues to build, you should continue to climb. You're still close to your stall speed, so try to not make any big movements.
If you're doing pattern work, keep the gear and flaps down. Otherwise, get the gear up as soon as you can hold a positive rate of climb. Start to raise the flaps between 150 and 180 knots. You want them fully retracted by the time you hit 200 knots. Turn the water injection switch OFF. Start using your TRIM buttons to control your climb. Just use small trim changes. You can easily get into a PIO if you over-cook your trim inputs.

OK, that's enough for tonight. :ernaehrung004:
One quick idea you might like to try for the pattern, start out with enough fuel for a takeoff in the 300-320 K pound range for gross weight. You're lighter than the max landing weight but you still have enough fuel for several hours in the pattern.
Believe it or not, extra light (200-230 K) gross weight take offs and landings are every bit as tricky as the extra heavy (400 to 488 K) gross weights.
Its best to start off somewhere in the middle.
 
Last edited:
Back
Top