Projected knowledge base:

Microsoft Knowledgebase Articles

OK girls and boys,

I guess I have a bit of time on my hands....

Here are the MS knowledgebase articles that turn up on a recent search...

Microsoft Support Articles for CFS3

https://support.microsoft.com/en-us/kb/331562
https://support.microsoft.com/en-us/kb/813195
https://support.microsoft.com/en-us/kb/815069/en-us
How to Troubleshoot Joystick Problems:
https://support.microsoft.com/en-us/kb/811463
Known Multi-Player Game Issues:
https://support.microsoft.com/en-us/kb/kbview/331570

There is at least one other that I couldn't find but IIRC is already in this thread - that is, what to do if white objects appear in your terrain. (something to do with Dual Pass Render in cfs3config????)
 
Shimmering and Stuttering

First, I know everyone's computer stet up is different, but it may be helpful to see what worked for me and why. (Win 7, Phenom X4 955, GTX 670, Nvidia Drivers 353.30)

I've spent a fair amount of time tuning my system to minimized both shimmering and stuttering while maximizing IQ. This became more noticeable after the recent update to the MAW scenery files.

My 3.2 GHz CPU is only good for OC to 3.6 GHz (recently managed to nudge it up to 3.8 GHz), so I know that's one major limitation on FPS, and I'm using Sparse Grid Super Sampling to eliminate the shimmer ( http://naturalviolence.webs.com/sgssaa.htm
), but that just about maxes out the GPU. Just to add to the workload I'm running at 3840 x 1024 (three 1280 x 1024 screens).

For me the key to cutting down the micro-stuttering was being able to balance the CPU and GPU workloads, so that neither one was going at a much different rate than the other. That meant picking a max FPS limit (in my case 44) and then dialing in a combination of graphics settings and max pre-rendered frames for the CPU in Nvidia Inspector. The CPU now runs at a high utilization rate without clipping at full 100% load very often (I just monitored it with task manager during the tuning process) for the two cores that were assigned to the game (set with Process Lasso). The GPU is generally running within a couple of FPS of the limiter setting without lots of big rate drops.

My current settings are:
Frame Rate Limiter 44 (You want this as high as you can go and still be able find a CPU/GPU balance point)
Max Pre-rendered Frames 2 (This Setting Significantly Impacts Frame Rate and CPU Load. For me 1 held back the GPU waiting for the unbuffered CPU data to be finished for each frame, and 3 was too much for the CPU to stay that far ahead of the GPU without overloading)
Triple Buffering On
Vsync Smooth On
Vsync Standard (Adaptive does not appear to eliminate Screen Tearing)
Vsync Force On (Eliminates Screen Tearing With TrackIR Head Movements)
AA Gamma Correction On
AA Override Application
AA 4x Multisampling (Should Match Strength Of Transparency Setting)
AA Transparency 4x SGSS (This Had The Biggest Influence On Eliminating Shimmering)
Anisotropic 16x
LOD Bias -1 (Sharpens Textures Degraded By Super Sampling)
Neg LOD Allow
Texture Filtering Quality (I Used This To Fine Tune The GPU Workload Without Incurring Big Reductions In IQ)
Trilinear Optimization ON
Power Prefer Maximum Performance
Threaded Optimization ON

 
Effects Master List

Uploaded under CFS3 Other > Effects is a pdf file of the Effects Master List provided with GMax CFS3 package. Not everybody has MS Excel so pdf is more accessible. If you want to add wake effects or muzzle flash effects, you might be surprised at the variety available in the stock effects.xml, nicely summarised in the master list.

However such a list cannot be comprehensive. For example, useful entries in the effects.xml providing effects for torpedos, are not mentioned in the master list. There are all sorts of experimental effects/drafts/copies etc in the stock effects.xml never fully actualised.

Anyhoo this file can be printed off and stuck on the wall for compulsive modders! :wavey:
 
Changing the size of Grassland Areas using Landclasses.xml

Landclasses.xml can be found in the terrdata.zip file within the Terrains folder.

If you want to change the look and feel of the scenery you fly over, this file can be edited using Notepad. For example, if you struggle to find fields big enough to land your aircraft when the engine stops, you can edit the Grasslands entry so that tiles identified as Grasslands are larger in size. This has been done in addons in the past.

Here is a thread where ideas by scenery gurus Henk and Winding Man are discussed:

Sent: Friday, 26 October 2007 1:05 p.m.


Subject: Updated terrains xml tweaks


Some more tweaking options courtesy of Henk,


For Johnno’s latest scenery version Oct 2007:


“Daiwilletti, I changed the following xmls a bit:
The Composite scenerybudgets XML:
setting in "Five"
changed the level of detail to 15,25,50 and last 50 (instead of 250).
density unchanged (0,00005, 0,0002, 0,00025, 0,00025). Changing (ingreasing) the density gives you more and more trees!
But, beware of a dramatically drop of framerates especially when you like to see trees in the far distance.............


Setting in "Five"
The CompositeTextureBudgets XML:
Changed the ImageQuality all to 0 (zero)
No use of mips (so UseMips="n")


Landclasses.xml:


Changed the following settings:
ID8 "Crops and Town", set the dim on "4096"
ID10 "Grass, crops & shrub", set the dim on "4096"
ID15 "Crops" set the dim on "4096"


I like to express here my thanks to Winding Man who give us the discovery of tweaking the landclasses xml! Do not forget the delete the texture and scenery zx files in the terrain folder.


Important is also the setting of your videocard: try to set the aniosotropische filtering on 16.”


....


"The original settings in the landclasses XML for the mentioned lines are all "5120". WM used especially (I think) for Over Flanders Fields the settings "9216", in that case the grassfields are much bigger so it is easier to land without the interfering of trees.........


Notice that you can change the settings by steps of 1024, f.i. 3072, 4096, 5120, 6144, 7168, 8192, 9216, 10240, 11264, 12288, 13312, 14336, 15360.
Try some settings, the higher the fields will be more expanding, however the lower settings gives a more realistic landscape, but it takes a high end pc."

Henk
 
I've been looking into the weather and skybox relationships this week.

If you are drawing new images each patch is drawn as Front, Left, Back, Right, Front to make the joins seamless.
Front is displayed looking South
Left is displayed looking West
Back is displayed looking North
Right is displayed looking East

In the panoramic_cubic_test.dds file these should be placed in Back, Front, Top, Bottom, Left, Right sequence.
(The default that came with cfs3 was not done correctly.) Some of AnKor's shaders use this file to create cloud reflections on the water, and I think it may be used for the UI background scene as well. You will notice mismatched seams at the edges of the sections if the sequence is not correct.

There is a setting in the weather xml files called skyboxcloudType that can have a few different predefined descriptions:
NoClouds (and ThinClouds) will display the clear_bk, _fr, _up, _dn, _lf, and _rt textures from the effects\skybox folder
FewClouds will display the cirrusonly_bk _fr, _up, _dn, _lf, and _rt textures from the effects\skybox folder
ScatteredClouds will display the scatteredclouds_bk, _fr, _up, _dn, _lf, and _rt textures from the effects\skybox folder
BrokenClouds will display the lowcumulusonhorizon_bk, _fr, _up, _dn, _lf, and _rt textures from the effects\skybox folder
ThickClouds will display the grayhorizon_bk _fr, _up, _dn, _lf, and _rt textures from the effects\skybox folder
If you don't have it explicitly defined in the weather xml file it seems to default to the NoClouds version.

Within the weather xml files there is a parameter called fogcolor that uses a 10 number sequence to define it's color. This is a decimal that converts to hexidecimal as FF followed by the Red, Green and Blue color values as numbers from 00 (darkest) to FF (lightest). A pure gray would have R = G = B. For example scatteredclouds4low.xml has the BackgroundWeather fogcolor as 4288529397 which converts to FF 9D C3 F5 which is a light blue R=157, G = 195, B = 245. The choice of this shade will have a significant impact on how well the fog will blend into the skybox background colors. AnKors latest shaders address the grey band that frequently was seen along the horizon, but they cannot completely make up for poorly matched fog/skybox colors.
 
Whit the recent Ankor shader mod 2016-03-29 will these corrections still be needed?
 
Just for reference:

[contact_points]
//0 Class
//1 Longitudinal Position (feet)
//2 Lateral Position (feet)
//3 Vertical Position (feet)
//4 Impact Damage Threshold (Feet Per Minute)
//5 Brake Map (0=None, 1=Left, 2=Right)
//6 Wheel Radius (feet)
//7 Steer Angle (degrees)
//8 Static Compression (feet) (0 if rigid)
//9 Max/Static Compression Ratio
//10 Damping Ratio (0=Undamped, 1=Critically Damped)
//11 Extension Time (seconds)
//12 Retraction Time (seconds)
//13 Sound Type
//14 Airspeed limit for retraction (KIAS)
//15 Airspeed that gear gets damage at (KIAS)
 
Mission Builder-mb on multiple installs with Windows 10

I have posted before on the problems of getting mb to work with multiple install using Windows 10 in particular. My son solved the problem in a few minutes, so I am adding the solution here.

1. Copy paste the mb folder (from a vanilla CFS3) into the expansion, (ETO, BoB, or whatever)
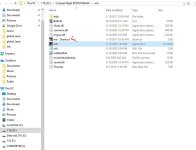
2. In that mb folder, make a shortcut of mb exe (see 1st pic)
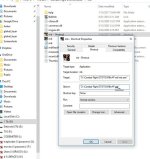
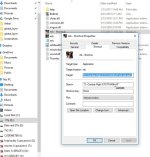
3. Right click the shortcut and in "start in", change "start in" to main folder; ie NOT start in the mb folder. (See 2nd and 3rd pic)
4. Run shortcut AND mb exe as adminisrator. (I also make them WindowsXP(SP3) compatible)


I do this for all my install and make a folder with all the appropriately renamed mb shortcuts.
attachment.php
attachment.php
attachment.php
attachment.php


Attachments

  • mb1.jpg
    mb1.jpg
    51.1 KB · Views: 135
  • mb2.jpg
    mb2.jpg
    57.9 KB · Views: 132
  • mb3.jpg
    mb3.jpg
    57.8 KB · Views: 131
Installation of AnKor's Shaders

This incredible addition to CFS3 was begun by Andrey Korchinskiy in December of 2013 and was originally intended to become part of WOFF so that it could access DX9 functionality making it compatible with the SweetFX shader injector. Since then it has grown to be so much more that it's easy to forget that it still provides the bridge to using SweetFX in CFS3. It's major features are:

Aircraft Self Shadowing
Anti-alias Aircraft Shadows On The Ground
Tree and Building Shadows
Dynamic Lighting
Environmental Reflections
Horizon Line Haze Blending
Eliminated In Cloud Square Border
Bump Mapping
Ability To Add Shading Textures To Aircraft That Don't Reference Them In Their Model File
Realistic Water Rendering
Cloud and Terrain Shadows
Adjustable Field Of View Angle
Adjustable Night Sprite Effects Levels
Searchlights
Tree Rendering with Alpha Transparency Effects
Dynamic Reticles With Variable Range Settings
Mouse Look
Mouse Scroll Zoom
Cockpit Lighting
Luminous Gages
Improved TrackIR Image Rendering
Multi-Processor CPU Management
Modern Rendering Optimizations
Cfs3config.exe No Longer Needed Everytime Video Drivers Update
Auto Generates MipMaps

These files are installed into the CFS3 root directory:
d3d8.dll
d3d8.ini
Optional - suneffect.xml

shaders30 Folder containing
Clouds.fx
Fog.fx
Generic.fx
GroundShadow.fx
Light.fx
Models.fx
RenderShadows.fx
Scenery.fx
SeaWater.fx
Skybox.fx
Terrain.fx
Texture.fx
TextureMagic.ini

Optional - effects\fxtextures Folder containing my modified water effects files
h2od_01.dds
h2od_02.dds
h2od_03.dds
h2od_04.dds
h2od_05.dds
h2od_06.dds
h2od_07.dds
h2od_08.dds
h2od_09.dds
h2od_10.dds
h2od_11.dds
h2od_12.dds
h2od_13.dds
h2od_14.dds
h2od_15.dds
h2od_16.dds

*** Warning ***
You must turn off Dual Pass Render, and turn on the High Resolution Z Buffer, and Disable Shadows. in cfs3confing.exe.

Z Bias Resolution should be typically be limited to 15. Higher values can lead to some rendering problems on some systems.

Z Bias Flat effects should be set to 25 to reduce flickering of the bomb crater decals.

The CFS3 Default Water Detail Texture Size is 5 and the SeaWater.fx settings in this package are preset to match. Using a different texture size will change the appearance of the wave dimensions unless you adjust the values in SeaWater.fx to match.
 
There seems to be a lot of misunderstanding about the relationship between AnKor's Shaders, and SweetFX.

AnKor's Shaders bring a quantum leap to the features and performance of CFS3 without changing the underlying artistic look of the game rendering. It can be used just as it is to full effect without any need to employ SweetFX in any way.

SweetFX changes the fundamental look of the game through various special effects, but will only work with CFS3 if AnKor's shaders are installed and working there first. Personally, I find very few of these special effects to be worthwhile, but a few do have merit if you are trying to do something in particular to CFS3 like sharpen the image, enhance the contrast, shift the color balance, or expand the brightness range.

Here's a list of the SweetFX effects you can activate in version 1.5.1:


#define USE_SMAA_ANTIALIASING 0 //[0 or 1] SMAA Anti-aliasing : Smoothens jagged lines using the SMAA technique.
#define USE_FXAA_ANTIALIASING 0 //[0 or 1] FXAA Anti-aliasing : Smoothens jagged lines using the FXAA technique. WIP - Currently only works in DX9 and you need to use the FXAA injector dlls.
#define USE_EXPLOSION 0 //[0 or 1] Explosion : Scatters the pixels, making the image look fuzzy.
#define USE_CARTOON 0 //[0 or 1] Cartoon : "Toon"s the image. (Interferes with SMAA, CRT, Bloom, HDR and Lumasharpen)
#define USE_ADVANCED_CRT 0 //[0 or 1] Advanced CRT : Simulates an old CRT TV display. (Interferes with SMAA, Cartoon, Bloom, HDR and Lumasharpen, and it has a very high performance cost)
#define USE_BLOOM 0 //[0 or 1] Bloom : Makes bright lights bleed their light into their surroundings (relatively high performance cost)
#define USE_HDR 0 //[0 or 1] HDR : Not actual HDR - It just tries to mimic an HDR look (relatively high performance cost)
#define USE_LUMASHARPEN 0 //[0 or 1] LumaSharpen : Also sharpens the antialiased edges which makes them less smooth - I'm working on fixing that.
#define USE_LEVELS 0 //[0 or 1] Levels : Sets a new black and white point. This increases contrast but causes clipping. Use Curves instead if you want to avoid that.
#define USE_TECHNICOLOR 0 //[0 or 1] TECHNICOLOR : Attempts to mimic the look of an old movie using the Technicolor three-strip color process (Techicolor Process 4)
#define USE_DPX 0 //[0 or 1] Cineon DPX : Should make the image look like it's been converted to DXP Cineon - basically it's another movie-like look similar to technicolor.
#define USE_MONOCHROME 0 //[0 or 1] Monochrome : Monochrome makes the colors disappear.
#define USE_LIFTGAMMAGAIN 0 //[0 or 1] Lift Gamma Gain : Adjust brightness and color of shadows, midtones and highlights
#define USE_TONEMAP 0 //[0 or 1] Tonemap : Adjust gamma, exposure, saturation, bleach and defog. (may cause clipping)
#define USE_VIBRANCE 0 //[0 or 1] Vibrance : Intelligently saturates (or desaturates if you use negative values) the pixels depending on their original saturation.
#define USE_CURVES 0 //[0 or 1] Curves : Contrast adjustments using S-curves.
#define USE_SEPIA 0 //[0 or 1] Sepia : Sepia tones the image.
#define USE_VIGNETTE 0 //[0 or 1] Vignette : Darkens the edges of the image to make it look more like it was shot with a camera lens. May cause banding artifacts.
#define USE_DITHER 0 //[0 or 1] Dither : Applies dithering to simulate more colors than your monitor can display. This lessens banding artifacts (mostly caused by Vignette)
#define USE_BORDER 0 //[0 or 1] Border : Makes the screenedge black as a workaround for the bright edge that forcing some AA modes sometimes causes.
#define USE_SPLITSCREEN 0 //[0 or 1] Splitscreen : Enables the before-and-after splitscreen comparison mode.

On my particular system, I found an odd issue with the CFS3 program code that prevents GSync from activating unless I have SweetFX running, and that only works if I have AnKor's Shaders installed first. I have SweetFX set up with all null settings so it's not actively doing anything, but evidently their d3d9.dll needs to be there for Nvidia's GSync to think it can turn on. GSync is an amazing piece of technology that lets me run at high frame rates without any screen tearing, so I took the extra time to configure SweetFX after installing AnKor's Shaders even though it serves no other purpose than being a signal to my Nvidia drivers to switch it on.
 
The key to getting JSGME to work with CFS3 is that the MODS folder needs to be outside of CFS3.
http://www.softpedia.com/get/Others/Miscellaneous/Generic-Mod-Enabler.shtml

I have a single copy of the JSGME program installed, and then created multiple desktop shortcuts for each of my 16 CFS3 install locations.

Open the shortcut and set the Target location to S:\JSGME\JSGME.exe (or wherever you have JSGME.exe located), and the Start In: to "C:\Program Files\Microsoft Games" (or wherever you have the MODS folder located for one of your CFS3 installs).

For the normal location C:\Program Files\Microsoft Games the MODS folder is at C:\Program Files\MODS.

JSGME will create C:\Program Files\JSGME.ini the first time you run the shortcut.

Its contents will look something like this:

[MODS FOLDER]
Name=MODS
[JSGME DETAILS]
FullPath=S:\JSGME\JSGME.exe
[FORM SIZE]
Main Height=529
Main Left=396
Main Top=693
Main Width=676
Main WindowState=0

Inside the MODS folder you will create folders that contain the modified files that you want to add or exchange with the originals.
At the top level (1) the folder needs to have a descriptive name for the individual mod. (For example 25 Feb 17 Shaders - Bob, Weather Mod - PTO, etc.)
At the next level (2) is a folder named the same as your specific CFS3 install. (Combat Flight Simulator 3, CFS3 PTO Rising Sun, DPC CFS3 Korea, etc)
The next levels (3+) are all the various files and folders that make up the mod itself. These need to be structured that same way they are in the game directories.

As you add and remove mods it will write a file at C:\Program Files\MODS\JSGME.ini (I know, using the same name again is confusing, but that's what the programmer chose to do)

Its contents will look something like this:

[DEPENDANCIES]
Feb 2016 Gunsight Shaders - PTO="25 Feb 17 Shaders - PTO"
[MODS]
New Composite Budgets - PTO - No Stutters=1
Weather Mod - BoB=2
Weather Mod - PTO=3
Feb 2016 Gunsight Shaders - PTO=4
25 Feb 17 Shaders - Bob=5
25 Feb 17 Shaders - PTO=6

Don't mess with the !BACKUP or !INSTLOGS folders inside MODS or you will destroy the ability to restore the original state of your game.

*** Once you've created the level(1) and level (2) folders in the JSGME MODS folder, you can directly unpack everything in the the zip file for AnKor's Shader package there to populate level (3+). ***
 
For those of you wanting to modify the color of the canopy glass posts #51, and #58 above describe how to recognize the section (diffuse color) of the m3d file that you would need to edit.

The first three pairs of that section are the color, and the last pair defines the level of transparency.

The trick is discovering the correct row/rows (there can be more than one entry) for the glass you want to edit. The colors are in B G R order, so for green glass you're looking for the second pair to have a higher value that the first and third, with a low value in the fourth pair to make it clear glass.

The type of drawing that precedes it is typically 00 00 FF 00, but that can apply to other situations as well so its not a sure thing that you've found the glass just because of that.

It's not always easy to figure out. For example, the new SJE_Typhoon_mkib_198q_44 has 75 7F 5F 35 (opaque blue green) starting at address 97C, and I changed it to 99 99 99 16.
 
Fix Recon Missions in Campaign Play

Campaign playing tips from days long gone (saved from a thread):

". . . Recon: There's a bug - the mission will always be a failure. "

IIRC there is a simple fix for the recon bug - the recon xml spawn files are faulty. You need to add the campaign mission objectives as per other campaign spawns, to the recon xml spawn files (no prob with the spawn table file). Without the objective, the spawns fail. Not at my cfs3 'puter otherwise would be more specific.
 
[h=2]Glass Reflectivity[/h]
Is there a way to use a hex editor to modify the reflectivity or transparency of the cockpit glass in an aircraft model?


Yes, I'm doing that constantly. The trick is learning what to look for in the pattern of numbers so you can edit the correct feature.

*** Always make a back-up copy of the m3d before you start! ***

The key to seeing the numbers is to have the editor set to show rows of 36 columns. This allows the section you need to find to stand out as all the patterns will start and end in the same vertical columns.

The section you need to edit is the table of values just before the list of texture file names. (These are referenced in the table by their sequence number in the list. Start counting from the first one being 00.)

In most cases, but not all, the glass does not have a texture number associated with it. The 8th pair will have some value less than FF (fully opaque). To check to see if I've found the right string of 36 pairs I will temporarily change the value in the 8th pair to FF and then look to see if the windows became opaque in the game.

My current default values for reflective glass are 00 00 FF 00 99 99 99 12 00 00 00 FF FF FF FF FF 00 00 7E 43 FF FF FF FF FF FF FF FF FF FF FF FF FF FF FF FF

The third pair being set at FF makes it reflective.

99 99 99 makes it light grey (BGR sequence) I don't find almost any WWII aircraft that actually had tinted glazing other than small pieces of thick bullet proof glass right in front of the pilot.

12 makes it fairly transparent. This is based on studying many images from the time period that show barely any cloudiness in the glazing, which would have inhibited visibility.

7E 43 is the maximum possible value (254) for the specular effect of sun glint. For painted surfaces I use 80 42 (64). https://gregstoll.dyndns.org/~gregstoll/floattohex/ Input floating values to get the hex code

If there was a texture associated with the glass it would be the next pair after the specular values. For AnKor's shaders to work with glass correctly there should not be any texture assigned to the surface, and occasionally I have to delete it to get the look I want. In most cases this was done inside the cockpit to display a fake reflection of the cockpit interior overlaid on the surface of the glass. The problem is that it's static, and never looks correct from any angle or lighting condition. I usually just kill the static version and let AnKor's shaders take care of it dynamically for me.

This desire for dynamic lighting effects has also prompted me to redraw a lot of exterior texture files, because prior to these new shaders the modelers had to bake the surface shading features into the texture (light on top, dark underneath). Unfortunately, depending on how the aircraft is maneuvering, this will look wrong most of the time. Additionally, this throws the shader calculations off as well (light colors are given more of a specular effect by the shaders), causing the inaccuracy to persist even with dynamic lighting in effect now.
 
Be aware that the Alpha layer trick to make objects invisible is not entirely compatible with AnKor's shaders. If the m3d has it's drawing mode set to take advantage of a reflection map texture then the alpha layer information in the main texture will not be interpreted as being transparent (they'll be the original color of the texture). Knowing this can save you a lot of headaches when you try this trick and it doesn't work for no apparent reason.

Also, the surface may not be reliably invisible if viewed from the back side (looking in the same direction as the surface normal of the poly). This can be see in the extra windows I added to the C-47 to create the Japanese L2D3 Tabby. Looking in the window on one side reveals the back of a solid surface where the matching windows are on the opposite side of the fuselage. Spin around to look through the windows on the other side and you'll see the same effect from the opposite direction.
 
Back
Top