Lockheed Electra Model 10

aleatorylamp

Charter Member
Hello folks,
I have been toying with the idea of buiding a Lockheed Electra Model 10, firstly because Smilo suggested building one after I finished practising a bit of AD2K with the two tutorials under his guidance, and secondly, because it would be a good extra opportunity to use Ivan´s interesting new 2-pitch propeller, for a Lockheed Electra Model 10A.

It could also be a good opportunity to build a detailed, fully animated model with AD2K, but only if the "manual Z buffer" sequencing technique could be undertaken by Smilo, as I feel quite incapable of doing something so complicated by myself.

The other possiblility would be to supply a not-so-animated AF99 model, but built as cleanly as possible using building techniques to the best of my knowledge that I have learnt from Ivan, with a SCASMed virtual cockpit, which wouldn´t be bad alternative at all!

So, this project could start with the Lockheed Electra Model 10A as a basis, and then also provide a Model 10E, the one flown by the famous Amelia Earhart. This one had more powerful engines and CV propellers and long range tanks.

The Model 10A was powered by 2 P&W R-985 Wasp Junior SB engines with single-speed superchargers, providing a maximum of 450 Hp at 2300 RPPM for take-off, and giving 400 hp at 2200 RPM upto critical altitude of 5000 ft. Apart from the restly already known but scarce performance specs, I have found an interesting historical article from a flight magazine that quotes a few additional performance details.

Now we know the following:
--------------------------
> Take-off power: 450 Hp at 2300 RPM.
> Lea Level Max Speed: 202 mph.
> Max Speed: 215 mph at 8000 ft.

> Continuous power upto 5000 ft: 400 Hp at 2200 RPM
> General cruise speed: 190 mph
> Cruise speed at 5000 ft: 190 mph at 2000 RPM.

> Max RoC of 1350 fpm (I haven´t tested this yet).

Making the necessary adjustments to the flight model´s engine and airframe parameters, I have arrived at the following results, which are not perfect yet, but would be quite usable, I suppose. Increasing performance a bit for 500 ft, as it isn´t really S.L., would give a bit more at 8000 Ft, at the price of a slight unwanted peak at 5000, because at the moment, 8000 ft performance really happens too soon at 5000 ft...

Maximum speeds:
----------------
_500 ft: 202.0 mph, 450 hp, 2296 RPM
5000 ft: 214.0 mph, 471 hp, 2436 RPM
8000 ft: 207.8 mph, 424 hp, 2412 RPM

Cruise speeds:
_500 ft: 190.9 mph, 399 hp, 2198 RPM, 93% throttle
5000 ft: 190.8 mph, 377 hp, 2410 RPM, 86% throttle
8000 ft: 190.0 mph, 364 hp, 2277 RPM, 85% throttle

Hello Ivan,
I know you are very busy indeed in your paint shop, with the textures on your Ki-61.
Consequently I don´t expect an answer or any comments on these performances, at least not for the moment.
There is time enough for that in the future, if you feel so inclined, so please don´t feel obliged to do so.

Cheers,
Aleatorylamp
 
Max. MAP 34.5" - performance closer.

Hello All:
I just came across another gem of information on the performance of the Electra, namely a performance/consumption table stating that a maximum manifold pressure of 34.5 inches of mercury was maintained upto critical altitude. I had had it a little higher from the Condor´s engines, for want of more exact information.
So, correcting that and increasing Boost Gain ever so slightly, and also compensating the S.L./500 ft power difference, I got it a bit nearer to the specified 215 mph at 8000 ft without getting excessively fast at 5000.
Now it is just 3 mph fast at 500 ft, and just 2 mph slow at 8000 ft, but these differences are probably negligible.


Max. Speeds:
_500 ft: 205.4 mph, 452 hp, 2307 RPM
5000 ft: 215 mph, 462 hp, 2426 RPM
8000 ft: 213 mph, 436 hp, 2444 RPM

Cruise Speeds:
_500 ft: 190.6 mph, 390 hp, 2198 RPM, 92% throttle
5000 ft: 190.1 mph, 362 hp, 2218 RPM, 84% throttle
8000 ft: 189.7 mph, 351 hp, 2253 RPM, 80% throttle

For the time being it seems as close as I can get!

Maybe I´ll start building the model at the weekend. My fingers are already itching.
I still have to decide with what, though... AF99 or AD2K, that is the question!

Cheers,
Aleatorylamp
 
Last edited:
Further improvement!

Hello Folks,
With the hope of not boring everyone, I thought I´d continue trying to get the numbers to coincide a bit better.


Having noticed the previous improvement higher up after adjusting Boost Gain, but also the greater speed lower down, I thought I would try and get it a little faster higher up, but also a little slower lower down, hoping to maintain Critical altitude at the specified 5000 ft.

So I raised Zero Lift Drag by 1, and increased Boost Gain a little as well, and I got even better maximum performance results:

_500 ft: 202.8 mph, 453 hp, 2300 RPM, 34.5 MAP
5000 ft: 211.0 mph, 460 hp, 2415 RPM, 34.5 MAP
8000 ft: 215.0 mph, 456 hp, 2477 RPM, 33.3 MAP

This pretty well coincides with the available specs.
Cruise speeds fit in nicely too, with some minor changes as regards required Hp and MAP to maintain typical 190 mph:

_500 ft: 93% throttle: 190.3 mph, 397 hp, 2194 RPM, 32.2 MAP
5000 ft: 86% throttle: 190.7 mph, 380 hp, 2248 RPM, 30.0 MAP
8000 ft: 82% throttle: 190.4 mph, 369 hp, 2284 RPM, 28.7 MAP

I think I´ll start building now... Enough numbers for the moment!

Cheers,
Aleatorylamp
 
Last edited:
RoC too weak perhaps?

Hello again,
I was already getting afraid of this, because matching the .air file as closely as possible to specs seemed to be going too well! Rate of climb seemed was a bit low, hardly 900 fpm below 2000 ft, and getting worse further up.

At first I thought I had to play around with the airframe, to get better lift out of the wings, which arguably could be possible, but I couldn´t manage an improvement there - but there could of course be a trick I don´t know about!!
Increasing the size of the propellers to 9 ft is no good because it drops RPM by more than 200, and t
he 8.21 ft propeller was actually not too far off reality, because I found another similar aircraft using identical engines with 99 inch propellers:

BEECH E18S AIRCRAFT SPECIFICATIONS:
Powerplant Pratt & Whitney R985
Horse Power @ RPM 450 @ 2300 RPM
Propellers Hamilton Standard
Propeller Diameter 99 in.

So, 8.25 ft has improved things: Below 2000 I can maintain 1000 fpm and 150 mph or so, which seems OK. However, from 2000 to 3000 it´s only 500 fpm, at about 130 mph. Perhaps this is normal? Maybe now it´s OK....

The 8.21 ft to 8.25 ft prop diameter increase has made a noticeable difference in RoC, but the 2300 max RPM I was getting at 500 ft have gone down to 2290 RPM. All in all, it´s better than before.

Cheers,
Aleatorylamp
 
Last edited:
as always, how you build your model is up to you,
but, i have to admit to being flattered by your offer.
truthfully, a cooperative project was my dream
for many years and, i have to say, i am intrigued.

here's the rub, or, rubs, as it were.
-i have forgotten most of the ad2k building techniques.
(not that i couldn't relearn them in time)
-my xp development computer bit the dust.
meaning, i will have to scavenge parts
and build another...again, doable with time.
-my main monitor is crapping out.
it's okay for reading texts and such,
but, is worthless for detail work.
of course, the remedy is buying another,
which i am less than ecstatic about.
-and finally, there is a time constraint.
i have irons in the fire that can not be ignored.

so, there are the negatives.
BUT, as i said, i am intrigued.

how about this option;
build the model in af99.
(are you aware that af99 parts
can be imported into ad2k?)
(also be aware, structures
and components are a problem)
anyway, when building the model,
ignore the parts limit.
make the thing ultra complex by af99 standards.
get around this by building
individual af99 models
of the inner and outer wing, the tail section,
the nacelle, the fuselage and so on.
each at 0,0,0 for easy viewing.
you get the idea, right?

as i said, i'm intrigued.
apparently, more so than a little.
we shall see how it goes.

that's enough for now,
the band is playing tonight
and i have to go get ready.
 
Then with AD2K shall it be!!

Hello Smilo!
The band is playing tonight, that will be great fun!

The problem is not really actually building with AD2k, but the sequencing, and this will have to be done even if I build with AF99 first - even in sections, as you conveniently suggested.

The AD2K building style itself, with the bulkheads and facilities offered in AD2k, will be in fact much easier and is quite attractive, so if you are still game to give me a hand with the sequencing, then I´ll be very pleased indeed to build the Electra with AD2K!


So, this will be great fun too!

...and I wish you luck reviving the required old hardware!
Incidentally, have you tried Virtual Machine Player to install WinXP onto a Windows 8.1 computer? It has worked for me, and I can build and test models there, although Hardware Accelleration for the graphics card won´t work, but so what! Then I transport the model via USB-stick over to the normal computer with the normal CFS installation.
Cheers,
Aleatorylamp
 
Last edited:
Hello NoDice,
Thanks for your concern!
The AD2000 I used for the tutorials Smilo helped me with some months ago actually came from thefreeflightsite.
I won´t be needing AD2002 and the corresponding fix for the moment, but I´ll keep it in mind for a future possibility.
Let´s see how it goes!
Cheers,
Aleatorylamp
 
Hello No Dice,
Yes, I´ve got Smilo´s Arado, and it is impressive, to say the least.
I remember trying to make AD2k2 work on my computer when I was doing the tutorials, but wasn´t successful - I think it was because it tries to put the compiled plane into FS2002 or CFS2.
Or maybe it´s the Data Fix that cures that... I´ll have to check again, just in case!

OK, I´ve just installed AD2k2 + the Data fix, and it appears to work. I haven´t built anything to compile yet, so I haven´t got that far yet.

What it does say in a little window, is that any AD2000 sequencing code is not valid and ignored in AD2002, so I don´t know how the bleedthroughs can be eliminated for CFS1. As it is meant for FS2002 and CFS2, it wouldn´t need it for those sims, but for CFS1, there´s no way around the sequencing because CFS1 has no "Z"Buffer. That´s why I can´t see how something built without the Sequencing Code could work for CFS1.

Cheers,

Aleatorylamp
 
you are absolutely correct, Stephan.
there is no z buffering in cfs1.
all sequence coding must be done by hand.
the process is tedious, but worth the effort.
that is, if a bleed free cfs1 model is a priority.

the advantage to having fs2000 installed
is when a test model is compiled and viewed
in fs2000, you can quickly see
how the new parts will line up
before going through sequencing.
i think it's a real time saver.

about the building in af99 suggestion,
the reasoning is in case i drop the ball,
you would already have more than enough
parts to build a less complex af99 model.
that said, i encourage you to try ad2k.
true, it has it's failings, but, it has potential.

thank, you for the hardware suggestions.
i have several old machines laying around.
what i really need is motivation
to dig one out, fire it up and see what happens.
i'm sure i can get one to work.

my main concern is the data on the machine
that went tits up. i hope i didn't loose it.
there's years of stuff buried in there.

the other major problem is my failing eyesight.
for years, i've used a 48 inch tv
as the development monitor.
it's very nice for those gnat's ass size parts alignment.
well, my big screen is crapping out
to the point where is useless for development
and i'm adverse to spending the kind of money
they want for a new one.

not that i would ever consider buying one,
but, i was in costco the other day
and saw a 60 inch model for $3500....plus tax.
i was floored. who buys such a thing?
obviously, some people have more money
than they know what to do with...not me
 
Hello Smilo,
I´m just preparing the 3-view drawing print-outs with scales on them to get the sizes and dimensions right, because it helps a lot when making the parts on-screen.

What I found quite attractive during the tutorials as regards AD2K building itself, is the rendering ability for shapes using different bulkheads - similar to AF99 structures but with more bulkhead building possibilities. ...and, the whole point of using AD2K would of course be to pull a detailed, fully animated and bleed-free model out of the hat!

Then I thought that the project would start out, divided into 4 main assemblies:
- fuselage incl. cabin and nose
- left wing + engine +wheel
- right wing + engine + wheel
- tailfuselage + horizontal stabilizer + vertical stabilizers + wheel

And then hopefully go for some detailed and ambitious goodies:
- flight deck interior
- passenger cabin interior

I think I´ll avoid the oil smudges on control-surface hinges, though...

We´ll see what we are able to do!

As regards old machines laying around, once you get one of them working, the hard disk of the broken one could be installed as a slave so as to retrieve all your valuable old data, but I suppose you already know that.
You should also be able to pick up a reasonable flat-screen monitor at a reasonable price. Nowadays they have come down in price quite a lot. Anyway, good luck with all that!

Cheers,

Aleatorylamp
 
hello Stephan,
using the old hard drives
as slaves is my hope.
i'll start on that process today.
(along with everything else on the plate)
we shall see how it goes.

the monitor issue is another kettle of fish.
i'm not sure how i'll deal with that, yet.
again, we shall see.

of course, it's your project,
but, if it was me, after building the flat
side, top and forward layout views.
i'd divide it into cockpit/nose,
mid fuselage/wing root, and maybe, inner wing.
nacelle, then outer wing
right or left doesn't matter, it will be mirrored.
and finally, the aft fuselage with stabilizers.
again, only the left or right horizontal.
each being a separate assembly
to cut down on file size and confusion.

also, if something goes wrong,
and it invariably will, everything won't be lost.

in final construction, all assemblies can be added
to the main project saving a ton of resources,
but, still have a complex model.

as i said above, it's your project,
so do as you please.
i merely make suggestions.
 
Hello Smilo,
OK, thanks for the tip.
So then: fewer sub-asemblies in each assembly and more assemblies in the project. Eeasier to oversee... makes sense!

I´m just doing the mid-fuselage bulkheads. At the flight deck and at the aft passenger cabin it´s slightly less high than in the middle - that´s clear enough, but one drawing has parallel mid-fuselage walls and another has them slightly bulging in the middle where the wing is thickest. Now I have to look at as many photos I can to see which is correct.

Typical inconsistencies with drawings!

Cheers,
Aleatorylamp
 
Hello again,
It appears that there were a couple of inches more fuselage-girth at the point where the wing is the thickest, coinciding with the highest point on the slightly rounded fuselage back, so I ´ll apply that. Aerodynamically it would of course also make sense.

One of the detailed seemingly most exact diagrams I was starting to use, shows completely straight lines for fuselage sides in the wing section, but all others, also plastic airplane model decal diagrams, show elongated drop-shaped fuselages.

Then, there´s the question of deciding where to put he horizontal datum line for the CoG/Centre of Rotation:
A) Aligned with the propeller axels, rather low in the wing-profile, but centred with the wing root profile. Motors, fuel tanks and baggage compartment under the floor being the heaviest zones, would make this more logical, but would this not be uncomfortable for passengers during banking manouevers?
B) Aligned with the nose-point, putting it slightly above the centre of the engines, at the wing top surface there - banking movement would be better for passengers.

Cheers,
Aleatorylamp
 
More discrepancies!

Hello yet again...
It´s getting more incongruous all the time. Upto now the differences were
only minor. The vertical scale shows itself as even more inconsistent than
anything else! Fuselage thicknesses seen from the side vary by upto one
whole foot, depending on the drawing!

It´s amazing how much garbage is published on the internet. At the same
time it can be regarded as the 8th wonder of the world since the library of
Alexandria, it is also the largest toilet in the world.

It´s just as well all this incongruency has cropped up when all I´ve done is
3 fuselage bulkheads...

More rummaging around for correct data is mandatory before anything else.

Update:
OK, no problem! I´ve found one or two that look quite exact, coinciding with
a couple I´d
already got. Fuselage height is NOT 5 ft - that´s the specified
cabin height (inside).
This must have been the origin of the bad 5 ft. vertical
fuselage thickness on the
diagrams from at least 3 different sources, 2 of
which seemed the most reliable at first.

It just shows, we have to keep on our toes all the time.
No rest for the wicked...

Cheers,
Aleatorylamp
 
Last edited:
....and now you know why,
you are doing the research
instead of yours truly.
odd that i don't have
the patience for it,
but yet, enjoy the tedium
of parts sequencing.

to each his own, i guess.
 
Hello Smilo!
Ha ha! So it´s just as well that teamwork exists.
Anyway, I´m printing out the new plans, and hopefully
I can post a picture of the first fuselage section soon!
Cheers,
Aleatorylamp
 
The mid-fuselage: AD2K´s Shaping Art!

Hello Smilo, hello all!
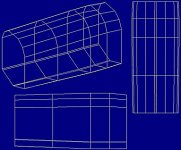
So... here´s the first fuselage section of the new Lockheed Electra Model 10, going from the leading edge to the trailing edge.

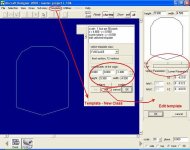
It took two tries to get the fuselage bulkhead template shapes right. I found it´s best to define a main one (at 0,0,0, for example) in "Template-New Class", with its number of points, position and size, and then shape the cross-section in the "Edit Template" Option.


After that, successively copy the bulkheads into subsequent positions fore and aft of the main one, re-sizing each one in height and width, and positioning correctly, without altering shape each time to avoid deformations. Corrections in width, after automatic width calculations after height changes, will of course be necessary.


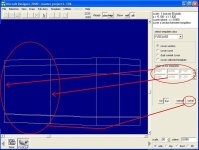
Then, cover each additional section with panels with the "cover template" option, being careful to have the correct templates selected in the corresponding windows!
Beware: Any editing of a bulkhead´s shape after this is possible, but may cause severe shape problems!

On the screenshots, the front is on the right, and would be the forward part of the passenger cabin, and where the flight deck would start.


I think I´ll add the wing roots to it and have that as the central assembly for now.

Cheers,
Aleatorylamp
 

Attachments

  • Making template.jpg
    Making template.jpg
    80.9 KB · Views: 0
  • Cover template.jpg
    Cover template.jpg
    78.4 KB · Views: 0
  • Midfuse-1.jpg
    Midfuse-1.jpg
    47.1 KB · Views: 0
Back
Top