• There seems to be an up tick in Political commentary in recent months. Those of us who are long time members of the site we know that Political and Religious content has been banned for years. Nothing has changed. Please leave all political and religiours commentary out of the fourms.

    If you recently joined the forums you were not presented with this restriction in the terms of service. This was due to a conversion error when we went from vBulletin to Xenforo. We have updated our terms of service to reflect these corrections.

    Please note any post refering to a politicion will be considered political even if it is intended to be humor. Our experience is these topics have a way of dividing the forums and causing deep resentment amoung members. It is a poison to the community. We apprciate compliance with the rules.

    The Staff of SOH

  • Server side Maintenance is done. We still have an update to the forum software to run but that one will have to wait for a better time.

Model Converter X Question and Help

expat

Charter Member
Hiroshi, the very talented modeler of POSKY, SkySpirit and now TDS made a nice FS9 model of the 767-100 series, a plane that was initially ordered by an airline but was then cancelled. Not a huge tube liner fan but I like the model and think it would make a great ultra long range BBJ that could also access medium length fields. I tried using Model Converter X to change it to a native FSX model, so it can be merged with a decent VC (default 737 or JF Freemium 757 vc) however I am not sure what to do and the output I exported did not appear in the sim. I have successfully created a scenery bgl from the USS Oriskany model, but that is a different process. I see Lazarus and other members here have started converting a growing number of freeware FS9 models successfully. Any suggestions?

Model (with winglets) is here: http://ssp.cyber-ninja.jp/

 
OK, I'll bite- bearing in mind I don't know what I'm doing on a good day...:stupid:
I also don't know what you're doing, so...

I'm presuming you've Henk's mdl definitions installed? That's first off, you have to have the updated animation definitions, or your're dead in the water at the jetty. The other utility needed is RADitor to re-set the model radius.
If you've got the animation definitions updated, and a export with functioning animations showing up in MDLX but no model in sim, you've probably missed re-setting the model radius, and the model viewing distance is ten miles plus, you won't see it in the selection window.

http://www.fsdeveloper.com/forum/resources/raditor.120/


Radius being the external eye point distance from centroid...I suppose
X, Y and Z radius- X being span left/right from centroid, Y being length fore/aft from centroid, Z being height below/above the model center.
Typically in a converted FS9 model, you will see a radius like 1845.235, or some huge number, similar values in the X,Y,Z.
I'm bloody lazy, so I'll grab a rough eye-ball radius of 8-15 for a small-medium fighter sized model, 20+ for larger models. Check Mitre 10 Catalogue and Officeworks Catalogue. I suppose the X,Y,Z should conform to the dimensions of the aircraft, plus some fudge factor. I usually just blork in the radius number for X and Y, half the value for Z, 70% of the value on the up side, 30% below.
A Essex pointed out, the interior model radius should be the same as the external model radius.
For a 767 try a radius of 33, X= -33+33, Y= -33, +33, Z= -10, +23

That seems to work for radius, and nobody's complaining...yet.

I'm down for a C check and a TX'd fan, so I'll keep an eye on the thread, get some turn around on this.
 
Lazarus, appreciate very much your taking the time to respond and explain what is involved in detail. Sadly, this is going to be way above my skill level!
Regards,
expat
 
No, it's not. It's just poking buttons. Though I'm almost violently opposed to riding in the back of a tube - a dreadful chore, as uncomfortable and un-enjoyable as an iron maiden, sans whimsy- I'm going to load that one up and were going to go through it step by step. Like the fat kid from north korea, building a bomb is easy if somebody else has done the skull sweat first!
View attachment 36597
 
Lazarus, could be so kind as to point out where to obtain the new mdl defs? I would be super interested....I'm like you just poking around, but I would love to understand a bit more how to use MCX as well. I thought I understood it well enough, but recently started getting animation linkage errors during export....so obviously I'm missing something!
 
Monkey looks super-glued to one of the 1960's Estes Rockets kits I used to drool over in their catalogue!

OK, will try to keep up widge ya but some of it sounds a bit out of my band width.
 
Gonna follow along with this as well. I have a low-level working knowledge of MCX as I use it for converting 3D scenery objects for use in my scenery. I would enjoy being able to "Nativize" some aircraft of my own too, so we'll see how long it takes me to cry "Uncle", lol
 
Okay...lets get hacking....

View attachment 36613
Everybody has model converter installed and pointed at the SDK? Henk's mdl def XML there, it goes in the SDK, just as the file structure of the nested folders.
Back up your existing XML, or move it to a spare folder, as you wish.
Fire up mdl converter.
View attachment 36614

Lets try something simple that most folks here can get into, the Alphasim A-3B. One is floating in the library, but it's a bit of a mess.
Click the import button top left...
View attachment 36615
Should look like this.
Open the A-3B model, the converter will grind and smoke for a moment, and a dialogue window pops up and asks for your wallet...kidding.
View attachment 36616
the variables need to be set. The 'gen model' number tells the converter which model in the file to read. 1= reads the VC, 2= reads the external model. I don't know what difference 8000 makes, it still reads the external model (see monkey picture) Leave 'gen model' at 2.
g_light_states tells the converter which attached lights and presumably, effects to read. For this model, 0=none, 1=nav lights, 2=VC landing light (?) 3= landing light, 4= I don't know (see monkey picture), 5= all attached lights. This one still goes by me- you have to set the conditions for the lights and I don't know how, so the damned things stay on all the time...Maybe we can smoke out a solution.
Hit the 'set' button
View attachment 36617
The converter spins round like a fruit machine, some smoke comes out, don't be alarmed....then you should see this.
View attachment 36618
 
I forgot to mention, the little paper clip icon shows attached objects...
By now you have noticed the opaque glass. A couple of the materials need editing in FS9 models.
Click the material editor, the button highlighted in blue...
View attachment 36619
A window will come up...scroll down on the left and click on glass_t. You may have to edit the alpha channel of the bitmap or DDS in DXTBMP.
View attachment 36620
At the top right of the material editor is a selection window, pull that down and select 'default transparent'. There's a bunch of other stuff for all the reflections and this and that that needs a bunch of fiddling...that can be done latter. Lets keep it simple and leave it the way it was, the glass texture assigned as spec. On this one, it comes out nice and shiny.
View attachment 36621
One reason for using the A-3B is, I've already found most of the un-features. One odd one on some of the old Alpha-sims is the interiors read transparent through FSX glass, so you'll have to click on each of the interior textures for the cockpit and assign 'default opaque' to them, otherwise, you have a glass-bottom plane. (see monkey picture)
View attachment 36622
So you should end up here, clicking on the little clapper-board icon, highlighted in blue. This is where the new mdl def XML file comes in.
I'm going to take a break for a few, let folks catch up a bit, make the Dog some breakfast (before his gut caves in on his backbone, from the expression he's giving me)
 
We've clicked on the animation editor icon (the clapper board), and a menu window comes up
View attachment 36624
The long list at the top is the list of animations in the model. Now we have to go down the list, and change the FS9 animation definitions to the new MDL X definitions.
First, you have to isolate the animations. We'll start at the top of the list with 'c_gear'. Beside the 'select name containing' button is a window with 'gear' in it. double left click to highlight that, and type in 'c_gear', then hit the 'select name containing' button. onlt the boxes for 'c_gear' should be checked. You can wiggle the slider or hit the 'play' button to see the animation.
View attachment 36625
To the right of the 'assign animation type' button is a window that says 'action 1'. Click the arrow to expand the list. These are the new animation definitions. Scroll down, and click on 'c_gear'- that's the nose gear retract and suspension sequence, bty. Now the window should read 'c_gear'.
View attachment 36626
Now click the 'assign animation type' button.
View attachment 36627
The converter does it's fruit machine thing, and the list comes back with 'c_gear' checked. Then to the next item on the list, 'lever_stick_l-r'. Type 'lever_stick_l-r' beside the'select name containing' button, hit the button to check off 'lever_stick_l-r', scroll down the list beside the 'assign animation button', select 'lever_stick_l-r', and assign.
Always check you have the animations you want-watch the syntax. If you mess up, the yellow arrow icon pointing left will undo the last action once. A second goof will usually mean starting over, or sorting through animations by hand to unsnarl any untended changes.
View attachment 36628
And so on down the list. Another reason for using the Alpha A-3 is most of the animations are one for one swaps, with no guessing at which animation goes where.
Usually, it goes like this. Some times, it's guess and test until it works. Some models have 600 listings of 'unknown', and you are going to go through one box at a time and wiggle the slider to identify which 'unknown' belongs to which part and animation.
 
In this case, there are 3 'unknowns' in the external model, all for the nose gear steering. Select these, and assign 'Rudder_pct_25_reversed'.
View attachment 36629
the other guessing game tag is 'usrvar', or user variable- the rudder. Assign 'Rudder_FS9_360' to this one.
The C_tire, l_tire and r_tire are assigned the C, l or r_tire_blurred_key.
elevators and aileron seem to like elevator_pct_25 and l_ or r_aileron_percent_25.
F-canopy is the crew door, 'door_0'. Bomb bay is 'visor', I changed it to 'door_1'
Spoilers, tailhook , wing fold, leading and trailing flaps are apparent.
When you get to the end of the list, check over the animations, make sure you have everything changed over.
 
Last edited:
OK. Almost ready to export. Next, we need to assign a new name and guid number to the model- you can skip this part, and the model will keep the original name and guid- possibly causing confusion latter.
View attachment 36630
Click on the magnifying glass icon, 'model information'.
View attachment 36631
Click 'edit', amend the file name, click the 'assign new guid' button, the converter does its thing, and a new guid pops up. The new name is now set, and the model reads as such.
View attachment 36632
Select the 'close' button in the 'model information' window. Now it's time to export. The export button top left, next to the import button. Hit it.
View attachment 36633
You get a window with the model name and type, all self explanatory. We want to export as an FSX MDL object. (*.MDL)
View attachment 36633
The converter grinds away, the little whirly thing in the lower left corner spin-cycles. When it stops, you should have a happy little light bulb down there (not there!)
View attachment 36630
Before you exit, manually go to the model folder and make sure you got a model file with something in it, but you should not have gotten any error messages. Should be about 5.4Mb. Then open the new model in the converter and see how it looks.
Now, the VC...
 
Last edited:
Radius and VC

Now we need to set the radius with RADitor. Dead easy. I guess everybody has RADitor installed- see top of thread, D/L and install. Run it, and a window comes up.
View attachment 36646
Point it to the newly converted file, hit the small select button, then the read button. You will see some huge number in the radius window and bounding box window. Double left click on each in turn and change to match the picture values. You can increase or decrease to suit your tastes, but the VC model should have the same radius and bounding box latter. Hit the the 'write' button. That's it. You should now have a basic MDL X A-3B ready to go.
Now, the VC. Hit the import button on MDL converter,
View attachment 36647
select the FS9 A-3B. The model dialogue window will pop up.
View attachment 36648
You will want to set 'gen model' to 1, lights state to 5 for the VC landing light. (You can use the converter to remove or edit those latter by hitting the wrench icon for the attached object editor.) Select set, the converter fruit machines for a moment, and...
View attachment 36649
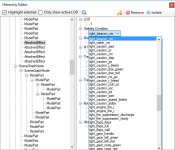
The VC come up. Select the material editor. Each of the $VPANEL place holders is selected and assigned 'default transparent' in turn.
After those are adjusted, select the animation editor (clapper board) icon.
View attachment 36650
This is a short list, so start at the top again, you can manually select these. These are going to be changed to the lever commands. There is the lever stick fore and aft, lever stick left and right. The tail hook lever is on the left side of the pedestal- pilots right hand. The 'unknowns' are the throttles- left lever becomes 'lever_throttle_0', right becomes 'lever_throttle_1'. Two 'unknowns' are the rudder pedals, those have 'lever_pedals_l_r' assigned to both. The last two are 'lever_landing_gear' on the right pedestal, the lever that looks like a gear leg and wheel, and 'lever_flap' on the left corner of the pedestal, f_canopy -s 'door_0'. Select one at a time and wiggle the slider. This one is easy. A cockpit with zillions of switches is a major PTA.
Select the 'object information' icon (magnifying glass) hit edit, change the name to A-3_interior_X or something, hit the 'set new guid' button, close the window, and export.
Run RADitor again, set the radius and bounding box to the same values as the external model, hit the write button.
Now, amend the model config file as you would for any FSX model- eg:
normal=A-3B_X
interior=A-3B_int_X.
Load up the sim, see if it works.
This is the tedious part. Find any miss features, note those, exit, go back to model converter, adjust animation definitions, export a new model. Note. Export with a new name so you don't overwrite and loose your original. You must also reset the radius every time you export a new model.
Test again.
I'll save you some time. The one un-feature I found is the left main wheel refuses to rotate. It could be a contact point glitch, I'll have to look, or I might have screwed up. If not, try 'tire animation' assignment, or assign it to the 'right tire blurred'.

View attachment 36644

:encouragement:


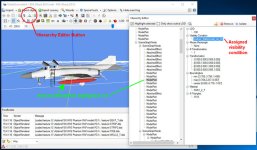
Addendum-de-dum-dum. I ran the 767-100 through the gizmo, just to have a look at it. As I thought, its got all this yellow stuff glommed around it on visibility conditions. That can be done, Henk seems to have that by the face. It's just a bit more complicated. Say, like tying your outflow valve to your uvula the long way 'round.
The nasty, lazy way I favour is to sand off the offending bit's with the material editor and hierarchy editor. You can isolate (sometimes!) parts, highlighted in red, and remove them.View attachment 36655 Easy.
Then...
View attachment 36656

So. This would be a (Sisyphean) labour of love(?). Then hope you don't get an aptly named 'main ARG string error' - which is when you scream ARRRRRRRRGGGGG!... And unload eight rounds of .45 ACP into the laptop...
 
Last edited:
Thanks for this tutorial Lazarus.

I often wondered what the steps were, I have dabbled a bit with MDLX but never managed to get the animations working.

Looks like I need to go thru your tutorial in detail to help me understand.

Gavin
 
This is a great tutorial. When the present subject is complete I'll add it to tutorials:applause:
 
"We'll do a tutorial, provided the model doesn't have some weird ground equipment on visibility conditions- still have not been able to wrap the skullbone around that..."

OK, let me explain how visibility conditions work. Any part of the model (or attached object like a light effect) can have a visibility condition tag which controls the visibility of the part in the sim. The conditions under which the part is visible or hidden are xml coded in a similar way as animations. Visibility conditions types are also stored in the ModelDef.xml file, you can recognize them in the ModelDef.xml file by the tag "Visibility<visibility></visibility>" (vs. animations which are tagged "Animation"). The possibilities are endless, let me just mention a few:

- Show drop tanks, missiles or bombs only when the correct weight is entered in the FSX Payload Mgr (see 2nd screenshot example).
- Show/hide modeled vapor streaks or drag chute
- Switch an aircraft light on/off
- Hide AI aircraft crew figures when the engine is not running
- Show/hide ground equipment

This is how you assign a visibility condition - assuming you already have the MDL file opened in MCX:
1. Click the Hierarchy Editor button on the top menu, this opens up the window as in the screenshots below.
2. Find the ModelPart or AttachedEffect which you want to assign a visibility condition to and click on it. In the 1st screenshot example I chose a beacon light AttachedEffect, in the right pane you will see it's properties. If the ModelPart/AttachedEffect does not yet have a visibility condition, the condition type under the "Visibility Condition" node has value "None".
3. Click on the "Visibility Condition" value to open the list box which shows all visibility condition types which are stored in your ModelDef.xml file.
4. For the beacon light, I selected condition type "light_beacon_vis" (this links the beacon light effect to the FSX beacon light key command).
5. Close the Hierarchy Editor.
6. You now can export the MDL as FSX MDL object.
7. Set the radius/boundaries with the MCX MDL Tweaker which is under menu item "Special tools" > "MDL Tweaker" (works the same as the Raditor tool).
 

Attachments

  • mcx_he1.jpg
    mcx_he1.jpg
    155.9 KB · Views: 12
  • MCX_HE2.jpg
    MCX_HE2.jpg
    111.8 KB · Views: 12
Last edited:
Excellent! Thanks Henk, that made sense. I've just sorted out glass and reflections, and am making up the next set of flashcards for that, then we'll tackle lights. Give me a year or so, I'll catch up!
 
Back
Top