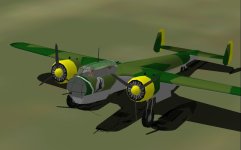
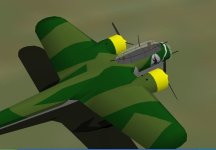
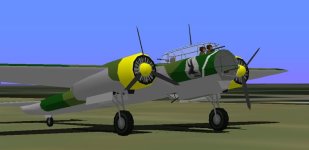
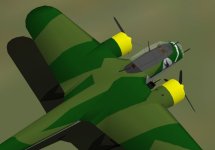
Project Dornier Do-17z2

Hello Ivan,
I hope your computer adventure takes you to a happy ending, and that the chain of coincidences that caused the problem will be followed by another with more positive results!

You will see that it is actually quite simple to set up VMWare. After deciding on the size of the virtual hard disk and the RAM allocated - I did 10 Gb HDD and 1 Gb RAM - you format the virtual HDD and install Windows XP from its CD. The CD was why I got a laptop with a DVD reader/writer (there was a faster one with 2.0-3.3 Ghz speed for 75 Euros more, but no DVD reader/writer). I understand there´s also a way of setting up from a USB stick with Windows XP CD image, but I didn´t bother.

Anyway, the Dornier:
I´ll go with your proposal for the 4 guns in the Dp files. The chin gun would probably be the fixed forward one with longer range?

On the real aeroplane, with 6 or 7 guns like on a gunship, they should have had at least 3 more gunners, but they just had them jumping around. Not effective at all, as you say!


Then, you are completely right about the limited choices of bulkheads for structures - a lot of them are useless anyway, and stupidly, a couple of more obviously useful ones like a) a keystone with a rounded top, or b) a trapeze or c) a flat-based pentagon have stupidly been omited, but anyway...

About the crew: Without one, you wouldn´t really need transparent windows, so those could be just grey-graded shading, saving lots of trouble and resources... Or possibly you mean leave just the pilot, and imagine the rest of the crew are bent down or something... The resources I used up with the extra crew members could perhaps come in quite handy for a couple of other things... Although these will not free any components - they are all structures.

For the moment, the result is quite satisfactory, but I am open to any additional ideas you may have.
I know your version of the aeroplane is going to rely on SCASM, but you know that will not be so in my case.

Great fun anyway!
Cheers, and thanks for your input.
Aleatorylamp
 
Resource Efficiency and improvements

Hello Ivan,
We mentioned resources... and I have just found out that I have one free component left! Now it´s bugging me to increase resource efficiency, and how to go about it.

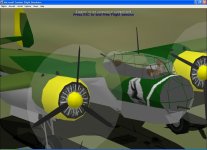
I can increase this even more by taking away the bomber´s torso and have him crouching like the dorsal gunner with only his head visible, which looks quite plausible (see screenshot) and including the glue, actually frees 47 parts (5.9%). Then, changing a structure to components elsewhere will free even more parts.
Now I have to have a look where is best to use these parts for an improvement.

One place could perhaps be the tail-fuselage, whose cross section in reality starts getting round just after the tailwheel.
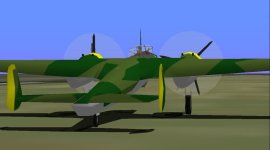
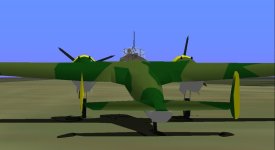
At the moment I have two structures here with dome and keystone bulkheads. I could put in a 10-sided circular one and use the component to make the transition piece. Perhaps this would be good (see other screenshot).

Cheers,

Aleatorylamp
 

Attachments

  • Crew-view.jpg
    Crew-view.jpg
    63.2 KB · Views: 0
  • rear-view.jpg
    rear-view.jpg
    30.4 KB · Views: 0
Last edited:
Hello Aleatorylamp,

New Found Wealth! How Wonderful!

Since you asked, here is what I would do if I were in your place:
Keep in mind that there are only 4 crewmen for this aeroplane.
The Pilot is probably going to be visible on the left side of the Cockpit.
The Dorsal Gunner is probably going to be visible at the back of the Kanzel.
The other two, Bombardier and Ventral Gunner are probably NOT going to be visible.
Note that they have multiple places they can be.
The Ventral Gunner is probably lying on his belly just forward of the Ventral Gun.
The Bombardier is either sighting in the Nose for a bombing run OR operating the Swivel Gun in the Nose.
This seems a touch weird, but I would just have the gun next to the Pilot as fixed forward firing (the one fixed gun I described earlier)

Now comes the tricky part:
For the Pilot and Dorsal One-Armed Wallpaper Hanger, put them in as only a single profile Part each and make sure there are no bleeds.
That should save a LOT of resources.
Since I am sure you will be using SCASM in any case for the Virtual Cockpit, Design Component Pilot and Gunner in addition to he Cockpit Interior.
You can then add the Component Aircrew along with the V-Cockpit.
If you know enough to do one, you can certainly do the other; It isn't much different.
Where there are calls to the Profile Pilot and Gunner, you just change the call to your Component Aircrew added at the very end of your SCASM source as you would for the V-Cockpit.

With the new found Parts, you might consider putting in some Insignia Windows on the sides of the Nose.
There was a lot of Glazing there that your model is missing at the moment.
It also might be a good idea to put in the very goofy looking Pitot Tube on the Port Wing.
Perhaps a functional Bomb Bay (attached to Spoilers) might be in order.

Let me know how it goes.
- Ivan.
 
Hello Aleatorylamp,

One further note:
If you want to save resources, use your remaining Component in a place that you are currently building with Top Only or Bottom Only Structures.
The Component will give you better control as you already know and should significantly lower the Parts count and even more so if you can replace both Structures.

Oh by the way, the drywall was mostly done as of last night and I expect the gentlemen will be painting today.
When this room is done, perhaps I can put up a small Computer assembly / testing table to see if I can find some workable equipment to repair my development machine.

- Ivan.
 
Hello Ivan,
Good luck with your hardware in the new basement as soon as possible!

For the moment, the rounded rear-fuselage rounding went well and is looking much better (see screenshots). I used the free component as a transition part and then a 10-sided structure. Should this, however, be unnecessary, I can easily revert to what it was before as I´ve saved that.

I´ll study your latest suggestions more closely and see what I can do! Thanks! ...although putting in the crew components with SCASM will be a bit difficult...

Now parts count is 148.8%, but if I take away the bombardier´s head (your reasoning on the crew´s behaviour is quite sound) and glue then it will go down to 144.6%, and your suggestion of adding insignia window parts to where there are cabin bleeds, sounds great! - and I´ll do the guns in the DP files as you said.

Cheers,
Aleatorylamp
 

Attachments

  • rear-rounded1.jpg
    rear-rounded1.jpg
    28.4 KB · Views: 0
  • rear-rounded2.jpg
    rear-rounded2.jpg
    21 KB · Views: 0
Last edited:
Hello Ivan, hello Smilo,
I´ve finally found a way of eliminating the annoying bleeds from the retractable engine-nacelle section through the flap when seen from below. Glue and insignia wouldn´t work, (the parts are in wing-low so as not to interfere with the wing seen from above), but I luckily found a solution - duplicating the flaps into the landing gear and marking them as insignia seemed to do the trick, and there´s no interference from the front.

Well, with no bombardier now, and with the rear-fuselage shape correction, parts count is now at 144.4%.

Now come Markings and Virtual Cockpit.

I´ll see if I am capable of following Ivan´s instructions to put in the Bombardier again with SCASM.
If I gather correctly, a mere textured silhouette in AF99 would be enough to position and identify the part in SCASM, and then it would be substituted in the listing by the SCASM text belonging to the 2 separately made and SCASMed Bombardier components -head and body.

Can they be structures or do they have to be components?

I´ll try! The alternative is that the Bombardier is unseen, crouching down, looking into the bombsight or something...

Cheers,
Aleatorylamp
 
Hello Aleatorylamp,

Just a quick note:
I don't believe it is worthwhile to include the Bombardier at all because I believe if he is sitting in the glazed Nose section, you would not see him anyway and two of his three jobs are in that area.

I was suggesting putting profile Pilot and Upper Rear Gunner to replace your current structures and put them back in via SCASM at the same time (though not the same place) as your SCASM Cockpit.

I take it that your Insignia Flap is facing Upper Rear?

Regarding the VMWare Windows XP.... I do not believe that will work for me. I do have Windows XP installation disks and they are legitimate, but not a generic install that I can use for my laptop.

Need to get to a meeting at the school.

- Ivan.
 
Hello Ivan,
I would have thought any legitimate Windows XP CD would be fine to install into VMWare... unless of course it is one that asks for supplementary license payment after three installations!
The one I have is a SP2 version, and doesn´t ask for validation. If need be I could mail it to you.

Thanks for your clarifications on the Bombardier.
At the moment there´s no real point in doing the pilot and dorsal gunner in SCASM as I´m only on 144.4% parts, and the plane is looking fine.


I´ll see what happens with the Virtual Cockpit, and I think I´ll have to block out the engines like we did on the Baltimores by putting in a call to the cabinfloor.

Yes, the Flap insignia is facing upper-rear, and nicely stops the bleed from the nacelle section when seen from below-rear.


Cheers,
Aleatorylamp
 
hello Stephan, by chance, could you send me
the new, updated, no bleed model?
without markings is fine.
i've had a quick look,
but, will need to change monitors
if i want to get serious.
(a long story, there)
anyway, i plan on taking a closer look this weekend,
but, don't want to comment on something
that may have already been corrected.
thanks in advance
 
New version Beta

Hello Smilo, and hello Ivan,
I was thinking exactly the same thing, and was about to ask if I should send the new model! Thanks for your request.

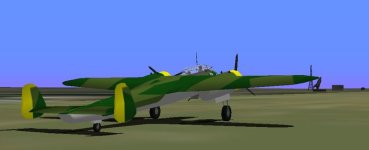
Here´s the model in its present state - Version 2, as it were!
I´m also posting the source files just in case Ivan wants to have a look and the hardware allows it.

In a nutshell, impprovements on this version are:
-It now has the round tail-fuselage cross section,
-Fins have a better shaped front end, as well as the correct notches for the rudder-balance part.
-Nacelle-ends don´t bleed through flaps seen from behind-low-rear,
-To save on parts, the bombardier is not visible because he´s bent down, poring over a map.
-Parts count is now at 144.4%, so there are 45 parts left for other niceties I´m trying to think of. Ivan mentioned some extra windows in the front, and I´m researching...

Thanks for your inspection!
Cheers, and have a nice weekend!
Aleatorylamp
 

Attachments

  • Do-17 screenshot.jpg
    Do-17 screenshot.jpg
    35.6 KB · Views: 0
thanks Stephan, got it.
as i said before,
i don't like nitpicking,
but, here goes....
just looking at the image,
-the inside landing gear strut
is bleeding through the wheel.
-what are the two black pieces
on top of each nacelle?

are you sure, you want me to do this?
am i sure, i want to do this?
 
Possible fixes

Hello Smilo,
Thanks for your initial comments! I appreciate them very much. I wouldn´t call it nitpicking, as, if things can be fixed and improved, all the better!

The landing gear struts, on each side of the wheel, have an inner part glued to the wheel facing sideways, and another facing forwards, and I thought I could save some glue on the second one... I didn´t notice the momentary bleed from the rear angle.
I could fix it easily with some extra glue, and it worked!


The black things on the engines are two exhaust nozzles, and to be honest, I am not very satisfied with them yet...
Maybe they are superfluous, or perhaps I should try making them dark grey instead of black. Another possibility would be just two black circles with insignia upwards. Perhaps that will be best. What do you think of the screenshots?

They do actually look much better, don´t they?
If we were to leave them as black circles, parts count is only 137.9% - I could really put the bombardier back in... just to keep company...

On the photos, the pipes only portrude a little. Making them more accurate would be very parts-consuming, so at the moment they are black wedge structures. There must be a better way, as they are a bit irritating...

Cheers,
Aleatorylamp
 

Attachments

  • new exhausts.jpg
    new exhausts.jpg
    32.5 KB · Views: 0
i wouldn't go so far as irritating,
...more like, distracting.
even though accuracy is important,
it wouldn't hurt my feelings if they disappeared.
then again, maybe dark gray circles or ovals.
we shall see.

in level flight, spot view from 45* left aft,
press the number pad 4 key.
the view will slowly move forward.
as it does, look at the wing leading edge and nacelle.
the root momentarily bleeds through the nacelle.
one more thing...actually several,
press key pad 2 for aft view.
there are flashing spots at inner wing joints,
aft fuselage after the wings
and where the fuselage joins the tail section.
also, some around the nacelles.
i believe these string of pearl like joints
are an indication of sightly misaligned vertices.

still think i'm not nitpicking?
 
ps...
have i told you lately(?)
i love this model.
at last, a decent cfs Do17z2
thank you for your efforts.
they have certainly paid off.
 
Hello Smilo,
Thanks for your information, and your good words!

I´m afraid the wing-root bleeds through the forward engine nacelle won´t disappear even with templates.
Actually, there are only wing/fuselage and nose/wing templates, not nose/fuselage ones... The problem is that the wing-root is grouped with the fuselage. Anyway, I´ll try grouping them in a different way and see what happens.

The string of pearl gaps at the places you mention are divisions between components and structures, and I have been working on that for some time trying to improve it. The alignment between these two types of parts always creates some difficulty.
I´ll see if I can improve them a little more.

Thanks again for your feedback!
Cheers,
Aleatorylamp
 
the things i've mention
are in no way a deal breaker
and probably not worth the effort to fix.
the model is great. besides,
who's going to sit off the wing
or right behind the tail
and zoom in just to look at
a bleed or string of pearls?
they need to get a life
or build their own, perfect model.
as i've said before,
this is cfs 1 !

just for fun, i renamed the all the files
to the stock Do17 name.
then, went into quick combat
so i could see a gaggle of Do17s.
first, it was a bitch flying with keyboard only,
but, as i shot through the formation
the views of your model were very nice indeed.
your work has enhanced the cfs experience.
thank you very much
 
Version 3

Hello Smilo,
Thanks for your encouraging comments! I think it´s getting better. Your feedback is definitely giving very good results!

The wingroot was actually grouped in Innerwing mid left/right with the nacelles and inner wings, so I changed it into the Body Main group, (where I thought I´d already put it but hadn´t). Then I put the wing/nose and wing/fus templates back in, and this time the annoying bleed vanished! I couldn´t believe it, as the last time it hadn´t worked. A considerable improvement!

Then, the cabin canopy, which is in Canopy/High Wing, still bled through the nacelles, so I put that into Body Main as well to see if I could eliminate that bleed too! Well... it stopped, but now there is some interaction between the crew and the windows, but I suppose it´s better than the windows bleeding through the nacelles. What do you think?

Here´s the model again. AFX is in the aircraft folder without R8 or PCX as they´re the same as before (for Ivan, just in case).

The exhausts are still round circles. Should they better be dark grey ovals?
I think I´ll put in the bombardier´s structures again, as there are parts left over, and see if I can do a good glue-sequence for him and the pilot. Let´s see how that goes!

Update::encouragement:
Exhausts are now oval, and in dark grey.
I´ve just put in the bombardier´s torso and head, and applied "Ivan´s Conga" glue sequence similar to that of the two AT-9 Jeep pilots, and it works - except for the canopy glass thing I still have to apply Ivan´s Conga to. I´m trying and there seems to be a slight improvement. Parts count is now at 148.7.

Another thing to think about is the panel. With so many windows, it will need a transparent part underneath, although it does not show on the model itself.

Note: I have updated the attached model Version 3, which now includes the bombardier´s figure and the changed exhausts.

Cheers,
Aleatorylamp
 

Attachments

  • Bombardier in.jpg
    Bombardier in.jpg
    32.1 KB · Views: 0
  • dark grey exhausts.jpg
    dark grey exhausts.jpg
    32 KB · Views: 0
Last edited:
wow...you did it, well done.
she looks better with every upgrade.
i like the oval exhausts.
i don't know about accuracy,
but, they are much less obtrusive.

one minor problem, though.
the props have disappeared.
 
Hello Smilo,
Really?!! Now we can´t have disappearing props, can we? Shocking - I´ll have to check immediately.
I had a German friend who called this type of result an "improve-worsening"

I´ve just tested the plane, and they show up here. Maybe something went wrong in Version 3.

OK then. I´ve attached the current version now, as Version 4, and I´m afraid I´ll have to kindly ask you to check if the props still cause problems. Thanks!

I´m still working on the glue sequence to include the rear cabin with the dorsal gunner, as that is still a bit dodgy.

The grey exhaust ovals are really a compromise between the short, round, backwards bent exhausts portruding from the nacelle with their opening towards the rear, and the hole in the nacelle which is rounded in the front and squared off at the back. I´ve just altered it and it looks better - just for the sake of accuracy! I´ll post an update as soon as there are other changes - like for example the interaction between rear gunner, the cabin-floor and the windows at the back.

Incidentally, I´ve just successfully deleted the previous Do-17 attachments Versions 1, 2 and 3, in the way you said when I asked about it a while back! Thanks.

Cheers,

Aleatorylamp.
 
oops...sorry.
the no props was my fault.
i inadvertently set my Display,
Image complexity to Sparse
which in turn makes the prop disappear.
did i mention i haven't fired up the game
for quite some time?
 
Back
Top