Project Martin A-30 Baltimore

Good evening, Ivan!

The way I have the CFS1 set-up, the sim opens in a small window. If I start the engines and give full revs, the RPM gauges both go up to the erroneous maximum reading, 4000 RPM, but if I then change to full-screen it marks the correct 2400 max., as per specifications.

Alternatively, if I change to full-screen before starting the engines, the same flaw happens, and is corrected by switching to window-screen size, so it is a matter of always having to change screen size at least once after engine startup.

I should have checked what happens with the restly engine gauges, but it didn´t occur to me! I will do so as soon as possible.

Good night!
Cheers,
Aleatorylamp
 
Hi guys:wavey:

Just a few words to say that I'm keeping an eye on your project and still searching for info.

One thing is certain, Aleatorylamp; the Baltimore had no internal gun-sight, only a WWI fashion bead-and-circle sight on the cowling, like on these pictures;

Martin+A-30(A)+Baltimore.jpg

c7e843f7c96d05100f6c66c642b03fbc.jpg


This was probably sufficient for strafing purpose (it was an "attack" plane after all...:kilroy:) and "pot shot" at a flying target obligingly passing just in front of it.

I see 3 alternatives to that;
1- removing any gun sight reflector from the cockpit and living with that inaccurate (and quite silly) stock one;
2- putting a bead and circle over that same silly stock sight;
3- modifying the Gunsight64.bmp to show an actual bead an circle.

Method 3 is more involved and include a semi-permanent modification of Gunsight64.bmp. I have made my own batch files that let me choose among two dozens sight (mostly self-made). Flying WWI missions with the overgrown stock sight was not immersive at all.

Choice number 1, for the "immersiveness" that I just explained, would not be my choice. The choice number 2 is at least worth a try. I have never used that method, but I will see if it can do.

I will also look into the bomb aimer panel. It would be a shame to not have one in this flying gold fish bowl!
 
Hello Hubbabubba,

Thanks for your info! OK, so I´ll take out the circle from the panel bitmap for the moment, and see what can be done with the stock sight.

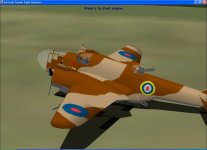
At the moment the progress so far is that the roundels are on wings and fuselage, the red-white-blue flag is on the fin, the radial engines are on the engine bitmap, and the props also have their texture.

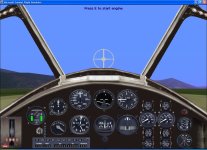
Update (again): I just had a look at the gunsight bitmap you mentioned in option 3 - That is for the moment the best solution, although the thing changes for other planes too, of course... Another solution would be drawing it on the panel bitmap, but it combines badly with the stock gunsight, leaving spikes outside the circle. Anyway, here´s a screenshot of the new panel showing the modified stock gunsight.
But, what I don´t understand is how to get a bomb-sight to be accurate from 30000 ft.

Cheers,
Aleatorylamp
 

Attachments

  • Baltimore roundels.jpg
    Baltimore roundels.jpg
    42.7 KB · Views: 1
  • Baltimore-gunsight.jpg
    Baltimore-gunsight.jpg
    83.6 KB · Views: 0
Last edited:
it's done using a series of gauges
and pilot skill to get lined up
and a bomb site gauge
to give the proper release point.
it use to be pretty fun stuff.
especially, with other players
shooting back at you.
 
Hello Smilo,
That sounds fun! Hubbabubba seems to be looking into a bomb-aimer panel. Let´s see...

Meanwhile I got the roundels, engine and prop textures onto the Baltimore Mk.V. The colour scheme is not the desert one, but normal brown-green camo. Here´s a screenshot!

I don´t really know if there´s a preference as to the markings. If so, do let me know. The Helenic Airforce had some Baltimores, and Turkey did too.

On the models themselves, the Martin gun-turret looks a bit too simple perhaps, but for the moment, with parts count at 148.6%, I don´t really have much maneuvering space to put any extra parts in there, like strut-lines or something...

The modified gunsight I think looks quite good - and would serve for other models as well without being annoying. But of course, it wouldn´t upload with the model...

Cheers,
Aleatorylamp
 
i wouldn't worry too much
about the turret detail.
especially, if parts are limited.

as for the Gunsight64.bmp.
yes, it does look good,
but, will have to be added
into individual cfs installs
per each users discretion.
personally, i'm not sure
i would want to swap out the file
every time i flew the a-30.
but, that's just me.
it could always be added to the upload
in a separate folder with readme instructions.

i may be mistaken, but, i believe
the a-30 was used extensively
in the mediterranean theater.
therefore, desert textures would be in order.
my opinion.

also, looking at the latest screen shot,
i'm wondering if the pilot is the proper scale?
he looks quite small in that picture.
 
Smilo,

I am thinking the Gun site could be incorporated into the panel and cover the stock one...am I incorrect ??
 
i believe you are correct, Dave.
hubba mentioned it as option #2
it sounds like Stephan tried it.
here is his reply;
"Another solution would be drawing it on the panel bitmap,
but it combines badly with the stock gunsight,
leaving spikes outside the circle."
a solution to the "bad combination"
could be to remove the stock Gunsight64.bmp
basically, having no gunsight.but, as i've said before, changing it
every time you want to fly a different aircraft
would be a major pain in the seat cushion.
 
Hello Smilo, Hello No Dice,
Thanks very much for your comments!

Regarding the bomb sight, I´ve been thinking about the "cleanest" solution, concluding that perhaps it would be best to supply the doctored-up exchange bitmap of Gunsight64.bmp as a separate option, leaving the panel without a gunsight, as it would be a messy combination with the default one if someone wouldn´t want to change or eliminate the stock gunsight. If it were included in the panel, it force a user to eliminate Gunsight64.bmp.

As regards the pilot being a bit small, I had already had the same feeling, and you are absolutely right! I´ve just increased the head size by 1.3 and raised the body height! It´s correct now, thanks!

With respect to the colour scheme: I´ve made two versions, the Mk.IIIA and the Mk.V, using the same AF99 model, as the differences on the real planes were not visible. So, I thought I´d supply two different colour schemes, which can be easily interchanged:
- Desert camo: Mk.IIIA, 2x1660 hp engines, 4 x .303 inch wing guns + 2x0.5 turret guns. 305 mph max.
- Khakhi camo: Mk.V, upgraded 2x1700 hp engines, 6 x 0.5inch guns. 320 mph max.
- Both carried the same bombload - usually 6x250 lb or max. 4x500 lb
- Both versions flew with either colour scheme.


As you say, the Baltimores were mostly used in the Mediterranean theatre, and I agree with you that a Baltimore in desert camo colour scheme is more adequate. Consequently, the question remains whether uploading two different models would really be of interest for simmers. The obvious choice for combat simming would be the Mk.V, with its noticeably increased performance and punch, so the lower performing Mk.IIIA would really not be necessary or interesting. So perhaps it would be best to upload only one version, the superior Mk.V, in desert camo colour scheme. Would you agree? Also, the desert camo is somehow more appealing, I feel.

P.S. A last minute correction for the panel: I read in an article on the RAAF squadrons that served in northern Egypt ("From El Alamein to the Alps.pdf") about the absence of sophisticated instruments like autopilot and radio altimeter. So I´ve taken out the autopilot. (I only used it to test the .air file anyway).

Cheers,
Aleatorylamp
 
Last edited:
regarding interest in the MkIII and MkV models
and not uploading the MkIII....
i have to say, i disagree.
obviously, the MkV is the stronger performer,
but, why discard your hard work on the MkIII
when you can easily have them both in the same folder?
yes, sir, you can do that by adding an entry or two or three
in the aircraft.cfg....[fltsim.1], [fltsim.2], et cetera
you can have the same model with different textures
and even call different models.
make sure to have the different .mdl files, .air files, .dp
and textures properly named and in the A-30 main folder.
no need to offer several uploads.
with a little work, it's all in one.

once again, the memory is fuzzy,
but, i'm sure it can be done.
another reason to fire up the old machine.

an afterthought...where is the dp called?
in the mdl or .air file?
you will have to rename each dp file
and make the change in each mdl or air file.
 
Hello Smilo!
OK, so it´s the 2 models then. More variety anyway, as it´s a separate model.
It´s good to have another point of view other than one´s own, for objectiveness, so I appreciate your opinion.
I´ve corrected the size of the pilot, and also by ordering the cabin struts and glass differently, bleeds are better.

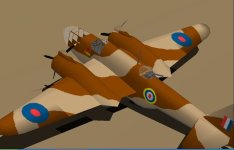
I have also exchanged the textures: Now it´s the desert camo for the more powerful Mk.V, and the khakhi-green/brown for the Mk.IIIA. They have different .air files for their weight and power differences, and different Dp files for the different firing power.

Very well, I think I know how to put 2 different models into one folder, each with their own textures, model and .air file - and Dp files too!

Here´s pictures of the planes with the newly re-sized pilots!

Update:
To get the 2 planes into the same folder I´ve done the following, but it won´t work. I must be doing something wrong! (The model and texture folders are named as in the Aircraft .cfg file):

[fltsim.0]
title=Martin A-30 Baltimore Mk.IIIA
sim=Baltimr3
model=.Mk3
panel=
sound=
texture=.Mk3
checklists=Baltimor_CHECK

[fltsim.1]
title=Martin A-30 Baltimore Mk.V
sim=BaltimrV
model=.MkV
panel=
sound=
texture=.MkV
checklists=Baltimor_CHECK

Thanks for your patience!
Cheers,
Aleatorylamp
paperclip.png
Attached Thumbnails
 

Attachments

  • Pilot2.jpg
    Pilot2.jpg
    34.1 KB · Views: 5
Last edited:
Hello Folks,
On closer inspection of the photos, I saw that the ventral, rear-firing gun barrels were not really visible. A moveable dual gun could be installed, but normally there were fixed guns, firing through 4 holes and controlled by a pedal in the pilot´s cockpit.

The removal of the two barrels I had there, has freed a considerable number of parts - parts count is now down to 143.9%, so I will try to use them to enhance the dorsal turret a little, as it seems over-simplified.

Then, I re-inspected the flight dynamics, and remembered that due to the absence of a 2-speed supercharger in CFS1, the shortcomings in the performance curve, i.e. the lack of power at low altitude and the excessive power higher up, was considerably compensated by the use of WEP only at low altitudes. So, WEP must not be used above 3000 ft. This able solution was of course Ivan´s idea!
This way, the airfile will give considerable realism, and performance is generally much better adjusted to the specified values throughout the whole power curve.

Anyway, as soon as I get the dorsal turrets better, I´ll post a screenshot!
Cheers,
Aleatorylamp
 
A Question of Details

Hello all!
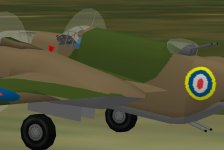
OK, now the dorsal turret has a few lines as per the turrets on the photos. The front dome also has an extra one which was quite prominent. I think they look OK. If they don´t , please let me know!

I also put in the radio mast - but it is debatable whether it is a good idea. Normally I never put in these details, but I´m not so sure... The same goes for the port and starboard red and green position lights on the wings, and the landing lights which in this case are on the leading edge. At the moment they are in, but it is questionable. I know some developers never put them in, especially for CFS1.

Anyway, here are a couple of screenshots for eye-candy. I don´t know if I should leave the mast on...

Cheers,
Aleatorylamp
 

Attachments

  • turret1.jpg
    turret1.jpg
    38.7 KB · Views: 5
just my opinion...
the antenna looks good.
why remove it?
unless you need the parts.

also am wondering,
are you considering an earlier,
pre-turret version?
 
Hello Smilo,

OK, thanks for your suggestion: If the antenna looks good, it will stay in!
The lights can also stay in - there are enough parts. I´ll try to put in the radio-goniometer too.

Funny that you are suggesting a pre-turret version... I was playing with the idea myself, and I quite fancy the idea of making the difference between the two models more pronounced:

Instead of doing the Mk.IIIA, it could quite easily be a Mk.II by substituting the turret with a kind of rear glass half-canopy open at the back with a dual MG in it, although it could even be a Mk.I with a single MG there! It looks much better than a turret anyway!

Then, to reduce 60 Hp per engine for the two GR-2600-A5B radials is easy, and presto! - we´d have a Mk.I/II! Performance is even more different, because the bombload was only 1000 lb, half that of the others. Interesting...


Or maybe you are suggesting to have three... Mk.V, Mk.IIIA and Mk.II... but wouldn´t that be a bit much?

Cheers,
Aleatorylamp
 

Attachments

  • MartinBaltimoreMK2.jpg
    MartinBaltimoreMK2.jpg
    44.1 KB · Views: 5
interesting indeed...
i see nothing wrong having
the MkII, MkIII and MkV
if you're up for it.

by the way, cool model.
is it yours?
 
Three it is, then!

Hello Smilo,
Well, then three it will be!

Is the model mine? Well, it could be yours, as you were the one who suggested building it, i.e. the instigator... and I am just the bricklayer and the mechanic... the engines could be Ivan´s, as I did pester him a lot to get the FD parameters right, including the exclusively low-altitude use of WEP.

One more clarification about this WEP limitation: The Baltimores had a lot of engine problems if they were pushed to the limits too much, especially in the earlier models. This was another reason to implement the low-altitude-only WEP on the model to make it more realistic, together with the fact that the power curve is more fitting this way, due to the CFS1 supercharger being limited to single-speed.

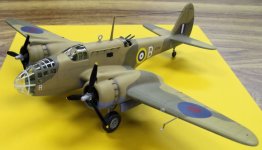
Ooops! Now I understand, you mean the plastic model of the Mk.II in the screenshot! NO, it´s not mine! I found the picture on the web. It shows better detail than the photos of real planes.

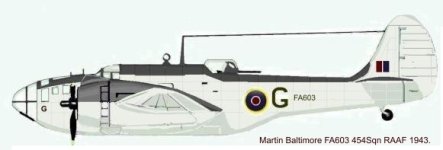
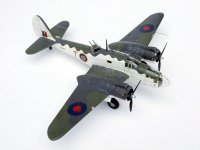
I´ve seen a third colour scheme of the RAF Coastal Command belonging to the Baltimore Mk.IV in a rather smart white-dark blue/grey colour scheme, (see screenshot). This which was essencially a Mk.IIIA with unnoticeable detail modifications, so this livery could be used for the IIIA/IV version model.

The side-view drawing shows a scheme without the wavy fringe on the upper dark-blue/grey of the roof, but on the plastic model it can be seen and it looks much better! The grey/blue can also be a dark blue/dark green.

So, we´d have the a) desert camo for the Mk.V, b) the Coastal Command white/blue-grey for the Mk.IV (Mk.IIIA) and c) the green/brown khakhi for the MkII.


Cheers,
Aleatorylamp
 

Attachments

  • Baltimore_FA603_G.jpg
    Baltimore_FA603_G.jpg
    32.4 KB · Views: 0
  • Baltimore grey-white.jpg
    Baltimore grey-white.jpg
    44.3 KB · Views: 0
Last edited:
whew...i was worried there for a second.
i'm glad you understand the "model" question.

i like the idea of your virtual model
being a collaborative effort.
and yes, you hit the nail on the head.
i am an instigator...would that i could do more.

question about textures;
the mkIII and V are interchangeable,
with the mkII texture layout being slightly different
to compensate for the lack of turret, correct?
(it would be ideal if all three were interchangable)
either way, might i suggest
keeping a set of the green camo for the III and V.

that way, you could rename each texture folder,
to, say, GrnCamo.Texture, DsrtCamo.Texture,
Cstl.Texture and GrnCamoII.Texture (for the mkII),
drop them all intro the main A-30 Baltimore folder,
then, add each to the aircraft.cfg as a [fltsim.xx] entry.
true, the main folder will be larger, but,
the whole project could be consolidated into one package,
instead of several small ones.
the cool thing is, if done properly, all will be visible
in the select aircraft window.
 
i am an instigator...would that i could do more.

Hi Smilo,

THAT was a pretty silly statement. You CAN and HAVE done more
I still haven't figured out why you stopped building after the Arado 196.
(Just like I haven't figured out why Hubbabubba hasn't done a second aeroplane....)


Hello Aleatorylamp,

I just noticed something in your textures and I am hoping I am wrong.
Are you Wing textures square? It looks to me like your upper wing roundels are slightly longer fore-aft than side to side.
Using square textures makes for much easier painting in the long run in my opinion.

Your camouflage schemes look pretty good.

I would strongly suggest being very careful when using plastic models as a reference for designing.
I am a plastic modeler myself and used to spend a lot of time in various places and shops with fellow modelers.
Unless they are in competition, the "look" is often all they are after. The details are not necessarily faithful to the real aircraft.
Often even in competitions, the judges do not catch issues that I can see are incorrect. (When I see these issues, I generally only tell my friends or my kids because if the judges found out, they would deduct points from the entry and I do not want to be the cause for someone losing a contest.)
I also remember talking to a fellow who was going to install a Hawker Hurricane cockpit interior into some other fighter because he happened to have the spare parts and the other cockpit looked a bit too bare.... I had to wonder how many parts were actually appropriate.
I have been known to put in pilot figures into a model that were not really dressed appropriately. In smaller scales, even the factory ones may not be correct.
Consider that Matchbox used the same pilot figure in just about all their 1:72 aeroplane kits (that I have encountered) and I doubt that pilots of various nationalities used the same equipment. Airfix is / was almost as guilty.

- Ivan.
 
Hello Smilo, hello Ivan,

I´m glad you like the camouflage! It wasn´t easy, and in fact the pattern isn´t so different from one scheme to the other...

The textures that AF99 allows me to use are all rectangular 128x256 pixels per side (top or bottom, left or right, front or back), and the whole texture is a 256x256 pixel square, which includes both sides. So, there is an quite a difficulty to get round things round and not oval - it took me hours to get it more or less right, and it seems it still isn´t!!

Maybe you mean making the textures in 256x256 pixels for each side and then squares and them squashing them into the 128x256 rectangles when ready? That would probably work much better, but then, there is an added factor, the texture extension length. This fuselage has 2 textures, but not in the same length, so they´d still deform circles.

I agree that plastic models are often not exact, but in this case it was the detail of the half-dome transparent cover of the open rear gunner-well which was better visible than on other photos of real planes I have, contrasting with the electrical Martin Turret of the Mk.IIIA/IV/V versions.

For the moment I was thinking of only one set of textures for each model to avoid confusions. Once finished, they can get all the extra textures they want in extra texture folders, even though the textures themselvs have to be named the same.

I could have had one single AF99 folder for both the models IIIA/IV and Mk.V models, (or even also the Mk.II), naming them differently so that they use their own differently named textures, but as each AF99 building folder requires the same aircraft model folder to compile into, the confusion can get dire, and I just can´t handle it. It is AWFUL, and one can go crazy. I´ve done it before, and I´ve sworn never to do it again. It´s so messy to keep renaming the model folder to switch from one model to another.

So, each aircraft has its own AF99 folder and its own CFS1 aircraft folder.

Then, once all are finished, I can join them up onto one package with one single aircraft.cfg file. I´ve done it before, with each aircraft having its own texture, and its own model folder, but in this case also the .air file is different, and it´s not working. It should work, though, I suppose...

Also, once the models are finished, they can have as many different texture sets as were to be needed, but before that, AF99 will only compile one texture set. If AF99 is set to make the same model with differently named textures, the model has to have a separate build for each livery. This can become a nightmare! Any structural modifications or corrections have to be done for all versions in the same AF99 folder. It is so confusing that I keep each build in a separate AF99 folder.

Now the third model, the Mk.II without the dorsal turret, also with its own .air file. This model could also have either desert or green-brown camo, just like all the others.

The only one that had the white/blue-grey was the M.IV. Anyway, for the moment, while I´m still building, each model will have only one livery, and once they are finished, I´ll put in extra ones for each of them.

We´ll see how it goes...
Cheers,
Aleatorylamp
 
Back
Top