D4Y Suisei

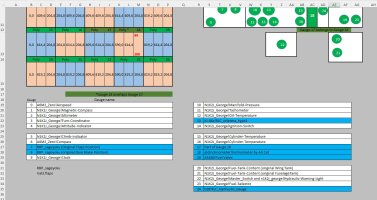
Just tweaking from here -- I'm very close. Question: Last time I tried to e-mail a gauge, gmail would not let me attach a dll. For a test is there any problem with just posting it? I'm fine with this approach. Admins -- is this cool?

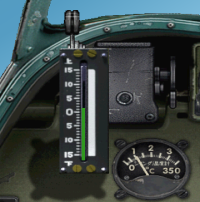
For the final version I intend to make two gauges -- one vertical and the other slanted.

PS - the green bar looks flat and pasted. I'm going to render it as well in Blender as a green glass tube. Should work.
 

Attachments

  • TestInclinomterPic.png
    TestInclinomterPic.png
    91 KB · Views: 48
Wofli, and anyone else, give her a try. The gauge is currently accessed as ...

gaugeXX=aldInclinometer!Inclinometer, YourX, YourY, YourWidth

The fourth parameter is unused.
 

Attachments

  • aldInclinometer.zip
    19.2 KB · Views: 14
Uh… , I don’t have access to my modelling and CFS2 PC until Friday next week. But if you would like to test the gauge in the aircraft, there is a full working test aircraft .zip on page 4.

wolfi
 
No hurry at all Wolfi. I'm working on the "slanted" gauge as we speak -- it won't take long. If there are no major problems/suggestions on the above, I'll upload the full package in a few days.

I had missed your AC test file. That could be helpful.

Again, great job on the D4Y -- she's a stunner!
 
I'm gonna call this the final version. I'll post here in case anyone wants it now. Access the gauge as before ...

gaugeXX=aldInclinometer!Inclinometer, YourX, YourY, YourWidth

As stated in another thread, there's more to come.
 

Attachments

  • aldInclinometer.zip
    18.4 KB · Views: 8
Tested it today and it worked fine. I added the new Panel.cfg for all who download the Beta Test aircraft on Page 4
 

Attachments

  • pannel 25-01-25.jpg
    pannel 25-01-25.jpg
    435.3 KB · Views: 28
  • panel CFG.zip
    1.5 KB · Views: 8
Wolfi - I can only upload from phone now but I got the new panel over to my desktop and boy, that's a good looking VC. And yeah, bit of a thrill seeing the inclinometer in action.

I've noticed that the right side of my gauge seems clipped off. Did I do something wrong or maybe something yet to be edited? I was worried that I would not get the gauge a dark enough black to match your panel but it looks good to me. When you get to that anticipated upload do feel free to include the gauge in your package if you wish. I haven't messed around with some of the newer downloads that self install so maybe this isn't an issue.

A question - those gauges down at the lower right. The ones that are horizontal. Fuel gauges? And would it help if I made those in perspective. The needles would swing in an oval arch but I have an idea I think will work. Such things which haven't been done (to my knowledge) really gets all my cylinders firing.

Thanks for mention me in the config file. That's a nice touch.

Great looking bird you got there,
Mike
 
No, you didn’t do anything wrong, I must adjust the gauge a bit to the background Polygons. I just dropped the new Gauge into the line without adjusting it.

Here is the way I set up the Gauges in FSDS2

My gauges are set up on a 1024x1024 texture on 5x5 Poly square, then I split the poly square into 25 single polys and place the single polys there where the gauges should be.

The benefit of this method is that I can adjust every single poly to the place I want them.

The setup of the gauges is very simple, each single gauge has its own poly! I make the setup in Excel. (You will see it if you look into the Panel CFG and on the Screenshot below)

My workflow in FSDS2: create a square with 25 polys, place a 1024x1024 gauge texture on it, splitting the poly into 25 single polys, place the polys on the Panel.

by the way, your Gauge is on Poly 18 :)

wolfi
 

Attachments

  • Panel setup A.jpg
    Panel setup A.jpg
    236.8 KB · Views: 16
  • Panel setup B.jpg
    Panel setup B.jpg
    271.2 KB · Views: 21
OK, textures are almost done, I had to adjust the materials for all parts also, there was too much gloss in some parts. Next step is to finish the “breakable parts” and Rework the rear Gunner animation.

wolfi
 

Attachments

  • D4Y 2025_01_28.jpg
    D4Y 2025_01_28.jpg
    176 KB · Views: 22
  • D4Y 2025_01_28 b.jpg
    D4Y 2025_01_28 b.jpg
    139.6 KB · Views: 23
  • D4Y 2025_01_28 c.jpg
    D4Y 2025_01_28 c.jpg
    294.8 KB · Views: 25
Back
Top