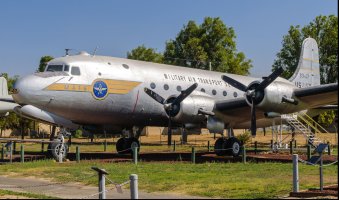
DC-4 Skymaster

I accidentally managed to open the doors and stairs and gse gear and don't remember what keys I used. What key(s) makes ladder and
other ground equipment show?.
 
Last edited:
@gray eagle,
I am very flattered by your interest in this add-on, but you have at least read the previous pages or even the post #225 ?
You could have read that this aircraft is not finished and that many things are being created so any repaints adapted to this addon can be yet find on FS.to.
S: You can be find some repaint on AVSim but they are in FSX/P3D format so some works is necessary:
- mirrorring the textures verticaly and
- compiling it in MSFS format

However, regarding the external textures (repaints), I didn’t make too many changes to the textures and their names.
All the things to know are summarized in post #225 :geek: .

The main files used for exterior repaints are the following so rename them:
- ns_fuselage.png.dds (i.e. the diffuse file) in dc4_fuselage_albd.png.dds
- ns_fuselage_bump.png.dds in dc4_fuselage_nrm.png.dds
- ns_wing_l.png.dds (i.e. the diffuse file) in dc4_wingl_albd.png.dds
- ns_wing_l_bump.png.dds in dc4_wingl_nrm.png.dds
- ns_wing_r.png.dds (i.e. the diffuse file) in dc4_wingr_albd.png.dds
- ns_wing_r_bump.png.dds in dc4_wingr_nrm.png.dds

To make it very short:
- download an old repaint for the flight replicas version released last year
- rename the main diffuse textures: fuselage, engines, wing_r and wing_l by following the recommendations given in quotes lines before
- delete other textures that will not be used (stairs, stairslights, etc.)
- copy the COMP and NRM files corresponding to these 4 types of textures from an existing layout (those I provided in the addon)
- create the correct section in the aicraft.cfg
- regenerate the layout and others json files and that’s it.

I could have kept the same names, but my workflow has been static for several years and I always apply the same rules to each of my aircraft, which allows me to know what has been done and what still needs to be done in terms of textures.
On the other hand, the spec and bump files are not used on MSFS so getting things back in line with my workflow seems like a good thing to me.
 
Last edited:
When the plane starts flight and I then taxi to another parking spot then shut down engines, the ladders and all other stuff auto appears. I
did not have to press any key(s). You have programmed the ladders to show upon engine shutdown.
 
Last edited:
Yes, exactly.
When the CTRL+E command is executed with the engines operating, the shutdown of these engines is requested and all commands via LVars are reset for the next flight. In a future version, a certain number of LVars will be saved so that they can continue on another flight under the previous conditions.
 
I didn't know what this LVars was all about till I looked it up.....
An LVAR (Local Variable) in Microsoft Flight Simulator 2024 is a custom, aircraft-specific variable used to store and control the internal state of a plane's cockpit switches, instruments, and systems.

It is all greek (GEEK) to me......:)
 
If you want to tak a little "greek" ;) , some explanations:
FS use many types of variables to compute the aircraft's state or other real components.
In very short, you have two main types:
- AVars which are variables used by FS, and some ones are possibly useable/editable by the developers (some but not all, read the SDK to know more)
- LVars which are users variables, created by the developer and that can be initialized, modified, etc

In this aircraft, I have created between 80 ~100 LVars for manage and obtain my purposes.

if FS is a success, it’s because of the presence of these LVars that allow the user to go beyond what FS offers and to be able to create many different things in sceneries but also in aircrafts.

-----------------------------------------------------------------------------------------------------------------------------------------
This morning, I have implemented the "lighting system" on the DC-4-1009 and the DC-4-1009 SAAF (first on the various panels and overhead).
The system is managed by 6 knobs: lh panel, eng panel, radio panel, rh panel, and compass/overhead (the spots knob isn't made yet).
The result with every knob to 100%:

1785492452045.png

I still need to add the lighting on the upper panel (I think that lighting is designed by glareshield ? ... ) as well as a few spots on the auxiliary lamps for the pilot, the copilot, the navigator, and the radio.

I’m also thinking of adding some mood lamps in the DC-4 model for the passenger cabin.
 
Last edited:
If you want to tak a little "greek" ;) , some explanations:
FS use many types of variables to compute the aircraft's state or other real components.
In very short, you have two main types:
- AVars which are variables used by FS, and some ones are possibly useable/editable by the developers (some but not all, read the SDK to know more)
- LVars which are users variables, created by the developer and that can be initialized, modified, etc

In this aircraft, I have created between 80 ~100 LVars for manage and obtain my purposes.

if FS is a success, it’s because of the presence of these LVars that allow the user to go beyond what FS offers and to be able to create many different things in sceneries but also in aircrafts.

-----------------------------------------------------------------------------------------------------------------------------------------
This morning, I have implemented the "lighting system" on the DC-4-1009 and the DC-4-1009 SAAF (first on the various panels and overhead).
The system is managed by 6 knobs: lh panel, eng panel, radio panel, rh panel, and compass/overhead (the spots knob isn't made yet).
The result with every knob to 100%:

View attachment 194199

I still need to add the lighting on the upper panel (I think that lighting is designed by glareshield ? ... ) as well as a few spots on the auxiliary lamps for the pilot, the copilot, the navigator, and the radio.

I’m also thinking of adding some mood lamps in the DC-4 model for the passenger cabin.
We deeply appreciate your selfless efforts in this endeavor. Thank you sir. (y)
 
This paint (#250) is made by Ferondoe and he ask me if he can send it to FS.to linking the dropbox link.

My answer to Ferondoe:
"As I said before theses version are Beta version that I want to reserve theses versions only for SOH to thank the participants of this forum who test and suggest improvements.

For now, I haven’t started working on the textures and maybe the original paintkit might be modified.
Publishing the repaint on FS.to with the dropbox link would mean making this WIP version available for public distribution all over the Internet.
I did this kind of thing with the PBY, and I realized that I wasted a lot of time giving answers to various users (some are using old versions that had been modified in the new release) because of these updates that sometimes changed the model and often the textures. That taught me a lesson and I would rather not start again.
I have committed to myself to providing a final version that will be completed.
"

If I can resume development at the same pace, I think I’ll be able to start working on the textures and the sound pack by the end of August.

A little patience is not a big sacrifice for the DC-4 lovers :cool:
 
Hello,

Since last week, I have been focusing on a subject that I had almost never studied on my previous aircraft cockpits : "lighting and instrument backlighting". The SDK is very succinct on this subject and, as usual, we had to study other aircraft to try to understand how it works. I mainly studied the Beechcraft D-18, whose interior lighting seems very successful to me.

First of all, the system.cfg file must be correctly entered in the [Electrical] section so as to clearly define the circuits that will be needed, both for the avionics instruments and also for the panel or panel lights.
circuit.12 = Type:CIRCUIT_LIGHT_PANEL:1 #Connections:bus.1 #Power:2, 5, 20.0 #Name: Panel_Light_1 ; panel light 5W
circuit.13 = Type:CIRCUIT_LIGHT_GLARESHIELD:1 #Connections:bus.1 #Power:10, 15, 20.0 #Name:Glareshield_1
circuit.15 = Type:CIRCUIT_LIGHT_CABIN:1 #Connections:bus.1 #Power:30, 40, 20.0 #Name:Cabin_Light_pilot ; Cabin light 40W
circuit.16 = Type:CIRCUIT_LIGHT_CABIN:2 #Connections:bus.1 #Power:30, 40, 20.0 #Name:Cabin_Light_copilot ; Cabin light 40W
circuit.17 = Type:CIRCUIT_LIGHT_CABIN:3 #Connections:bus.1 #Power:30, 40, 20.0 #Name:Cabin_Light_radio ; Cabin light 40W
circuit.18 = Type:CIRCUIT_LIGHT_CABIN:4 #Connections:bus.1 #Power:30, 40, 20.0 #Name:Cabin_Light_passengerA ; Cabin light 40W
circuit.19 = Type:CIRCUIT_LIGHT_CABIN:5 #Connections:bus.1 #Power:30, 40, 20.0 #Name:Cabin_Light_passengerB ; Cabin light 40W
circuit.20 = Type:CIRCUIT_LIGHT_CABIN:6 #Connections:bus.1 #Power:30, 40, 20.0 #Name:Cabin_Light_passengerC ; Cabin light 40W
circuit.56 = Type:CIRCUIT_LIGHT_PANEL:2 #Connections:bus.1 #Power:2, 5, 20.0 #Name: Panel_Light_1 ; panel light 5W
circuit.57 = Type:CIRCUIT_LIGHT_PANEL:3 #Connections:bus.1 #Power:2, 5, 20.0 #Name: Panel_Light_1 ; panel light 5W
circuit.58 = Type:CIRCUIT_LIGHT_PANEL:4 #Connections:bus.1 #Power:2, 5, 20.0 #Name: Panel_Light_1 ; panel light 5W
circuit.59 = Type:CIRCUIT_LIGHT_PANEL:5 #Connections:bus.1 #Power:2, 5, 20.0 #Name: Panel_Light_1 ; panel light 5W
circuit.60 = Type:CIRCUIT_LIGHT_PANEL:6 #Connections:bus.1 #Power:2, 5, 20.0 #Name: Panel_Light_1 ; panel light 5W
In a second step, we can add to the [Lights] section of this file the light effects for the navigation, landing but also that will serve as lamps for the panels.
; Types: 1=beacon, 2=strobe, 3=navigation, 4=cockpit, 5=landing 6=Taxi, 7=Recognition, 8=Wing, 9=Logo, 10=Cabin
lightdef.10 = Type:4 #Index:1 #LocalPosition:Y,X,Z #LocalRotation: P,H B #EffectFile:LIGHT_SOH_Gauge#PotentiometerIndex:3
lightdef.11 = Type:4 #Index:1 #LocalPosition:Y,X,Z #LocalRotation: P,H,B #EffectFile:LIGHT_SOH_Gauge#PotentiometerIndex:3
....
For the modern cockpit (i.e. C-54 N500EJ) I have study the various photos and for this aircraft, "gauges lights" are located on little supports which are positionned above the gauge.
In fact I have 67 supports to add and after that 67 lightsdef.XX (type:4) to add
- while accurately entering the point where the effect should appear (Y, X, Z) and the emission angles (P, H, B) so that they correctly illuminate the gauge,
- other solution, by defining 67 nodes that will then be associated with these effects via the Emesh and node parameters (in this case LocalPosition and LocalRotation parameters are no used)
lightdef.10 = Type:4 #Index:1 #LocalPosition: 0,0,0 #LocalRotation: 0,0,0 #EffectFile:LIGHT_SOH_Gauge#PotentiometerIndex:3 #EmMesh: Light_10 #Node: Light_10
lightdef.11 = Type:4 #Index:1 #LocalPosition: 0,0,0 #LocalRotation: 0,0,0 #EffectFile:LIGHT_SOH_Gauge#PotentiometerIndex:3 #EmMesh: Light_11 #Node: Light_11
....
Currently, I have equiped only 9 gauges on the modern panels (17 lights to locate with precision ...) using the first method define above.

1785749924264.png

For vintage panel, I think that I will use only backlighting of gauges and only add 6 lights under the "top panel" where are the Emergency buttons.

1785750003199.png
PS: I have tried to respect the Mike's work using a "red lighting" on the DC-4 vintage panel.

As the DC-4 has some knobs on the overhead to increase or decrease the panels lights (lh panel, engine instruments, radio, rh panel, etc) we should animate theses knobs and associated them with potentiometer number. Theses potentiometer numbers are used also in the section lights of the system.cfg to increase/decrease the gauges lights in the same time.

By declaring the various elements of the gauges (background, needles, etc.) as emissive via an appropriate behavior model, it is possible to simulate the backlighting of these elements and by associating them with the potentiometer defined for the panel to which this gauge belongs.
<Component ID="DC4_LIGHTING_ENG_EMISSIVE">
<DefaultTemplateParameters>
<POTENTIOMETER>3</POTENTIOMETER>
<FAILURE>(A:CIRCUIT ON:57, Bool)</FAILURE>
<NO_SIMVAR_LIGHT/>
<EMISSIVE_CODE>0.1</EMISSIVE_CODE>
</DefaultTemplateParameters>

<UseTemplate Name="ASOBO_LIGHTING_Panel_Emissive_Template">
<NODE_ID>eng_inst_background</NODE_ID>
</UseTemplate>

<UseTemplate Name="ASOBO_LIGHTING_Panel_Emissive_Template">
<NODE_ID>manifold_pressure_eng1</NODE_ID>
</UseTemplate>
<UseTemplate Name="ASOBO_LIGHTING_Panel_Emissive_Template">
<NODE_ID>manifold_pressure_eng2</NODE_ID>
</UseTemplate>
...
<UseTemplate Name="ASOBO_LIGHTING_Knob_Panel_Template">
<NODE_ID>custom_knob_enginst_light</NODE_ID>
<ANIM_NAME>custom_knob_enginst_light</ANIM_NAME>
<POTENTIOMETER>3</POTENTIOMETER>
<INIT_VALUE>0</INIT_VALUE>
<ID>3</ID>
<SIMVAR_INDEX>3</SIMVAR_INDEX>
</UseTemplate>
</Component>

A little picture, taking off in the morning from CN66 (all lights ON & mixture FULL RICH)

1785750798966.png
 
Last edited:
I gave the the latest version a serious test flight. Good cockpit and easy to start with a counting of the blades and smoke. Nice! Easy taxiing and take-off roll, yes it has a steerable nose wheel with is so different compared to the DC3, Mossie and Lancaster. Two remarks: when looking down from the pilot's seat the head position seems to be to the right and a bit backwards. So the position of the seat is too much left or the head position to the right. I further noticed that the elevator and rudder trim tabs are not moving and stuck at maximum.
The Dutch livery looks weird. I checked the nrm textures and they are green and different to the other grey nrm textures. I swapped them and now the aircraft looks much better. I increased the metal shine a bit to my liking.

Overall a real nice and easy to fly aircraft. Thanks Lagaffe.

1785783610720.jpeg
 
Have I been living under a complete rock and only now realised that people are alpha/beta testing this new DC4? Or are people doing screenshots of the flight replicas freeware that released on flightsim.to a while back
 
The location of the point of view is always a point of discussion: some find it too far forward, others too far back and yet it is simply a matter of personal taste, especially as changing it is childishly simple.
All is in the camera.cfg on the frst line:
[VIEWS]
eyepoint = 25.4,-1.82,4.8 ; (meter) longitudinal, lateral, vertical distance from reference datum

The original value in the flight replicas portover (released last year):
[Views]
eyepoint=25.5, -1.91, 4.8
Moreover, it depends a lot on whether you fly in VR or with a screen. As far as I’m concerned, I have a 32-inch screen.

To answer about the trims and NL repaint, I advice you to read the post #187. To be exact, the NL repaint was made from a FSX repaint (perhaps it the reason of green nrm textures) find on AVSim library and I have spend only half one hour on it. The nrm textures will be changed for the next release.
This repaint was for JAVIS who last December finally convinced me to launch this project; in the Netherlands a copy of DC-4 painted in this way is displayed near his home ;).

@Mantock: it's not an other Flight Replicas portover but a complete rebuild aircraft based on the Mike's source and with his agreement. It's a native FS20 product.
 
Last edited:
Ahhh ok. Thanks. Yes I'm now fully on msfs2024 now so won't be able to help test. Hopefully one day it comes to 2024 as well!! I'm currently building propliner era airfields and love this era.
 
Regarding the camera/eyepoint. I'm using trackIR always freshly calibrated and I take two reference points. Looking straight down should give the steering wheel/column or stick exactly down below. Looking right over the shoulder gives the head position of the copilot. Mine should be more or less the same. Of course up/down and forward/backward is not absolute as the real seat could be adjusted. But NOT left/right.

The current livery of the Aviodrone/Lelystad DC4 can be seen here: https://www.aviodrome.nl/ontdek/wat-is-er-te-doen/collectie/douglas-c54a-skymaster.
 
Ahhh ok. Thanks. Yes I'm now fully on msfs2024 now so won't be able to help test. Hopefully one day it comes to 2024 as well!! I'm currently building propliner era airfields and love this era.
It is 2024 compatible though!
 
Back
Top