• Guest Please check out the Help Wanted thread in Ickie's NewsHawks.
    The future of the Outhouse depends on you!
    Help Wanted

Gmax Video Tutorial Series - Beginning Modeler

Milt,

These tutorials are perfect for me. It's great to have access to an accomplished modeler's processes while demonstrating the care and patience necessary to complete a project.

I have made many attempts to model but of only completed a few. Problem solving, getting painted into corners and vertex pushing is the nature of the beast. Planning based on experience is one aspect that is obvious from your work that appears key to ensure success. The building struggles that I've now seen you deal with have encouraged me to renew my attempts.

I enjoy these a lot and look forward to more.

Thanks you for your time and effort.

Regards,

Mike

Hi Mike,

Your comments are greatly appreciated. I agree Mike; there's some planning, patience, and problem solving involved... and a lot of personal rewards for the effort. To me, every new project is like a new toy at Christmas, one I can share with others. :) Very happy these tutorials are helpful to you Mike. Have a great day.
 
Gmax 1.2 for the Beg Modeler 20 - Finish Fuselage - Part 3

Gmax 1.2 for the Beginning Modeler #20 - Finish Fuselage - Part 3


Objective: Build the Nose Gear Doors, Set Pivots, Animate Doors

Youtube link: https://youtu.be/4m3QwzNbMcQ

Author: Milton Shupe

Steps:

1) Build cutting tools to Boolean Nose gear doors
2) Boolean cut the doors
3) Set pivots and animate each door, link to fuselage
4) Add the inner surface to the doors, link and smooth

------------------------------------------------------------------
Gmax 1.2 for the Beginning Modeler #21 - Finish Fuselage - Part 4


Objective: Finalize the Nose Gear Doors and pilot entry/exit area with a wheel well and internal walls

Youtube link: https://youtu.be/JNA5UTrB7vE

Author: Milton Shupe

Steps:

1) Construct Nose gear wheel well using extrude, flatten the ceiling and adjust
2) Construct walls around the entry/exit door

This completes the fuselage.
 
Last edited:
I've watched a number of these "Shupetorial" videos, and can say from the perspective of someone who has gone through the often painful process of learning the complexities of Gmax and 3DS Max modeling, these are the finest tutorial videos I have seen.

They are patient, comprehensive and sensible. The pace of the teaching should be very easy for anyone to follow. Excelante'...:very_drunk:

Thank you sir!
 
Gmax 1.2 for Beginning Modelers v22 - Build Wings - Part 1

------------------------------------------------------------------
Gmax 1.2 for the Beginning Modeler #22 - Build Wings - Part 1


Objective: Construct the wing from the 3-view drawing


Youtube link: https://youtu.be/3Y94PKTJdKg


Author: Milton Shupe


Steps:


1) Using the standard primitive, cylinder, shape the vertices to the wing root air foil
2) Position the mesh using the TOP (T) viewport and extend its
length and mid-wing diameter per the drawing.
3) Now extend the mesh to the outer wing tip root
4) Build the rounded wing tip
5) Adjust the wing vertically from the BACK (K) viewport
 
I've watched a number of these "Shupetorial" videos, and can say from the perspective of someone who has gone through the often painful process of learning the complexities of Gmax and 3DS Max modeling, these are the finest tutorial videos I have seen.

They are patient, comprehensive and sensible. The pace of the teaching should be very easy for anyone to follow. Excelante'...:very_drunk:

Thank you sir!

Gordon, thank you for those comments. Not a tutor, teacher, or presenter so one needs feedback to get a sense of how this is being received and to its usefulness. In that regard, I am most appreciative.

Just posted the start of Wings Construction so we are rolling now.

Also, FYI, Camstudio locked up on me during final save of a video; I lost my settings. In getting it setup again, I stumbled across amazing results in both quality and file size reductions. I can now do 75-90 min videos if I wanted; I don't but at least I have a safety margin such that length is not a worry.
 
Milton, I have downloaded all videos so far but I have one small problem. I have my computer sound settings set to the highest volume and the YouTube player is also set to full volume but when I go to play the video the sound is very low and sometimes appears muffled. All the sounds in my flight sim are good as are any other sounds on the computer. I am liking how you are breaking these tutorials into small manageable bits and look forward to enjoying them when I get the sound problem fixed.
 
Milton, I have downloaded all videos so far but I have one small problem. I have my computer sound settings set to the highest volume and the YouTube player is also set to full volume but when I go to play the video the sound is very low and sometimes appears muffled. All the sounds in my flight sim are good as are any other sounds on the computer. I am liking how you are breaking these tutorials into small manageable bits and look forward to enjoying them when I get the sound problem fixed.

Thanks AM. How are your viewing the videos, meaning what browser or video player?

Have you tried viewing them online at Youtube and do they play okay there?
That is, is it a download player issue?

My volume is strong on all of my choices, either raw before upload or at Youtube with the Opera browser, Firefox or Chrome.
 
Gmax 1.2 for the Beginning Modeler 23 - Build Wings - Part 2

Gmax 1.2 for the Beginning Modeler #23 - Build Wings - Part 2


Objective: Build Wing Flaps and Ailerons, and Fit to Fuselage


Youtube link: https://youtu.be/yF555Cqxi0o


Author: Milton Shupe


Steps:


1) Build Cut Tools to Boolean Flaps, Ailerons and Trim Tab
2) Close in the new parts
3) Fit the Wing Root to the Fuselage


------------------------------------------------------------------
Gmax 1.2 for the Beginning Modeler #24 - Build Wings - Part 3


Objective: Build Split Flap and Aileron Trim Tab, Clone Left Wing and Parts to Right Side

Youtube link: https://youtu.be/jJ7rKLhcBMU


Author: Milton Shupe


Steps:


1) Finish up the control surfaces (Split Flap and Trim Tab)
2) Clone the left wing and parts and mirror to the right side
3) Set pivots for all the control surface parts
------------------------------------------------------------------
Gmax 1.2 for the Beginning Modeler #25 - Build Wings - Part 4


Objective: Set Pivots for the new wing parts for proper animation; cut in navigation lights; assign glass texture to canopy
and nav light lens; build wing air intake guides; build pitot


Youtube link: https://youtu.be/CTOUL31KqvM


Author: Milton Shupe


Steps:


Demonstrate how the wing intake air guides were built
1) Cut in navigation light lens
2) Build the pitot
3) Set pivots for animated control surfaces
4) Clone the left wing and parts and mirror to right side


This video completes the wing construction series.

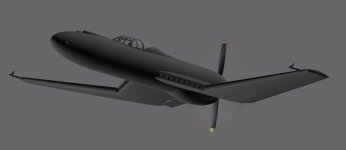
This is what we have accomplished in the first 25 videos.
 

Attachments

  • HOMEUNIT-2017-jan-24-001.jpg
    HOMEUNIT-2017-jan-24-001.jpg
    11.2 KB · Views: 14
Last edited:
Gmax 1.2 for the Beginning Modeler #26 - Booms and Tails

Gmax 1.2 for the Beginning Modeler #26 - Booms and Tails - Part 1 - The Boom


Objective: Construct the Boom, Vertical and Horizontal Tails


Youtube link: https://youtu.be/nK4nmgonq4w


Author: Milton Shupe

Focus in this video is constructing the Boom


Steps:


1) Construct the left boom using the standard primitive Cylinder
2) Shape the boom per the 3-view and rough fit to the wing

------------------------------------------------------------------
Gmax 1.2 for the Beginning Modeler #27 - Booms and Tails - Part 2 - Vertical Tail Construction


Objective: Construct the Boom, Vertical and Horizontal Tails

NOTE: I had to re-upload this video so it is now a different link. If you downloaded it already, you need to do that again.
Youtube link: https://youtu.be/zBPfmJl9RnQ


Author: Milton Shupe


Steps:


1) Construct the left Vertical Tail using the standard primitive Cylinder
2) Shape the VTail per the 3-view and cut in the rudder and trim tab
3) Set pivots for animation and link to parents
------------------------------------------------------------------
Gmax 1.2 for the Beginning Modeler #28 - Booms and Tails - Part 3 - Horizontal Tail Construction


Objective: Construct the Boom, Vertical and Horizontal Tails


Youtube link: https://youtu.be/n0l8w_uiMuk


Author: Milton Shupe


Steps:


1) Construct the Horizontal Tail using the standard primitive Box
2) Shape the HTail per the 3-view and cut in the Elevator and trim tabs
3) Set Pivots for animation

------------------------------------------------------------------
Gmax 1.2 for the Beginning Modeler #29 - Booms and Tails - Part 4 - Clone Left Boom and VTail to Right Side and Fillet the Horizontal Tail to the Booms


Objective: Construct the Boom, Vertical and Horizontal Tails

Youtube link: https://youtu.be/86wszp2VX2I

Author: Milton Shupe

Steps:

1) Clone the left boom and vertical tail parts, mirror them, and move to the right side
2) Finish out the horizontal tail by filleting the ends to the booms
3) Complete the htail work by re-smoothing all the polys
4) Link the right boom to the right side wing
 
Last edited:
AussieMan,
I agree with you. The voice could be a little louder. I have Sony Vegas so I run the downloaded videos in it and can boost the voice a few db's. My PC speakers are ok for music but maybe not voice, which is really the problem, and not Milton's fault. Oh well. Maybe someone can buy Milton a better dynamic mike for his birthday (hehe). Thanks Milton. Great job. I am at #2 and slowly soaking it all in (overwhelmed is putting it mildly). It's scary but it feels good at the same time. I bought some Centrum vitamins and minerals (Senior Formula) for the job. Time for my nap - CYA.
Chuck B
Napamule

Okay guys, I turned the mike volume up to max (was at 80%). I do use a boom mike on a headset. The volume comes through loud and clear here so my apologies.
You might verify your output settings are up all the way, or use a headset. Some headsets also have volume controls.
If your speakers are not powered with an amp, then I can understand your issue.

I ask for feedback in every video and no one yet has suggested louder volume until you guys spoke up. Well, I am ready to post video #27 and its a bit late now to correct all the early ones.

Have you tried listening on Youtube? I just do not have trouble hearing any way I listen.

Chuck, happy to hear you are on video 2. I take it nice and easy for the first 8-10 videos so you should have time to let it soak in. :)

Thanks for the heads-up; volume cranked to max.
 
Gmax for the Beging Modeler #30 - Exporting Project to FS9

-----------------------------------------------------------------
Gmax 1.2 for the Beginning Modeler #30 - Exporting Project to Flight Sim

Objective: Export the Project to Flight Simulator

Youtube link: https://youtu.be/5-DWIKoRSXA

Author: Milton Shupe

Steps:

1) Prepare the project for Export
2) Prepare Flight Sim to receive your exported aircraft
3) Export
 
Gmax 1.2 for the Beging Modeler v31-Build and Animate Gear

Gmax 1.2 for the Beginning Modeler #31 - Build and Animate Gear Parts

Objective: Build and Animate the Main Gear and Nose Gear

Youtube link: https://youtu.be/MtyvfNuSETY

Author: Milton Shupe

Steps:
1) Identify the parts of the gear
2) Build top down starting with the upper gear strut; link to parent
3) Build the lower gear oleo; link to parent
4) Build the axle,
wheel and tire; link to parents
5) Build the torque links (scissors); link to parent
6) Animate
7) Build the retractor bar and the pivot bar; link to parent


--------------------------------------------------------------
Gmax 1.2 for the Beginning Modeler #32 - Build and Animate Gear Parts


Objective: Build and Animate the Main Gear and Nose Gear

Youtube link: https://youtu.be/sUbkFZJK7I4

Author: Milton Shupe

Steps:
Done 1) Identify the parts of the gear
Done 2) Build top down starting with the upper gear strut; link to parent; set pivot
Done 3) Build the lower gear oleo; link to parent; set pivot
4) Build the axle, wheel and tire; link to parents; set pivot
5) Build the torque links (scissors); link to parent; set pivot
6) Animate
7) Build the retractor bar and the pivot bar; link to parent; set pivot

-----------------------------------------------------------------
Gmax 1.2 for the Beginning Modeler #33 - Build and Animate Gear Parts


Objective: Build and Animate the Main Gear and Nose Gear

Youtube link: https://youtu.be/6g_wI65Mpxw

Author: Milton Shupe

Steps:
Done 1) Identify the parts of the gear
Done 2) Build top down starting with the upper gear strut; link to parent; set pivot
Done 3) Build the lower gear oleo; link to parent; set pivot
Done 4) Build the axle, wheel and tire; link to parents; set pivots
5) Build the torque links (scissors); link to parent; set pivot
6) Animate
7) Build the retractor bar and the pivot bar; link to parent
; set pivot

-----------------------------------------------------------------
Gmax 1.2 for the Beginning Modeler #34 - Build and Animate Gear Parts - Part 4

Objective: Build and Animate the Main Gear and Nose Gear

Youtube link: https://youtu.be/7nwo5qL6nWk

Author: Milton Shupe

Steps:

1) Identify differences between nose/tail gear and main gear
2) Setting up nose gear to rotate for steering
3) Animating C_wheel steering

-----------------------------------------------------------------
Gmax 1.2 for the Beginning Modeler #35 - Wrap Up Animate Gear Parts - Part 5


Objective: Wrap Up the Main Gear and Nose Gear

Youtube link: https://youtu.be/FRH2EImryOk

Author: Milton Shupe

Steps:
1) Main Gear final Animation
2) Boom wheel well finish
3) Rudder Trim Tabs Animation
4) Landing Light Addition
5) Next-Contact Points and other Data
 
Last edited:
Gmax Video Tutorials for Beginning Modelers

I have added a link to these YouTube based videos so they will be easy to find.

Just look at my signature and click on the appropriate item.
 
Gmax 1.2 for the Beginning Modeler v36 - Aircraft.cfg Data

Gmax 1.2 for the Beginning Modeler #36 - Aircraft.cfg Data

Objective: Transferring Gmax Data to the Aircraft.cfg

Youtube link: https://youtu.be/0hjZP14BueY

Author: Milton Shupe

Key Points:
1) Units Setup - change to Decimal Feet for Aircraft.cfg
2) Gmax coordinates display versus the Aircraft.cfg
3) How to get proper coordinates in Gmax
4) Copy paste data to cfg
5) Suspension setup points (Key for cfg to match animation)
a) Total suspension movement (67% mains; 40% nose)
b) Max-static ratio (1.5 mains; 2.5 nose)
c) Damping (0.9 - 1.0)
NOTE: static compression * Ratio = Total suspension animation (always ensure this is true)
 
Melo, thank you so much for your comments. It is encouraging to know that people will use the videos and that the videos are helpful.

I am working on videos #12 & 13 right now, Constructing the canopy.

Once we get a canopy and wind screen constructed, progress will pick up at a pretty good clip.

WOW! :)

The videos have been very helpful so far. During the previous weekend, I managed to get through three of the videos and found some basic settings that were not set correctly in my GMax, and also the bit about centering the gizmo on every part after it is created. Now I know why some of my previous parts did not behave as expected when moving or rotating things.

Last week I was on a business trip and had a very busy week. I was amazed when I checked back in today to see so many videos already published. It will be fantastic to get caught up and really learn how to master GMax. Thank you so much for the wonderful work you are doing to help us all!
 
Gmax 1.2 for the Beging Modeler #37-Intro to Texture Mapping

Gmax 1.2 for the Beginning Modeler #37 - Introduction and Preparation for Texture Mapping Part1

Objectives:
1) Explain Mapping and types we will use
2) Gain understanding of preparation necessary to organize the mapping process

Youtube link: https://youtu.be/F2qNEOGTrIw

Author: Milton Shupe

Key Points:
1) What is texture mapping? UVW Coordinates? Texture sheets?
2) Implications of Mapping 3D objects to a 2D texture sheet
3) See UVW Mapping in Help for basic info.
4) Texture sheet sizes - 2048, 1024, 512, 256, 128, 64
FS9 uses a maximum size of 1024X1024
5) Resolution considerations - pixels per inch/cm/meter

-----------------------------------------------------------------
Gmax 1.2 for the Beginning Modeler #38 - Preparation for Texture Mapping Part 2


Objectives:
1) Learn importance of a structured selection process
2) Learn the methods to make selections easy and error-free
3) Learn viewing options to validate and ease selections
4) Learn how to bake in your selections
5) Learn how to correct mistakes

Caveat: There are many methods and approaches to mapping; this is mine for FS9

Youtube link: https://youtu.be/U46jXNO1iRI

Author:
Milton Shupe

Key Points:

1) Material ID Selection groups
2) Methods to do poly selections to minimize errors
3) Assigning Material ID selection groups
4) Using Ignore Backfacing, wireframe view, and shading to your advantage

-----------------------------------------------------------------
Gmax 1.2 for the Beginning Modeler #39 - Texture Mapping Part 3


Objectives:
1) Learn how to apply poly selects, then use the material ID selection to select the pre-assigned poly selection group you want
2) Learn how to apply a UVW Map, size it, orient it, and position the UVW Gizmo correctly for the texture sheet
3) Export the mapping
4) Open LithUnwrap, import the model and check for errors
5) Save a texture template as a bmp
6) Create a new material, open the new bmp and assign to the mapped parts
7) Set other material values as desired
8) Merge canopy map to the fuselage map

Caveat: There are many methods and approaches to mapping; this is the way I do it for FS9.

Youtube link: https://youtu.be/_1rySA6_9bw

Author: Milton Shupe

Links to Mapping Tutorials Done by Others:

UVW Mapping in Gmax - Part 1 (by "Hairyspin") - http://www.fsdeveloper.com/forum/resources/

also available here:

http://www.sim-outhouse.com/sohforums/showthread.php/89779
 
Last edited:
WOW! :)

The videos have been very helpful so far. During the previous weekend, I managed to get through three of the videos and found some basic settings that were not set correctly in my GMax, and also the bit about centering the gizmo on every part after it is created. Now I know why some of my previous parts did not behave as expected when moving or rotating things.

Last week I was on a business trip and had a very busy week. I was amazed when I checked back in today to see so many videos already published. It will be fantastic to get caught up and really learn how to master GMax. Thank you so much for the wonderful work you are doing to help us all!

Thank you Melo. It gives me great pleasure to know that the videos are helping to get new modelers producing. We old guys need to pass on the torch while we can :)
 
Gmax 1.2 for the Beging Modeler v40 - Virtual Cockpit Intro

Gmax 1.2 for the Beginning Modeler #40 - Virtual Cockpit Intro

Objective: Intro to the Virtual Cockpit Construction

Youtube link: https://youtu.be/opALitDFQ0A

Author: Milton Shupe

Key Points:

1) Most important Part of the Interior Model - the VC; this is where most of pilot's time is spent, and where most of your time modeling will be invested
2) Key differences in construction from exterior model parts
....a) Closeness to view - texture resolution must be very high
....b) Vertice closeness restrictions and impact; parts are smaller so many sided objects are hard to pass the limit restriction on closeness
....c) Lack of dimensional data for parts
....d) Lack of scale drawings
....e) Poor data availability for other than panel - maintenance manuals and POH helps
....f) For older aircraft, reference pictures may not be available
....g) Impact on modeling; time required; number of parts and polys; building from the inside
3) Comparison of untextured VC to final textured VC appearance shows value of texture artistry
4) Most of the VC is eye candy; only some of it is functional
5) What about the outside parts? Is that part of the VC?
6) Okay, now how do we build a VC? How do we get started?
7) Clone the Exterior model to Interior Model (after exterior is completed and mapped)
8) Provides exact structure to build the cockpit
9) Separate scene or same
 
Outstandingly brilliant series of highly in-depth, but hands-on tutorials.


A massively generous gift which provides everything needed to getting creative and enriching the sim World with YOUR very own creations.


Massive, massive KUDOS, Milton!
 
Back
Top