• Guest Please check out the Help Wanted thread in Ickie's NewsHawks.
    The future of the Outhouse depends on you!
    Help Wanted

Gmax Video Tutorial Series - Beginning Modeler

Gmax 1.2 for the Beging Modeler v41 - Build Virtual Cockpit

Gmax 1.2 for the Beginning Modeler #41 - Build Virtual Cockpit Part 2

Objective: Virtual Cockpit - Show How to Get Started with Infrastructure

Youtube link: https://youtu.be/horq-SfCI2o

Author: Milton Shupe

Steps:
1) Create a basic infrastructure
2) Isolate your work in new scene
3) Create the panel and glareshield
4) Prepare the panel for gauge display
5) Build parts for each side wall and floor

Related video:
Creating a Basic VC Panel and Displaying Gauges in Less than 15 Minutes:
https://www.youtube.com/watch?v=UC3By8GNM7k
 
Gmax 1.2 for the Beging Modeler v42 - Build VC-Part 3

Gmax 1.2 for the Beginning Modeler #42 - Build Virtual Cockpit Part 3

Objective: Virtual Cockpit - Refine VC Walls, Add Rudder Pedals

Youtube link: https://youtu.be/v91CmYs-l5w

Author: Milton Shupe

Steps:
1) Refine walls for visual interest, realism, and function
2) Build rudder pedals, then animate

-----------------------------------------------------------------
Gmax 1.2 for the Beginning Modeler #43 - Build Virtual Cockpit - Part 4


Objective: Virtual Cockpit - Build Joystick Control and Animate

Youtube link: https://youtu.be/kjbBIKSYIvg

Author: Milton Shupe

Steps:

1) Create the joystick control and parent objects
2) Set Pivots and animate
3) Build Seat

-----------------------------------------------------------------
Gmax 1.2 for the Beginning Modeler #44 - Build Virtual Cockpit Part 5


Objective: Virtual Cockpit - Build Electrical Box, ECU, Levers and Animate

Youtube link: https://youtu.be/7OIGT5_Y2Kg

Author: Milton Shupe

Steps:
1) Build Electrical Box
2) Build the ECU, shape, cut in slots, add levers, and animate.
3) Add lever handles and knobs

-----------------------------------------------------------------
Gmax 1.2 for the Beginning Modeler #45 - Build Virtual Cockpit Part 6


Objective: Virtual Cockpit - Discuss Added Flaps, Gear, Switches controls, and Prepare VC Panel for Gauges

Youtube link: https://youtu.be/CtJexgwujPU

Author: Milton Shupe

Topics:

1) Discuss other VC animated objects and added items of visual interest
2) Prepare panel to receive gauges

Steps to prepare VC panel for gauge display:
1) Clone the face polys of the panel; name it vc01
2) Link vc01 to the VC panel
3) Reset pivot Center and align
4) Move the vc01 planar .002m (.006 feet/.078") from vcpanel
5) Map the vc01 to a square UVW
6) Export the mapped vc01 to Lithunwrap
7) Create/save a new bmp from Lithunwrap named $vc01
8) In Gmax, create a new material and add $vc01 bmp
9) Apply to vc01
Done

FS2004 SDK:
FSDeveloper website: FS2004 SDK Documentation in .pdf format:
http://www.fsdeveloper.com/forum/resources/

Also of interest:

Creating a Basic VC Panel and Displaying Gauges in Less than 15 Minutes:
https://www.youtube.com/watch?v=UC3By8GNM7k
 
Last edited:
Outstandingly brilliant series of highly in-depth, but hands-on tutorials.


A massively generous gift which provides everything needed to getting creative and enriching the sim World with YOUR very own creations.


Massive, massive KUDOS, Milton!

Hellooooo Nigel :)

Great to "see" you again. :)

Well, not sure about brilliant, but at least they are finally getting done. Just trying to do my basic modeling thing again. Hopefully it will help some good modelers get a start.

Thank you Sir.
 
Gmax 1.2 for the Beging Modeler v46 - Test VC in Sim Part 7

Gmax 1.2 for the Beginning Modeler #46 - Test VC in Sim Part 7

NOTE: This is the last of the construction series. One more video to come focusing on generating a flight model.

Objective: Virtual Cockpit - Export to Sim, Add Gauges, Test VC Animations

Youtube link: https://youtu.be/Ror0UjmH4mU

Author: Milton Shupe

Steps:
1) Merge VC to primary aircraft scene
2) Create Interior model; export to sim
3) Show Panel.cfg vcockpit01 entries - discuss params
4) Show vc01.bmp in panel folder
5) Open FSPanel Studio to show gauges adds
6) Open FS9 to show results

If you are interested in FSPanelStudio:

FSPanelStudio Review:

http://www.flightsim.com/vbfs/content.php?861-FS-Panel-Studio

FSPanelStudio Purchase:

http://www.fspilotshop.com/flight1-panel-studio-p-289.html?osCsid=8b50jhl18539u9pf7s1nhcr5r2
 
Gmax 1.2 for the Beging Modeler v47-Generating Flight Models

NOTE: This is the Final Video in the Tutorial Series
Here's hoping that these tutorials finally get you over that early gmax learning hump. :)

-----------------------------------------------------------------
Gmax 1.2 for the Beginning Modeler #47 - Generating Flight Models


Objective: Discuss Tools to generate and Test Flight Model

Youtube link: https://youtu.be/egbuHW_VxQw

Author: Milton Shupe

Topics:
1) Generating a flight model, or Flight Dynamics
2) The air and cfg files
3) Tools
a) AirEd and AAM - http://www.aero.sors.fr
b) Airwrench - http://www.mudpond.org/
c) AFSD - http://www.aero.sors.fr
d) Test Panels - http://www.mudpond.org/
e) FS Internals on Flight Model Development - http://www.aero.sors.fr/fsairfile.html

4) SDK's - http://www.aero.sors.fr
5) Aircraft Development support websites:

FSDeveloper - http://www.fsdeveloper.com/forum/forums/flight-dynamics.65/
AVSIM - http://forums1.avsim.net/index.php?showforum=122
 
Hi Milton,

Working on video #20 now. Amazing and helpful throughout. And I like the default speed of the videos, helps things sink in better. After watching video #19 could you comment some on how you build the prop blade? Is it just a cylinder that is shaped and then rotated and then tips are rounded off using extrude?

And I noticed you are building the aircraft fuselage as a whole, and I have gotten some previous advice that it should be built as one half only at first, and then copied to the other side, therefore ending up with identical aircraft sides when copied. Is that just a personal preference, so it does not really matter which way I go about it?

Diving into video 20 now, very gratefully. :)

Best regards,
Melo

Melo, thank you; happy the videos are proving useful to you.

Re: Prop blades - I've built them several different ways. Probably the easiest is to use a cylinder standing vertically to start with around 8-10~ segments. Use non-uniform scale to flatten (all but the shank end), and shape the leading/trailing edges out from the rounded shank. Shape width wise using non-uniform scale. Once you have the shape you want, then go to the Top view, and start gentle twists of the blade segment vertices using the rotate tool. Your data should have the targeted twist at the 30"~ station. Compare your result to pictures of your blade and tweak to perfection.

Re: Fuselage - I do it both ways usually in the same project. I keep both sides together because its the only way to use the non-uniform scale tool effectively (and I use that often). If I am focused on reconstructing a lot of polys by hand on one side, (which I do often for clean mesh), I will then delete one side, clone the remaining side, set the X pivot to 0.0, clone and mirror, and put the halves back together with a Weld at .004m. Because that project fuselage was a cylinder, there were no real mesh anomalies to cause me to have to do that.

I did however do that when making the windshield framework because of having to adjust so many vertices. It was simpler to adjust one side, clone and mirror.

Hi Milton,

Thanks for the advice on building the prop. The first prop I will need to build is a Spitfire prop. Building a Mk XI PR Spitfire will be my second Gmax project. My first Gmax project is a jet, so will not need any props. But the fuselage of the jet will get rebuilt again (for the third time now), after watching and absorbing your great video tutorials. Learned a lot and see many ways I can improve on my previous efforts. :)

For the Spitfire build I have excellent fuselage cross section drawings so that should be easy to get very accurate. For the jet project, I don't have good cross sections so I will restart with cylinders. Thanks again for the great help!

I am on video #25 now, so am more than half way through your series.

Best regards,
Melo
 
Hi Barry,

Thanks a lot! That is just what I was looking for. Very helpful. Saving that link to my resource list. :)

Best regards,
Melo
 
Hi Milton,

As of today have got through the first 35 videos. They are excellent! Can't thank you enough. :)

I am already thinking through in my head many ways I can fix/improve the current aircraft project I was working on. Going to get through the rest of your videos though before I dive back in.

One thing you mentioned in one of the recent videos that I don't have in my Gmax setup is the "Max Script Tag Tool". Can you please advise where I can finds that to add it to my Gmax setup?

Thanks!

Best regards,
Melo

Melo,

Thank you for your comments. I agree, watch all, then go back as you need to refresh. That helps to complete the big picture before you dive in.

Last time I went to get that link, I had trouble finding it. But Google search with "FS Alpha Tag tool" found it right away.

I could provide a direct link but that would be inappropriate to the creator, here is a link to his tutorials that also includes a link to the Tagtool download about 3/4 way down the page.

Bruce and I were learning Gmax at the same time and he was instrumental in helping me work thru the mapping process ... we were learning at about the same pace, he was creating tutorials for me, and I was applying the methods almost real time.

http://www.fsalpha.com/tutorials/tutorials.shtml
 
Hi Milton,

(I tried replying with quote first, but my spacebar would not work in that instance, even after a PC reboot)

Thanks, yes I agree that it is best to get through the whole series first!

I have the Tag Tool installed in my Gmax now, thanks a lot. I had actually been to his site before a while back, just did not realize the importance/relevance of the Tag Tool program at that point. Learning something new every day. :)

I was also reviewing your video #30 about exporting from Gmax into FS9, and was wondering about the Middle Man 1.3 program you are using. I did a search on the web and after some searching was able to find Middle Man version 1.3 beta 3. Is that the most current version available? I did see the the original download links are now gone.

Can you also comment on the model commander program? Is it useful as well for the Gmax to FS9 import process?

On to the next video to learn about texturing! :)

Thanks again!

Best regards,
Melo
 
Melo,

That would be the one according to my version.

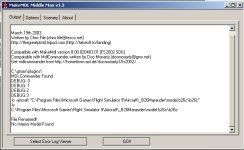
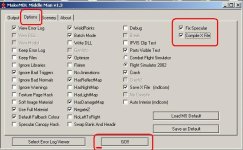
Middleman and MdlCommander work together to do the export providing a GUI interface and other fixes to improve your model. Hopefully your download got you both of them.

See attached.

Once you are ready to use them, check your options settings against my posted options.

You must also select under the Options tab - Specular Fix and Compile X File Check Boxes
 

Attachments

  • HOMEUNIT-2017-feb-21-021.jpg
    HOMEUNIT-2017-feb-21-021.jpg
    46.1 KB · Views: 1
  • HOMEUNIT-2017-feb-21-022.jpg
    HOMEUNIT-2017-feb-21-022.jpg
    78.9 KB · Views: 2
  • HOMEUNIT-2017-feb-21-023.jpg
    HOMEUNIT-2017-feb-21-023.jpg
    50.9 KB · Views: 2
Melo,

That would be the one according to my version.

Middleman and MdlCommander work together to do the export providing a GUI interface and other fixes to improve your model. Hopefully your download got you both of them.

See attached.

Once you are ready to use them, check your options settings against my posted options.

You must also select under the Options tab - Specular Fix and Compile X File Check Boxes

Hi Milton,

I figured out the reply with quote bit. In Chrome my spacebar does not work (only in Reply with quote), in IE it does, go figure.

I did a bit more searching today and got the official MDL Commander for sure. Thanks for the options screen, I also captured a screenshot from your video.

Now that I am on the second texturing video, better go back and grab LithUnwrap too, then should have all the needed programs to proceed. :)

Best regards,
Melo
 
Hi Milton,

Finished video #47 on Friday. Excellent series, thank you very much!!! :)

Reshaping my fuselage (version 2) today. Once it gets further along I will post a comparison of where I was on this project before and after your video series. I thought it was going to be a piece of cake after watching you, but some things still don't seem to work as smoothly for me, as when you demonstrated them in your videos. But now at least I know enough to do some work-arounds or get to the same result a different way.

For all you new guys out there, don't forget to keep an eye on whether Ignore Backfacing is on or off. When I was finishing up and capping the rear end of the fuselage, I accidentally had ignore backfacing on. What a mess, and thank goodness for frequent saves and the undo button.

Best regards,
Melo
 
Hi Milton,

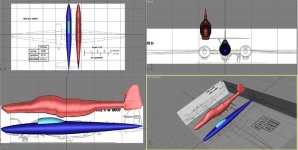
So it may take me a while, but I am on my way now, thanks to you! Watched all 47 videos, figured out how to make an exterior node/part, and centered that at 0,0,0. Also centered my calibration backgrounds and aircraft there, at a reasonable 1/4 MAC location, and started rebuilding the aircraft from scratch. Rebuilt the fuselage, and got a rear canopy part completed that I am very happy with after trying a number of approaches this weekend.

The attached picture shows where I am so far. The red aircraft is the before tutorial version, the blue is the after tutorial version. :)

Thanks again.

Best regards,
Melo

attachment.php
 

Attachments

  • fuselage-2 and rear canopy.jpg
    fuselage-2 and rear canopy.jpg
    57.5 KB · Views: 120
Back
Top