• There seems to be an uptick in Political comments in recent months. Those of us who are long time members of the site know that Political and Religious content has been banned for years. Nothing has changed. Please leave all political and religious comments out of the forums.

    If you recently joined the forums you were not presented with this restriction in the terms of service. This was due to a conversion error when we went from vBulletin to Xenforo. We have updated our terms of service to reflect these corrections.

    Please note any post refering to a politician will be considered political even if it is intended to be humor. Our experience is these topics have a way of dividing the forums and causing deep resentment among members. It is a poison to the community. We appreciate compliance with the rules.

    The Staff of SOH

  • Server side Maintenance is done. We still have an update to the forum software to run but that one will have to wait for a better time.

Learning AD2K

I beg your Pardon!

Hello Smilo,
Thanks again... I beg your pardon, I didn´t know this was going to have such grave consequences...sorry to have insisted on my idea...In my defence, I´d say I thought I´d just try adding the Jump Gear thing to what there was.
As it was only 4 more lines, I thought it wouldn´t hurt, but of course...Yes, I see your point.

Separating the Main Code into sections like you said in your previous E-mail was my next plan.
Thank you so much for fine-detailing the steps.

That will be fun to follow! - As detailed as any professional tutorial, absolutely!
I will go through all the instructions in both e-mails and do it. THEN, I´ll post another post!

Cheers,
Aleatorylamp
 
well, Stephan, i don't see it as grave consequences.
i see it more as getting the basics down pat,
before moving on the next phase.
sorry if i scared you.

while it's true, knowledge can be gained
by studying and copying another's work,
real, lasting knowledge comes from
first hand experience...
getting one's hands dirty, so to speak.

please understand, i don't know
all there is to know about ad2k.
last week, clearly proved that.
but, i am willing to explore the program with you
and reveal any secrets i may have buried in this old brain.

i am, by no stretch of the imagination,
a master ad2k builder, but, i do have some experience.
who knows, i might learn something.
actually, i already have.

so, if you want to play....let's go.
i'm ready to rock and roll if you are.

ps, i'm amazed that this thread
has already had over 3,300 views.
who are all the viewers?
i thought cfs was dead.
apparently, not...welcome
 
hello Stephan, i'm unable to read
the model editor you posted.
the image is too small
for tired old eyes.
please zip the 3DM as it is
and post it,
so i can drop it into ad2k
and have a close look at it.
obviously, my radical methodology
is too much to ask.
 
Hello Smilo,
Grave consequences was only an exaggeration, I thought you were a bit upset, but I´m glad you aren´t!

Actually, looking at the length of your Main Code Page for the initial version of the CubeFly, it is striking to
see how effective it is - so I put in the externally retracting landing gear to make it completely bleed-free.
I saved that one separately changing the name to "MCubFly2" ("M" for Smilo)!
"MCubFly1" doesn´t exist, as it´s really the original bleed-riddled CubeFly.

If recommended procedure, and it seems logical, is to split the plane up into more sub-assemblies
for decent Jump Plane Sequencing, then what you have done on the CubeFly qualifies as a work of art.
So I thought I´d try and fix that in a quick way... well...

Thanks for offering to look into that build file! The Build name is "MCubFly3".
I´ll include the aircraft files too so you just have to select the working directories, not make them.

Cheers,
Aleatorylamp
 
it's not necessary to send more than the 3DM.
as i said above, if i open, work on and compile
a model of a different name, after compiling,
it will be sent to the original cubefly aircraft folder directly.
the model file and aircraft .cfg will have the new name.
of course, it can not be viewed in cfs,
until there is an .air file of the same name.
my cfs cubefly folder has several .air files
of several different names. easy peasy.
no need to change the directories.
 
Hello Smilo,
A practical way for prototype testing! That way there´s not much clutter.
I´ve just e-mailed the zipped .3dm file to you, including the Main Code Page screenshot for easier reading.

What happened to the Forum-Post-Text-Editor? I can no longer easily paste things in as before.
It used to only put in extra spaces which I could easily delete, but now, with all the squares, tables and windows, I´m getting my knickers into a twist. Obviously it has been done to make things easier, so I have to see how.

You commented on the visits to the thread. That´s quite a lot, so it must be interesting - or fun - or funny - to follow!

OK, Smilo, Thanks again!
Cheers,
Aleatorylamp
 
what? there is something amiss
with the forum text editor?...oh grand.
sorry, i hadn't noticed.
hopefully, one of the senior admins
can straighten it out or at least explain.
(how's that for passing the buck upstairs?)

okay, are you ready for this?
grab a cup of coffee, tea ,
or any beverage of your choice,
this might take a while.

i received your email and the zip, thank you.
i dropped the mcubefly3DM into the ad2k cubefly folder,
fired up ad2k, clicked open and selected it,
went directly to model editor (F9)
and compiled (again, F9),
then, minimized ad2k and opened cfs/aircraft/cubefly folder.
as you know, this is the project destination folder.
i copy/pasted the existing cubefly.air file
to be reused in a few seconds.
next, i opened the aircraft.cfg file
and copied the title=MCUBEFLY3 and closed the cfg document.
next, i right clicked that copy of cubefly.air file
and pasted that new aircraft.cfg title, MCUBEFLY3.

dang, what a convoluted explanation for an easy shortcut,
the purpose of which is to quickly add a new ad2k project aircraft to cfs.

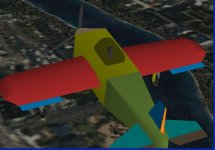
okay, so, fire up cfs, select mcubefly3
from the aircraft list
and have a look at her.
with the exception of a third gear
protruding from the middle of the fuselage,
she looks pretty good.
so, what's up with that?
any clues?
well, yes, there are.
which gear is the middle one, left or right?
key, Alt, A, A and select the next aircraft on the list.
what? why? because, if you try to compile ad2k
with the project aircraft flying,
you will get an error message.
minimize cfs to the task bar
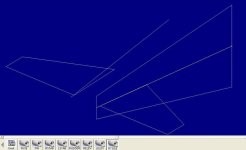
and bring up ad2k and go to the model editor.
at the very top of the main page,
click to highlight the entry just below MASTER.
key, Ins, then, Enter to add a Return call.
this will, basically, block every instruction below it
from showing in the next compiled model.

(please, bare with me here)

while the new Return is highlighted,
key, Ins, S and Enter to add a new GOSUB call.
click on the ? and carefully use the slider
on the right side of the window to scroll down
the list to RTWNGALL and click on it.
go back to the top to make sure
the gosub call is in fact RTWNGALL.
compile.
bring up, cfs, change aircraft back to mcubefly3
and have a close look at the right wing and gear.
how does it look? any bleeds?
does the gear retract and extend properly?
look at all angles top and bottom.
change aircraft and bring up ad2k.
double click on the RTWNGALL gosub call,
scroll down and click on LTWNGALL,
compile and go have a look in cfs again.
(get use to this ad2k to cfs back and forth procedure.
in a real, complex project, you will do it
hundreds, if not thousands of times)
okay, in cfs, what do you see?
wtf is that? why is it there?
how can it be fixed.

i could tell you, but, i won't.
if you want to build with ad2k,
YOU, need to figure this out.
what i will do is give you some clues.

still in cfs, change aircraft.
bring ad2k to front and scroll down
to the left and right gear
jump gear range, gear bank and trans/rot calls.
look closely at the right sequence ,
then look closely at the left.
do you see a difference in the sequence?
remember, the left gear is the one with the problem.
make the correction, compile, have a look.

when you're satisfied and all done,
don't forget to delete the gosub and return
we added at the top of this exercise.
now, we're done
 
Hello Smilo,
Thanks very much for your intervention, and it looks like it wasn´t bad as I´d thought.
...but that´s mainly because the entire sequencing was rather a good one to start of with!

I like your style of explaining things - it makes an entertaining read for a start, and now I´ll
follow it through and find what´s at fault. BTW: A practical way of adding a new project!
Keeps the level of clutter low!


So, my hopes for a platform for the sequencing tutorial you had in mind i.e. "Jump Plane Sequence
Refresher Turorial" will have a happy outcome.

Instead of calling it CubeFly or CubFlY, do you have any predilections for a different name and colour
schemes to make it more fitting? I must change some things on the textures, as the existing ones
only serve to check position and spread.

I will delve and return!

Cheers,
Aleatorylamp
 
thank you, i'm glad the explanation
was taken as it was intended,
a step by step, how to do it instruction.
the point being, i don't know how much
the reader knows or understands about ad2k,
or, for that matter, combat flight simulator.
with especially, ad2k, you are beginning to see,
just how complex and repetitious it can be.
it's too easy to get lost or confused, both,
with all the drawings and the sequence coding.
this is precisely why, i suggested the earlier hack job.
the beauty of the program is individual,
complex sections of the model can be
easily added to the whole project later on.

if you knew me, by that, i mean could walk into my life,
you would find the above comment hilarious.
reading it, you would think i am an organized,
very orderly person, but, in reality,
my life is a disorganized mess
and that's putting it mildly.
i won't go into detail, you'll have to trust me.

about the tutorial...we are not done yet.
we need to talk about seals
and their importance to a bleed free model.
i actually learned something last week,
while fighting with the gear to wing fiasco.

about colors...i've said this before,
and hate to say it again.
i believe the textures should be added
after the sequencing is completed.
i know you've spent a lot of time on it,
so, i'm adverse to comment negatively.
my reasoning is simple, one has a better view
of individual parts that may bleed through each other,
if each is a different GPOLY color.
also, if a part need to be modified,
it will be easier to locate if it's a different color.
for example, early on, when i started looking
at the cubefly (or should we call it, CUBEFYI.)
i noticed a potential part bleeding in the tail.
i changed it to a gpoly and made it red.
have you noticed it, yet?

okay, i need to go get some coffee.
i'll look in a little later.

oh, yeah, looking at your mcubefly3 last night,
i learned something new.
i wasn't aware that you could insert the jump gear range
right after the other gear instructions.
last weekend, i inserted it after the gear
had been added to the wing jump plane.
i like the way you did it much better.
that way, all of the gear instructions are consolidated.
 
Hello Smilo,
OK, so Gosub SA Label + Return is how to isolate said SA.
Nice! ...a flying wing in CFS!

Well then..,, let´s see: Left wing has an additional, unlawful, non-TRANS/ROTted Gear.
BINGO! Ha! Got the culprit! - I´d forgotten a RETURN at the end of the Left Gear Bank + Vector Instruction!

That´s cured the third gear syndrome. OK for a DC 10, but not for this!
Fine, the MCubFly3!!!

Next comes the un-animation...


BTW: The idea of inserting the Jump Gear instruction after the other Gear instructions actually came from the Ugly100 tutorial. Yes, I remember your suggestion of doing away with textures until the model is structurally correct, as it facilitates seeing glitches. Will do!

Many thanks for your guidance! I´ll check out some other things now.
Cheers,
Aleatorylamp
 
i'm pleased that you found and corrected the problem.
i must have done something right.

about removing the textures and changing to simple colors,
careful with that axe...nothing need to be removed.
just open, say, the right gear sub assembly,
left click the top entry to highlight,
key and hold Shift and left click the last entry.
all entries should be highlighted.
key, Ctrl+P, select shaded and key Enter.
(the short cut is key, Ctrl+P,S,Enter)
all TPOLYs will now be GPOLYs.
for the gear, i made the strut red,
the tires dark gray and black,
and the skirt, green on the inside
and blue on the outside.
but, that's just my choice.

about the name, CUBEFYI.
Cube For Your Information.
i was just being a wise guy.
i love multiple meanings.


once again, thank you
for the encouragement
regarding my writing.
at times, it may sound over simplified,
almost to the point of demeaning.

that, is, surely, not my intention.
as you know, all too well,
the ad2k tutorials lack some specifics
and, at times, are mistaken.

frankly, i don't know what readers
may or may not know about the subject.
i feel it best not to assume anything.
it's easy enough to get off track,
without getting bogus instructions.

therefore, i've decided to write
as much detail as possible.
i mean no offense, if i'm writing
Aircraft Designer 2000.25 for Dummies
all i can say is, i wish there was such a document
when i was working with the program.
my learning process was trial and error.
mostly error
 
Hello Smilo,
OK, I´ve bypassed all the textures. It was quickly done!
Interestingly enough, I hadn´t added a Shaded Colour instruction to the fuselage, and it became transparent seen from below, but not from anywhere else - so it only found a shaded colour instruction from somewhere else in time from a different viewing angle sequence. Anyway, I knew I hadn´t put it in, and now it´s fine.

OK, this will uncover hidden bleeds. Of course! One tactic I use for unavoidable bleeds in AF99 is to texture the parts involved with the same colour.


Cheers,

Aleatorylamp
 

Attachments

  • textureless.jpg
    textureless.jpg
    41.5 KB · Views: 0
i'm curious about your "unavoidable bleeds" comment.

look closely at the cubefyi.
do you see any?
let's get nit picky.

as i've mentioned before,
i'm not using a joystick,
which in my case, eliminates the hat.
i've also mentioned that i use slew mode
for viewing a model's building progress.
that said, the only slew key commands i care about
are the Look ahead, ahead/right, right, back/right,
back, back/left, left, ahead/left and Look down.
all are set to the Shift + Number pad for easy access.

the only movements i care about is Move up,
Freeze all movement, Straight and level,
and Bank left and right.

basically, i go into free flight,
go to exact location N0 E0 altitude +0
why, you might ask?
simple, there's nothing there
to distract my view.
of course, this is impossible without
Bill Potvin's classlist.bgl modification.
it makes landing on water possible.
(it's great for piloting float planes,
hubba's ships or ditching in the channel)
i've attached a copy, if you're interested.

okay, so, where was i?

take the model to around 5000 feet
and freeze all movement.
of course, in spot view.
slowly look around.
then, bank left or right and let her roll.
slowly look around for anything unusual.
if i want to check out a particular spot,
key, freeze all movement
zoom in and out is also helpful.

anyway, this technique works for me.
it's simple, quick and, with a little practice, accurate.

okay, go have a close look at cubefyi.
see anything unusual?
 

Attachments

  • classlist.zip
    2.7 KB · Views: 0
Hello Smilo,
Well, in AF99 modelling there are sometimes unavoidable bleeds, the result of a trade-off between eliminating something you want or having it with unavoidable, momentary, transitory bleeds. Maybe for someone like Ivan, some of my unavoidable bleeds could be avoidable...

Oh! and the whole point of mentioning this, was that one way of disguising these bleeds is using the same colour texture. Related to AD2000, textures can disguise bleeds which otherwise could be discovered more easily.


OK then, thanks for your post! My way of inspecting a model is very similar. Fine, I´ll slew around and zoom in and out, to look at the model and see what I can find.

Later: Well, I found a few glitches:
1) Open strut tubing underneath: I´d already done it on a version I lost by overwriting with another file... silly accident. Both lower strut ends: One was missing even from the desk and I mirrored and flip the opposite one, moving it into the other SA, and flipping it too. Then,
2) the stabilizers were digging into the fuselage, and
3) one elevator was invisible from above, and had to be copied and flipped too. Also,
4) the aeroplane sat about 2 ft below the ground, but I knew that already and wasn´t bothering yet, but I fixed it.


Let´s see if there´s anything else...

Cheers,
Aleatorylamp
 
Last edited:
okay, good, you got the stabilizers.
keep looking at the tail.
there's a glaring one there.

Look back, Look back/right, and Look back/left
are the key commands,
but, they seem counter intuitive.
they are, actually, looking forward
from the right, center and left rear.


once you find them all,
we'll talk about why
they are happening
and how to repair the issues.
 
Hello Smilo,
OK! Thanks. The tail-skid bleeds through from almost any forward horizontal or forward-upward angle.
I´d put that in so the plane wouldn´t have to drag the tail on the ground, thinking of converting it into a wheel later.

It is obviously un-sequenced, to be found at the end of the FUSE SA in the Tail Assembly.
I suppose taking it out into a separate SA, using a bottom rear-fuslage seal and a Jump Plane instruction it could be fixed.

You mention issues in plural, so there must be more. Let´s see...

Cheers,
Aleatorylamp
 
nope...as far as i could see,
just the horizontal stabilizers and the skid.

if you want to turn the skid into a wheel,
it's best in it's own sub assembly.
if you want to keep it as is,
within the Tail MDI,
look in the fuse assembly
at the last polygon entry.
just above it, insert a return.
you will also have to name the polygon.
be forewarned, they don't like being named.
check out what happens.
off the top of my head,
i can't remember how to get around it.

at the top of the list,
insert a jump plane
and call the skid and everything else in the sub assembly
 
as stated above,
one bleed issue is
"the stabilizers digging into the fuselage"
this is clearly illustrated in the screen shot,
by the left stabilizer digging in...notice, the right stab
has been repaired.

the red line is the plane of the fuselage side
where the stabilizer and fuselage intersect.

so, why does the left stabilizer bleed
through the left side of the fuselage?

in the second screen shot, for ease of viewing,
just the right side fuselage panel is visible,
along with lines drawn to indicate the stabilizer/fuselage
intersection planes with the horizontal stabilizers.

notice how the inside of the left stab crosses the line.
this overlap is the source of the bleed problem.

when a jump plane is created properly,
the sim viewer orders the parts in sequence,
so, from the side, you see
first,the fuselage panel,
second, the stabilizer.

the problem arises because the small inside portion
of the stab protrudes beyond the fuselage panel.
the viewer can't tell how big the stab is.
all it knows is that the stab, in it's entirety,
will be viewed after the panel.

the solution is simple...trim the stabilizer
at the points where it touches the fuselage panel.
both screen shots show the right stabilizer
after it has been trimmed.

of course, there is a caveat...be careful trimming.
if you take too much, there will be the inevitable
"string of pearls" as evidence that a gap exists
between the stabilizer and the fuselage.
accuracy is everything.

if you would like, i will gladly post
a step by step of the modification process.
just let me know.
 

Attachments

  • -2017-mar-3-004.jpg
    -2017-mar-3-004.jpg
    9.3 KB · Views: 1
  • -2017-mar-3-003.jpg
    -2017-mar-3-003.jpg
    30 KB · Views: 0
Hello Smilo,
Thanks a lot!
Will study and be back later!
BTW, the gear animation not working would be because the jump to the wing is too far maybe? We´ll cross that bridge when we get to it, so it´s not on the menu yet!
Cheers,
Aleatorylamp
 
excuse me....what gear animation not working?
mine is working just fine.

you are right, we'll jump back to that,
when we finish the task at hand.


UPDATE;
oh gosh, i'm sorry.
i missed your "unanimation" comment in post #170.

i thought there was a glitch on my machine.
for some reason, when i first enter free flight
in the mcubefly, go to altitude in slew, freeze,
and then, try to raise the gear...nothing happens.
is this what happens for you?
if so, change aircraft to, say, the stock bf109e,
raise and lower the gear a couple times.
it works, right?
change aircraft again to the mcubefly3.
try to move the gear...i'll bet it works.
weird glitch.

hey, wait a second...have you just compiled the Tail?
i'll bet you can't find the Mcubefly3 in the cfs aircraft list, right?
unless you've changed the directory path,
ad2k has over written the model and aircraft.cfg files to Tail.
it's a pain to jump back and forth from one 3DM to another
 
Back
Top