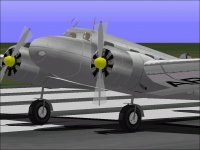
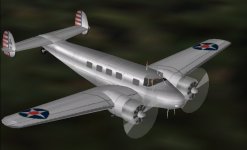
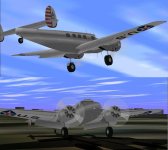
Lockheed Electra Model 10

5-minute WEP for the Electra´s engines

Hello Ivan,
Yesterday I managed to implement WEP into the Electra, to avoid
prolongued maximum power flying.

Performance specifications for the Electra 10A are as follows:

Fast-cruise: 400 Hp at 2200 RPM, giving 190 mph. maintained upto 5000 ft.
Max. take-off: 450 hp at 2300 RPM and 34.5 inches of MP, giving 202 mph.

So, putting a max. MP of 32.4 and an extra 2.1 for Methanol-Alcohol
WEP, into the .air file, and adjusting the two propeller graph tables
and the torque graph, I got the flight model performing at 500 ft as follows:

WEP: 34.5 MP
2300 RPM
454 Hp
204.5 mph

non-WEP: 32.4 MP
2202 RPM
402 HP
192.6 mph

For the moment, it´s as close as I can get - for a start, it looks quite acceptable,
although there´s a quote for 215 mph at 8000, and here I can only manage about
210 mph, although I´ve already been adjusting Boost Gain a little. Perhaps a little
more won´t do any harm, but it leaves critical altitude at 6500 ft instead of 5000.

Cheers,

Aleatorylamp
 
Hello Aleatorylamp,

I don't really like 10 sided wheels either, but there are a lot of compromises when building with AF99.
Nice rounded pieces are great, but one has to make a choice of where to spend the very limited resources.
I would like to be able to build all the wheels like that for the Messerschmitt 109E, but usually there are not enough resources left.
That 109E started off life as a much less detailed model so there was a lot of resources left over.
As a AF99 project, it also has a lot of compromises, but most of those compromises are in the shapes of the major pieces of the aeroplane. I had already altered or replaced over 90% of the Parts to get it to where it was and did not feel that it made sense to redesign everything for a project that wasn't my work to begin with.

I actually tried to create a DF Loop with a Structure last night and it did not work, so I used the Structure as a reference for Parts for a Component version of the DF Loop. Attached is a screenshot of the result. I think it came out pretty well.

Regarding Aircraft Animator:
I believe it is possible to get much more precise with Propeller Disk Diameters. I do it for many of my projects.

What do you actually have left over for Components at this point? Is it enough to add something to each Outer Wing section to cure the Exhaust bleed? If not, there is yet another cheaper technique that might work, but it is much less elegant.

Engine power looks to be a pretty good match.
When choosing between Engine Power and Performance, choose Performance.

- Ivan.
 

Attachments

  • Electra_DFLoop.jpg
    Electra_DFLoop.jpg
    61 KB · Views: 0
Hello Ivan,
At the moment there are 3 components and 9 structures free.
With the new cabin and goniometer, Parts Count is at 1184, 148%, although I could
perhaps get that down
a bit by whitling away some pieces somewhere...

After dividing the cabin component (it had included part of the nose before)
into 2 components, I managed to get a textured aft cabinwall with a curtain on it,
and also a darker-
coloured cabinfloor, to display correctly.

I made a component for the gonio like the one you are showing - it looks much better!
Here´s a screenshot showing the new cabin, the AA propeller disc and the new gonio.
The model´s definitely improving. Thanks again for your suggestions along the line!

Regarding engine performance, I regulated Boost gain a little bit and I´m getting
the 215 mph max. speed at 8000 ft, apart from the other two S.L. specifications
(max. 202 mph and 190 mph cruise at specified RPM and Hp).
Then, 5000 ft Critical Altitude is still correct, which is rather satisfying!

I´d be interested in trying out your possible cure for the small, short exhaust bleeds.
The model has been at a higher parts count than at the moment, so adding a couple
of pieces will probably not harm compilation.


Cheers,
Aleatorylamp
 
Hello Aleatorylamp,

The idea that I had was to break the Outer Wing into two Components on each side.
One would be attached to the Nacelle to hide the Exhaust and make the Glue to the rest of the Outer Wing simpler.
I don't know how many Parts are in each Outer Wing minus the Tip, but essentially that number would be added to each side.
I would guess it will probably cost around 30 - 40 extra Parts to do this properly.

I actually tried to start working on a Propeller Construction Tutorial, but the Development Computer was quite uncooperative.
I never was able to get a clean build of the test subject even after over a dozen tries.

By the way, did you notice that the Port Antenna that you have on the chin of your Electra isn't quite connected with the aeroplane and is just flying along in close formation? It can be seen in the screenshot in your latest post.

- Ivan.
 
An Insignia Patch!

Hello Ivan,
OK, thanks. It´s coming along very nicely, as usual, with your coaching!
I have to see where I can scrounge some parts to economize for the
extra wing component. It would need a total of 30 parts, as you say.

I´m led to believe that the extra component would be a narrow one,
its outside edge in line with the middle of the outer flap section.

Update:
I applied 3 insignia shaped parts in the way of a curved patch to
cover the exhaust bleed, and it worked. Just 6 parts in total
.
Perhaps not an elegant solution, but a very parts-thrifty one,
without needing to simplify anything elsewhere.
Now parts count is at a dangerous 149.3% with 1194 parts, but
thankfully
there aren´t any wierd goings-on at all!

You´re right about the forward antennae - and they were bleeding too!
I got them in properly now, their outside parts glued to the aft-nose
component.
That complicated the whole cabin area glue sequence,
but it went OK, as
can be seen from the other screenshot.

I could prepare a WIP-5 at this stage, as there are quite a few notable
improvements: The flap bleeds, the cabin improvement, the exhaust
bleed, the antennae bleeds, the improved gonio, the cleaner propeller blurs
and disc, a few cracks
less in the nacelles... Any demand for a WIP-5?

Cheers,

Aleatorylamp
 
Last edited:
Hello Aleatorylamp,

I am glad you got things to work the way you wanted.
I still think there is some strange interaction with the Outer Wing Glue and the Exhaust and that is the sequence I was trying to eliminate.
The alternative was as you did with just a couple Insignia Parts though I would have Glued them in place.
I didn't want to do that except as a last resort because of lighting differences and also because it would leave the wacky Glue issue with the Outer Wing, but that is the nature of building in AF99.

Make sure that the new Insignia Parts don't bleed through the top of the Nacelle when viewed from the opposite side.
That bleed will not be horrible even if it is here.

- Ivan.
 
Glue Template re-positioned!!

Hello Ivan,
You are right indeed, Sir! It did cause a bleed.
The Kicker, again! I knew it was a bit too good to be true.

I checked out the interaction you mentioned between the exhaust
and the glue template
, and moved the glue template outwards, away
from the exhaust. The exhaust is now inboard from the glue template.
The flaw had escaped my notice, but thinking about it now, it should
have been quite obvious, because it´s exactly how
glue templates do
their job!
It worked beautifully!! So I threw out the insignia covers.

ernaehrung004.gif


I was just SCASMing the Virtual cockpìt to see if everything fits and

compiles, and there don´t seem to be any glitches or artifacts this time!
I got the correct View-position in, as well as getting most of the interior
elements (floor, dashboard, co-pilot, rear wall, roof) to display correctly.

I still have to put in an extra covering part onto the nacelle to stop the rear
engine-cylinder texture bleed, and then display the window struts to stop
a prop-disc bleed, but that should go well.

Cheers for now,

Aleatorylamp
 
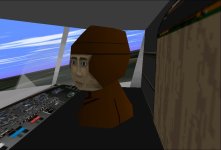
Virtual Cockpit SCASMed.

Hello Folks,
Well, it has been a busy afternoon with tea and cakes included.

After the successful decimation of the exhaust bleeds, I managed

a Virtual Cockpit free of interferences by unwanted elements.

Parts count is slightly lower, at 148.5%, 1188 parts, which is OK.

Here are a couple of shots of the result. It doesn´t look too bad!

The co-pilot is just saying the service at the airport cáfe is better
now, after the pilot´s guild complained...

Cheers,
Aleatorylamp
 

Attachments

  • CV right.jpg
    CV right.jpg
    42.4 KB · Views: 0
Electra WIP-5

Hello All!
Well, for the weekend if you like, you can try out the improved
Electra L10A model with a SCASMed virtual cockpit, in version WIP-5.
The livery corresponds to an Army Air Corps Staff Transport.

For 1935, I think it´s impressive how Lockheed achieved such a sleek
and modern looking design.

The glitches mentioned in recent posts in the thread have been ironed out.
WEP has been implemented to cater for 5-minute 450 Hp take-off power at
2300 RPM, giving 204 mph at S.L. Normal full throttle covers max-continuous
400 Hp at 2200 RPM, giving 192 mph as S.L.

This is just 2 mph over the specified 202 and 190 mph respectively, but further
adjustments of several kind reduced it too much. What is bang-on exact,
however, is the specified 215 mph at 8000 ft.

Anyway, here´s the model for you to try out, and some screenshot eye candy.
The blueprint is only to make it look more scientific!!
pirate.png

...although it does give an idea of the build.

As usual, suggestions, additional ideas and protests will be welcome,
as the model will benefit from it. Let me know what you think.

Cheers,
Aleatorylamp
 

Attachments

  • Electra2.jpg
    Electra2.jpg
    38.1 KB · Views: 0
Exhaust Bleeds

Hello Aleatorylamp,

Just checked out your WIP5 version of the Electra.
I don't think you really got the Exhaust Bleeds.

- Ivan.
 

Attachments

  • ExhaustBleed.jpg
    ExhaustBleed.jpg
    42 KB · Views: 0
Hello Ivan,
Thanks for checking - I hadn´t seen it.
At least it´s much less than before, only through the very top of the
leading-edge panel, and very scarcely through the second one. The
previous bleed was through the third panel as well.

The cure, adding an insignia panel there may cause causes worse bleeds,
and an extra wing component would involve freeing simplifying things
elsewhere to free the
necessary parts. I´ll see what I can do.

Another possibility would be to have the exhausts only painted on the
nacelle textures, but I want to avoid that.

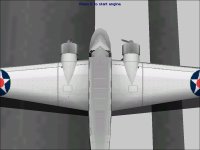
Update: I think I´ve managed to minimize it drastically.
I reduced the exhaust pipes´ outward angle, making them portrude
less, but keeping their length and downward angle the same.

The bleed is just barely visible for an instant at the edge of the nacelle,
just a line of 3 pixels, but for such a short time that I couldn´t get the
bleed on the screenshot. Here´s a top view screenshot.

Thanks again for pointing it out!
I re-SCASMed the model, but I won´t
post a WIP-6 yet, just in case something else needs fixing.

P.S. What´s next on the list is to get my engine vintage-framed metric
engine Gauge set with adapted FSFSConv bitmaps, into imperial values again.
I won´t use the original FSFSConv Gauges as they look a bit too modern.

Cheers for now,
Aleatorylamp
 
Last edited:
Hello Aleatorylamp,

I was just thinking this morning that it is possible to hide the Exhaust bleeds entirely with about 3 Insignia Parts per side.
This idea wasn't new. I had already mentioned it as a last resort earlier if the Components were not available.
What IS new is a really cool way to hide the lighting differences that a set of Insignia Parts would cause.

I believe the reason you were getting bleeds when you put in Insignia Parts to hide the bleeds was because you were adding them in a less than optimal order.

I was thinking that your build cycle time was really fast, but for the last couple days, I have been going at almost the same speed with the D-25 Thunderbolt. It is really cool to think of how easily we are reshaping significant portions of the Aeroplane without a great amount of effort other than figuring out what it is exactly that we are trying to do.

- Ivan.
 
Wip-6

Hello Ivan,
I know there must be a more coherent way than I was doing, to apply the
3 insignia parts to cover the bleeds of the previously more portruding exhausts.

However, I doubt it will be necessary, now that the manouever of just reducing
the outward exhaust
angle proved successful. It´s actually a better angle anyway.

As with your models, improvements through effective re-shaping, are a nice challenge.
It´s like a puzzle in many ways - how to find the most practical way!


Here´s a screenshot. I´ve also attached a WIP-6 model, just in case you want to check!

My build cycle in the past days was quite fast because I had really done the hard work
before, when I was making the nacelle components, added to my
having a bit more free
time on my hands now that I´m retired...


Cheers,
Aleatorylamp
 
Further minor fixes

Hello Folks,
WIP-6 was really only to check that the remaining almost invisible
exhaust bleed was going to be acceptable.

The grooming process continues... I took out some more cracks I
found on the lower engine nacelles and the upper and lower fin roots,
and then decided to give the flaps their own texture. Here´s a new screenshot.

Update: Parts count is at 148.8% with 1190 parts.
Sometimes, like what happens to painters, one doesn´t know when to stop
building and declare a model as finished.

I suppose a high Parts Count, and having used up all textures, would be hints
that it´s time to stop, if of course, no other glitches are discovered!

Cheers,
Aleatorylamp
 

Attachments

  • tex-flp.jpg
    tex-flp.jpg
    52.5 KB · Views: 0
Last edited:
Hello Aleatorylamp,

Texturing the Flaps makes sense. How else does one add detail when the resource limits are so low?

I am a bit surprised that you are at the limit for texture count. I don't think I have ever gone past 13 texture files and I put textures on a LOT of stuff. Sometimes they need moved around as on the Thunderbolt when I find that the original space I allowed is no longer enough with the revised pieces. As we build more, we get smarter and think ahead, so that kind of thing doesn't happen much any more.....
....But it it still does happen from time to time!

Deciding when a project is done is always a difficult choice for me as you can see by how many I have worked on that have not been released. There is nothing I have ever done that cannot be improved.
I figure a project gets released when it satisfies me.

If you are satisfied, release it. If you are not, then work on it some more.

- Ivan.
 
Hello Ivan,

One thing I´ve never been able to do is to share one texture bitmap
with different sections for different areas of the plane, like for example
the wheels, and the head on one texture bitmap. That´s why I always
get to the maximum quite quickly.

I´ve only managed to use, for example, the front of a texture for the back
wall of the cabin, and the rear of the same texture for the dashboard, but
not dividing a 128x256 bitmap section for use with two differently patterned
128x128 squares.

With the Electra I´m slowly getting to the finish line, and I´m lounging
around a bit to see if I can spot anything else that needs attention.

Cheers,
Aleatorylamp
 
Hello Aleatorylamp,

For laying out textures, I use a tool called AF5Paint which is available now from the Freeflight Site.
Unfortunately, I believe it is limited to Window 98 machines. It is one of the reasons I am still on W98 for Development.
I don't take all the numbers I get from AF5Paint, but refine them a little inside AF99.

I wrote a couple simple C programs many years ago to assist with texture layouts, but they are not very easy to use because they just give text output to feed into AF99 and don't really detect when objects map to the same space. They just make it easy to texture parts of a fuselage to a constant scale.

I have a pretty good idea of the features I would want in a more modern program, but don't know enough about Windows graphical programming to develop such a utility.

One thing I would suggest is to make the texture layouts square and to a constant scale. That would certainly make things easier to deal with later when trying to repaint.

- Ivan.
 
Hello Ivan,
Actually it´s not so much a matter of the actual paint program and the
creation of the bitmaps. That´s easy with most paint and/or photographic
retouching programmes - as long as they have cut-and-paste onto the
same canvas, which in the 64bit versions only exists on payware nowadays!

It is more the problem of entering the 4 numbers to be entered in the AF99
texturing window, to define the spread of the bitmap. The AF99 tutorial is
very laconic on that aspect.

That´s why I usually use one complete texture for an entire zone, which can
be shared by different elements making up that zone.

Upto now it´s gone quite OK with the 15 available ones.
Cheers,
Aleatorylamp
 
Hello Aleatorylamp,

I don't believe you are understanding why AF5Paint is such a useful tool.
Yes, it is a "Paint Program", but isn't very full featured in that respect.
Its real value is in determining the offsets to properly map pieces of the aeroplane into a texture file.

The easiest way to illustrate is to show an example of its use.
(This is why it took so long to reply to this message; I actually needed to get things settled enough to fire up Development Machine without interruptions.)
For some reason, the screenshot feature has never worked from this program so I had to resort to using a digital camera.

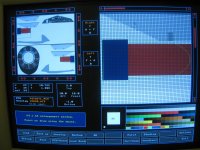
I had discussed in the Thunderbolt Thread that by switching to a Hamilton Standard Propeller, I made some edits that required that I remap the Propeller Hub and the Fairing in front of the Hub.
In comparison to drawings and photographs, the Hub was much too small in diameter and the rounded H-S fairing is also much wider.

The first Image shows where the Hub and Fairing was located in P47D271.PCX.
Note that the Green outline is the reference Part ZPHub.afp with its new size but in the original location.
As you can see, it was starting to run into the Pylon texture above it.
Pieces unintentionally sharing textures is obviously bad.

I could have just simply moved the mapping downward by using the "Overlay" option and entering new dimensions.
There was a clear spot below where it currently was.

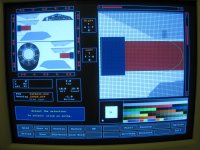
The second image shows why I did not just re-map the piece a little lower on the same texture file.
The file P47D231.PCX uses the same offsets to map its Propeller Hub and Fairing.
The problem though is that the P47D23 is a Razorback and has a Canopy Frame using the region below where the Propeller pieces currently were.
If I wanted the two Thunderbolts to retain their consistent texture mapping, I had to find something else.

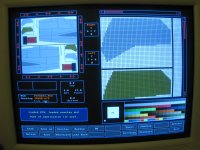
The third image shows P47D253.PCX and where the Propeller Hub and Fairing were moved to.
There is a little room for expansion and because all the mappings are the same, this should be possible for all my existing Thunderbolt projects.

Hope that makes sense.
I should probably also include this in the Thunderbolt thread as an explanation.

- Ivan.
 

Attachments

  • P47D27_Hub.jpg
    P47D27_Hub.jpg
    126.1 KB · Views: 0
  • P47D23_Hub.jpg
    P47D23_Hub.jpg
    119 KB · Views: 0
  • P47D25_Hub.jpg
    P47D25_Hub.jpg
    115.6 KB · Views: 0
Hello Ivan,
I see! - Then AF5 paint is a programme specifically designed for textures
used with AF, as it allows the builder to exactly define positions and sized
to draw in different textures for different aircraft elements on one bitmap.

Very interesting! I have areliable PIII Win98 computer up and running, so
I´ll check it out.

Thanks for your explanations!

As regards making screenshots. My usual texture working programme
disables pixel-smoothing when making screenshots, so I use Paint Shop Pro
in parallel that allows the user to choose any of the computer windows that
are open, to make a screenshot of.

Cheers,
Aleatorylamp.
 
Back
Top