P-47 Progress Thread

About a month or so ago MS tried to euthanize my PC through an update. This resulted in having to reinstall Windows and losing about 2 years worth of email, diary contents and some other stuff - despite having a backup system. Fortunately I have back-ups of the P-47 model and all related files on 3-4 different HDDs, USB sticks etc. so no losses there. But it also meant reinstalling ETO and somehow my settings have changed: My carefully tweaked textures now appear much more reflective. I attribute this to a setting in Ankor's files which differs from my previous setup but I can't remember/find the original one. This is a slight inconvenience, as it requires adjusting the _s and _r files again but it can be done.

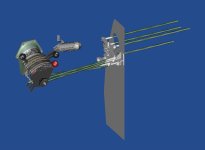
In the months since the last post, I have found some blueprints which helped me to remodel the mechanical linkages between the throttle quadrant and the engine (the parts visible in the VC anyway, up to frame 132 which you can partially see, as well as the duct leading from the intercooler to the engine). See the low quality gmax screenie below (at high quality gmax crashes):

Teaser41.jpg

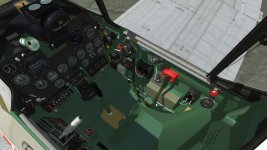
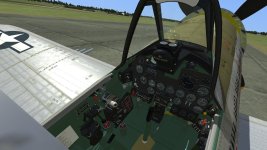
And I worked hard at unwrapping most of the VC objects and giving them a basic coat of paint. This makes them look a little flat in the screenies below but after riveting, detailing, weathering and adding a bump file, the surfaces will have much more depth and definition:

Teaser43.jpgTeaser42.jpg

The VC still requires some additional modelling but we're getting there, slowly and steadily (mostly slowly :biggrin-new:)
 
Sounds exciting ! Can't wait till they see the light of day ! Thanks for all your work. Hope all goes well and you get the help needed. Regards,Scott
 
A bummer re your lost stuff Joost!:pop4: Looks like you are doing a really detailed job there. Will it be quite an active 'pit similar to Daniels Spitfires?
 
Oh wow! The detail is unbelievable :) Where did you get the blueprints for all the cockpit fixtures?

https://aircorpslibrary.com/, membership required but well worth the money if one wants to build one of the aircraft they have in the library! They don't have blueprints for all aircraft in the library (for some just manuals) but for the main US WW2 fighters, they are present.

A bummer re your lost stuff Joost!:pop4: Looks like you are doing a really detailed job there. Will it be quite an active 'pit similar to Daniels Spitfires?

@1; Yes, it's annoying and at some point I'll probably discover I am missing something important but life goes on...
@2; I hope so, but that requires Daniel's input because I don't now how to do his magic :biggrin-new:. Right now the cockpit is clickable to the extent that ETO and Ankor's work allow but I hope Daniel can add additional animations like he did for the Spit. There are a few I would really like to see, such as the trim wheels, parking brake, fuel cocks and tail wheel lock.
 
In the months since the last post, I have found some blueprints which helped me to remodel the mechanical linkages between the throttle quadrant and the engine (the parts visible in the VC anyway, up to frame 132 which you can partially see, as well as the duct leading from the intercooler to the engine).

wow, very good :encouragement:. Curious how you are you animating the linkages in gmax ?
 
... Curious how you are you animating the linkages in gmax ?

By using the same naming convention for all animated linkages as the orginal object with the addition of a underscore and number, eg. "lever_throttle", "lever_throttle_1", "lever_throttle_2". To me, this seemed different from the SDK instruction of "lever_throttle#" (like "lever_throttle1" and "lever_throttle2" for a two-engined model). Using this system for a multi-engined model, the parts names would be "throttle1_1", "throttle1_2" and "throttle2_1", "throttle2_2" etc. It also seems to work without the addition of a number but then you'll get a "duplicate object name" export warning. Both solutions seem to function, though.

So in this P-47, the throttle lever object is designated "lever_throttle" as per the SDK. The rod connected to the throttle lever is "lever_throttle_1, the bellcrank is named "lever_throttle_2 and the second rod leading to the engine is called "lever_throttle_3". Any other objects such as nuts, bolts etc. are simply linked to their animated parent part. The 4 parts are animated individually to have their pivots points coincide for all key frames, so they move as if connected to each other (not different than, say, scissors links in an undercarriage animation).
 
thanks Joost,
You've detailed everything so well i was not sure if you were maybe using animation constraints or inverse kinimetics to get all the links to move together. Maybe some other method?

congrats on 100k views
 
Pity that you can't monetize it as per YouTube!:biggrin-new:

I am not sure that would be a good thing: To make more money it would be better to protract the development of the model nearly indefinitely and have you came back over and over again... :biggrin-new::biggrin-new:
 
... You've detailed everything so well i was not sure if you were maybe using animation constraints or inverse kinimetics to get all the links to move together. Maybe some other method? ...

I already had some much to learn for this model, I hope no-one would notice the occasional short-cut :biggrin-new: (Okay, then I shouldn't have told you how I did it - but you asked... :playful:)
 
... Any wonderful screenshots ? ...

Not yet, Scott!

The past 3-4 weeks I had some PC issues again. I installed Win10 a second time last weekend (so that's three times in the past 3-4 months - sigh). Hopefully everything is OK now. Anyway, I must say the system seems to run smoother than before the first crash in June.

During my summer holiday I worked on the instrumentation; I created new, more accurate texture sheets for the instruments, hopefully better needles, some (partial) 3D instruments (gyro horizon, turn & bank indicator, gyro compass and standard compass - CFS3 uses the same textures for the two compasses but in reality they were different). I am also differentiating between the D-25/27/28 and D-30/40 instrument panels: they differ in shape/dimensions and the 3D instruments require that I cut holes in them, just like the real thing. Lastly, I am playing around with the instruction & warning decals that adorned the panels. Originally, I used an amateurishly picked unwrap scale that allowed me to paint them on the instrument panel texture, whereas CFS3 uses decals instead. Now I am thinking that the latter does give reasonably decent results. So that is still somewhat undecided.

All this started because I want the operation limits painted on the instruments glass as per the blueprints/manuals. And with the thought that I might add more models to the originally planned D-25, D30 and D-40, I would have organized my texture sheets differently. Oh well, one lives and learns...

Screenies when we're there!
 
Sorry for all your problems. Hope it works out ok. Great news on the progress ! Glad to hear of so many models to choose from. Ever think about doing a P-47M model or a proper N model ? That would be very interesting for us late war fans and '46 buffs. A impressive amount of detail in your aircraft. Good luck ,and Best wishes . Regards,Scott
 
Thanks Scott!

Yeah, it's a bummer! Installing Win10 a 4th time this weekend :)banghead:) and running all the CHKDSK, scannow and DISM stuff I can find but the 'puter is having a hard time. I think after 11 years the HDD is on the verge of dying. Considering the PC's age, I need to replace it but I really don't know what to buy; mid-range or high-end? And where? There are no reliable PC shops anymore where I live, which means that I am condemned to the online cowboys. Most of them have no experience with sims and will happily sell you any gaming rig. Makes me feel like buying a car: Being too unfamiliar with the technicalities, you know you are being screwed but you need one.

The little info I could dig up on simming says that CPU power is more important than GPU power. Buy a pre-built system and pay more or find all the parts myself and save some cash? I never built a complete PC myself but I did replace parts, including a CPU cooler and smearing some paste. As I also would like to try DCS, the new PC should be able to handle that and I mean handle well: No minimal settings but preferably maxed out (which probably means high-end). And let's not forget the current prices of PC parts and, with the current energy crisis, the electricity bill; A high-end system most likely demands a more powerful PSU than my current 650W.

So, a lot of considerations that slow my work considerably down. I have an old laptop with an aging battery that allows me to do some simple work in the meantime but the smaller display is such an annoyance. Not a happy camper right now! Please don't mind the above complaining too much but you'd better not expect any P-47 revelations any time soon!
 
Back
Top