Learning AD2K

without reading the tutorial entry,
my best guess would be,
the prop, spinner, gearbox are being built at y=0,
then, are moved to their proper model position
using a vector instruction.
believe it or not, this is a good way of doing it.
the trick is not having both show in the model.
RETURN is a perfect barrier.

this is how i did the 196 prop/spinner.
if i'm not mistaken, the process
can be seen in the related 3DM
i posted a week or two ago.
 
as promised, but, a little late,
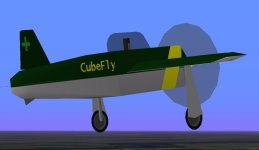
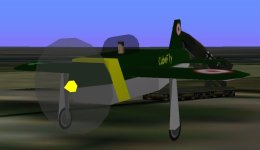
the completed cubefly 3DM file.
 

Attachments

  • CubeFlyComplete.zip
    13 KB · Views: 0
Hello Smilo,
Thanks for the new CubeFly!
Update:
I quickly made a completely new working and cfs aircraft directory, compiled the Tail and Compiled your model.
It works excellently!!!
:applause: :triumphant:

I was thinking of making an opening and closing gear-door in the fuselage and making the gear disappear when retracted, instead of moving the gear out...

I´ll look into the sequencing after the morning class today.

Re. Prop at y=0:
Thank you for your patient explanation!:encouragement:
I thought once again it was a glitch, and I still to see if the vector to move it into position is correct.
I´ll have a look again into your 196 prop sequence, thanks - I knew too little to understand anything.

I have a busy morning today with other things too and have to dash off early... :running:
No rest for the wicked, is there?

Cheers, and thank you so much again!
Aleatorylamp
 
Last edited:
CubeFly Jump Plane Sequences

Hello Smilo,

You have certainly been busy inserting sequencing lines, turning it into a whole new kettle of fish!

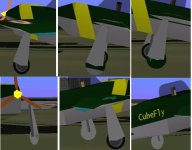
I noticed one little bug on the left wheel:
Dependiong on the viewing angle, the texture is correct, or not: It sometimes gets the portion of the "Wing" bitmap corresponding to the right wing, and switches twice. Once to the division vetween the upper and lower half of the wing bitmap, and once again further out.

The right wheel, however, is OK. Please see the attached screenshot.

Maybe, to put this right, it will be better to make left and right wings have their own, separate bitmaps?
Perhaps it will also be easier to discover what´s wrong this way?

I´m trying to follow the sequence and see where a jump ommits the texturing and keeps the wing one, perhaps offsetting it by 90 degrees, but I haven´t been successful yet.

Cheers, and sorry to bother you, but thanks in advance,
Aleatorylamp
 

Attachments

  • Roundabout-.jpg
    Roundabout-.jpg
    44.3 KB · Views: 0
i just woke up and no coffee, yet.
so am still a little groggy.

yes, i noticed the left wheel texture issue.
since i was only interested in sequencing,
i let it go.
my guess would be, there is an issue
with the texture call in the left gear sub assembly.
it's most likely my fault.
i changed the parts order
because i had to add a jump plane
to stop gear assembly bleeds.
the right gear is okay,
so compare both left and right sub assemblies.
i'm sure you will find my error.
 
Hello Smilo,
I looked up the time difference between your place and mine, and it´s 8 hours.
Feeding the cats and making breakfast makes me have to get up foat 6.30!!
You´re luckier than me. Then I had to laugh, under the time-difference it
said: Travel time to (by car) : 88 hours 55 mins ... I suppose I could try...

Anyway, to the texture bug:
OK! A treasure hunt... When I got in from class this morning I had a short while to, like you said, compare left and right subassemblies, but not enough, as making lunch and another class got in between.
Busy, busy ...:icon33:, so I´ll try again later tonight and print out some screenshots to make it easier.
There´s no other way to print out anything from Ad2k, is there?

More later,
Cheers,
Aleatorylamp
 
funny you should mention,
88+ hours by driving.
for the past week or so,
i've been wondering what it's like
on the canary islands.
not that i would attempt to drive.
if one could, i guarantee,
it would take much longer than 4 days.

i am not aware of being able
to print out ad2k entries.
except, the help files.

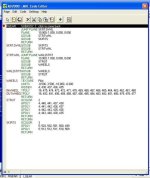
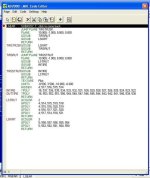
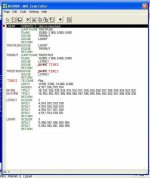
hang on, i'll post a couple screen shots
of the right and left gear assemblies.
 
Hello Smilo,
Yes! ...and then the internet page even says it is 5525 miles "only"!! ...only about one fifth of the Planet´s circumference...

Well, the Canary Islands are very different one from another, depending on their altitude - i.e. their ability to stop the clouds driven by the trade winds. Islands with mountains have lush vegetation - on higher ground there´s pine forests, and laurel, heath and miur forests, upto the tree line, and then dersertic, volcanic, dramatic landscape further up if the island is higher, with a few volcanos (our big one in Tenerife has snow in the winter), none of which is extinct. Two islands, La Gomera and La Palma (with a new volcano since 1972), are almost completely green.

On the coast there can be desert, some beaches or cliffs, or towns. No rivers, but when it rains there are streams, and only one little group of small lagoons in the north, apart from the puddles when it rains.... The lower Islands have more desert and less forest, and there´s two islands, Lanzarote and Fuerteventura, with hardly any trees and with a Martian landscape which is fascinating, but you start craving for some green after a week. Then there´s one tiny one where cars are prohibited, roads aren´t asphalted and there are only a few houses and about 100 people living there. No trees either.


You can drive around Tenerife, it´s got some winding roads and it used to take about 4 hours before the new straight motorways (highway in American?) with tunnels and bridges were built, and now I suppose it will take about 3 hours, but I haven´t bothered.

There are asphalt roads, and traffic jams in the 2 or 3 capital cities, and contrary to the popular belief of people on the Spanish Mainland, we do not wear grass skirts (honestly, some think we do!). That must be because the Islands are not too far off the African Coast.

Anyway... Thanks for the screenshots! Saved me the trouble!
Let´s see if I can find the bug! I´ll tell you tomorrow.

Cheers,
Aleatorylamp
 
Hello Smilo,
Ha!! Me too! Here´s a few screenshots.
Striking, how absolutely bleedfree the model is, indeed!
Just got up for a snack and some water,
and I thought, let´s look again!

Now it´s back to sleep.:sleeping:


For a start, I think I now feel like making the wheels 3D,
and having the gear disappear when retracted.
Shouldn´t be too difficult.
Next will be animating the movement, and later possibly a hole
in the sides, with inner panels and a hinged door.

Cheers,
Aleatorylamp
 

Attachments

  • LeftGear.jpg
    LeftGear.jpg
    61.1 KB · Views: 0
  • M-CubeFly1.jpg
    M-CubeFly1.jpg
    26.6 KB · Views: 0
  • M-CubeFly2.jpg
    M-CubeFly2.jpg
    28.8 KB · Views: 0
you got it...perfect.

if i might recommend,
forget about the cube gear.
the cube was merely a test bed
for learning seal and texture mapping,
jump plane sequencing
and a little animation.

it's time to move on to the pony
and beyond.
 
Hello Smilo,

OK, yes, stay dynamic, move on! ...but perhaps only the disappearing gear
when retracted, as it is not exactly the Rubbish Flying Object, but a little nicer.
I think I can get it easily with the Range instruction.

If the Prop-blade/Disk animation has a Range instruction set at 0,60 for the blades
to stay visible and make the disk appear at a given moment, then the gear could
be 0,99 inserted somewhere near Jump Gear, or 99,0. I´ll see.
On the pony Range is at 228,0 just after Jump Gear, and the gear disappears a bit
too soon for my liking, but it´s a guide.

P.S. Range is only of use for the Pony, because the CubeFly uses L/R Gear Bank
and Trans/Rot, so it will be more difficult to figure out. Well...

Then, in a nested sequence, with different axis vector, wheels can be made to turn,
depending on the Model Editor/Settings/ Ref.speed entry. As it´s just another part
of the aircraft to be displayed, this must be the way to do it.
...Once I finish learning exactly how to nest sequences, of course...

Note: In the original RFO tutorial, the landing gear skirts are really doors that open/close
independantly from the extending/retracting gear struts and wheels. However, I chose to
include the skirt with the strut assembly - a simpler but also realistic option.


Cheers,
Aleatorylamp
 
Last edited:
Disappear when retracted...

Hello again!
Findings: In reality, it should have been quite obvious to me from the start, but it takes time for the penny to drop.

Trans/Rot and Bank Gear:
The before-last of the 6 vector parameters associated to these instructions refers to the Banking angle.
Entering 10 and -10 degrees (value changes automatically to 350) for the outside/inside gear-views here into either instruction just offsets the 90 degree arc gear arc, slanting the gear outwards by 10 degrees in the extended position, and a downwards by 10 degrees when retracted. Changing this parameter in both instructions, adds the slants together, in this case giving 20 degrees.

There is no utility in using these instructions for the gear to disappear sooner, because there is no animation anyway!
You only need to eliminate the retracted position! It is not a movement, but an apparition.

Cheers,
Aleatorylamp
 
...a for what it's worth observation;
when looking at the cube with gear up,
the struts seem to lay along the bottom of the wings,
which indicates that the pivot point
is not where it should be,
within the wing chord itself.

also, the reason the gear bleeds
into the fuselage when retracted
is because the gear protrudes
beyond the wing to fuselage
seal and jump plane call coordinates.
that seal is, also, the fuselage side chain.
anything beyond the seal will bleed.

the easiest solution would be to adjust
the gear location farther out on the wing
to a spot where, when retracted,
the wheel is at the wing side edge
of the wing/fuselage joint.

while you're at it,
move the top of the gear parts up a bit,
so the top is inside the wing cord.

hmmm, on second thought,
could this be an opportunity
to experiment with the technique
we talked about with vectoring
the 0, 0, 0, built prop?

and here i thought we were done with the cubefly.
 
Hello Smilo,
I appreciate your interesting thoughts, and given the situation, they express 2 best and simplest solutions.
(1, moving the vectors to make the gear end up inside the wing and 2, moving the longer landing gear outwards).

I didn´t follow the tutorial accurately for the landing gear because it made the plane look so squat with the small propeller that it put me off completely, and I had to ad-lib it a bit. The larger prop needed a higher aircraft position, hence the longer gear.

My expectation that the gear would disappear when retracted (and I thought it would be animated), made me put the hinge in a position where the gear sub-assembly would not interfere with the wings and would stay below the wings, separated from them by a seal (the seal is the bottom panel of the wing). That they would end up inside the fuselage didn´t bother me either for the same reason. But of course they don´t disappear, and it would not be didactic to scrub the retracted position completely because you´d lose an opportunity for using the JUMP PLANE conditional!

OK, I need the practice, so I´ll follow your instructions to improve this unexpected way you suggest, and the Prop 0,0,0 vectoring is another thing that I need further practice on. Lead on, Mc Duff!

Also, the CubeFly will be a good platform to experiment with turning wheels. I think it looks good enough to deserve this little extra! The original RFO tutorial has a sub-section I didn´t know about, that illustrates how to go about this. I can post an update for the .pdf of that tutorial.

Cheers,
Aleatorylamp
 
all righty then, back to the cubefly, it is.
all i ask is that we stick to one project at a time.
as you know, i'm easily confused.

but, first, thank you for the new word...didactic.
i had to google it. i understand the
intended to teach, part, but, can't help but wonder about,
particularly in having moral instruction as an ulterior motive.
whatever you say, Stephan.

something else, sorta off topic, that i feel is important.
as you, no doubt, have noticed,
there is a hell of a lot of jumping around
and entries to be made in ad2k.
compiling, going into cfs, looking at the model,
jumping back to ad2k to make corrections,
and on and on and on...in a word, tedium.

so, what can one do to speed this process?
there has to be a better way,
than chasing menu items around with the mouse.

i am all about keyboard short cuts,
both in ad2k and cfs.
if you're interested,
i'd be more than happy to share
some tips and techniques
for making the job, in my opinion,
a lot quicker and easier.

the question is, should i do it here,
or, start a new keyboard shortcut thread?

back to topic,
i just thought of another way
to make the gear disappear inside the fuselage.
split the cube into upper and lower parts
just above where the gear sits inside the lower,
create a seal and jump plane to hide the protruding gear,
then use the same seal to join the upper and lower fuselage.
 
Hello Smilo,
Didactic, meant in this case also from the point of view of the learner. The tutorial is teaching. If the student discards the retracted gear, the tutorial can´t teach that, and it won´t be learnt, so the didactic purpose is lost. Incidentally, I didn´t know that the term could have a moral aspect to it! So I have learnt something too!

OK! No prob. I will not do or post anything with the Pony until I or we have finished ALL pending issues with the CubeFly tutorial. This way it is also easier for me to attack the other one later, because I´m stuck with the propeller at the moment.

The way I have built the Pony Propeller in the nose, instead of at the null point with Copy/translate from the null point to the nose, won´t let me work with the animation vectors proposed by the tutorial, so it will be good (didactic!) to practice that on the CubeFly first.

As regards a Keyboard Shortcut thread, it would depend entirely on you, if you fancy doing that. I don´t really use shortcuts, not even in Word, but I know some people really like them. One of my daughters is really into them.

It is not even off topic to have posts related to Keyboard shortcuts here. If you like, you are very welcome to do so.

Funny thing: Initially, in the Model Editor, I was scrolling down the text to the sub-assemblies, or using the sliders on the side with the mouse.

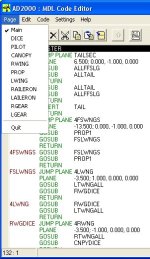
BUT: This morning I discovered the menu bar at the top. Clicking on the "page" option on the top left opens a drop-window with the names of all the Subassemblies you can click on to go there directly.
I only use 4: Ctrl/Insert to insert an instruction; Enter/insert to insert one complete Jump-Plane sequence; Ctrl/P to change TPOLY to GPOLY; and left mouse click+Caps Shift to select the last line of a block of lines once you have clicked on the first line of the block, without releasing the mouse-button.

Split the Cube and shove the gear in between! That is a totally lateral-thinking brainwave! I like the idea.
It´s much simpler and cleaner than moving the gear outwards. ...and it looks like less work!
AND: The aircraft won´t have to to look like a bow-legged Duck!

Let´s see if I can do it!

Cheers for now,
Aleatorylamp
 

Attachments

  • Model Editor Menu.jpg
    Model Editor Menu.jpg
    50.9 KB · Views: 0
as for the last bright idea....never mind.
a seal and jump plane will not split
the view of a Sub Assembly if said SA
over laps the seal.
as, for example, the retracted gear protruding
through the wall of the side fuselage.
the jump plane merely decides
which will be drawn first,
at the selected seal coordinates,
the complete gear SA or the fuselage wall.

another example would be
the subtle bleeds at certain angles
where the horizontal stabilizers
meet the tail fuselage side panels.

it's basic stuff, learned the hard way.
 
Hello Smilo,

I understand. Oh, well... Probably it won´t look too bad with the landing gear moved a bit outwards, I was exaggerating.

If one is to provide the model as a basis for a Jump Plane Sequencing Refresher Tutorial, this should definitely be cured, otherwise it would just be bad form, so I´m going to fix it following your suggestions in your earlier e-mail.

I´m also very intrigued by the way the Trans/Rot is described for turning the wheels, one degree at a time as long as the aircraft speed is below the reference speed set in the Settings menu. That could be quite an attractive feature on a model.

Thanks for your time and your efforts! I do appreciate it, as I know it can get a bit tedious at times.

Cheers,
Aleatorylamp
 
Back
Top