Lockheed Electra Model 10

Vertex deletion and Vertex alignment

Hello Smilo,
OK, thanks about the deleted template remnants!
Am I documenting the templates? Well... Hopefully a Screenshot like the one I sent will be OK.

Deleting Vertices on an AD2K template: HOW?
I have the feeling we are going round in circles with the vertex-intersection problem.

As far as I can see, in order to delete a vertex on a template, one would have to work on a ghost template, i.e. a normal chain coming from a deleted Template a normal chain.

This will then have to be turned back into a template, which unfortunately, I haven´t found a way of doing upto now.
The template shaping menu won´t even let you join the dots closely enough so that 2 count as 1.

If template vertices have to be deleted, one might as well start off with a normal chain in the first place, but the
vertex-intersection problem with the wing persists - the automatic process is not available unless cross-sections are official AD2K templates. The automatic vertex-intersection option is the whole point about my starting to use AD2K.

To manually have to intersect the points, or adjust vertices, especially on parts with 18-point cross-sections, is a nightmare I will avoid at all costs, because personally, I´m afraid I find it is so completely off-putting and depressing that it takes away any pleasure of building anything this way. AF99 is bad enough there, but as it´s simpler, I can cope with it.

Update: Anyway, before giving up altogether... I also tried out 18 and 20 point Template Classes, and it seems that the Template Shaping Menu gives slightly better results, both just as good for the top, but slightly better for the bottom.
The best one is the 20-point template. The slight curvature of the "V" on the bottom left and right template corners is the smallest, so I´ll use that one to make the mid-fuselage.

Update2: OK, the mid-fuselage is done! It has a rounded top, a "V"-shaped bottom from the front to the "BB" Cross-section reference point, and a flat bottom at the trailing edge. Possibly I´ll round off the "V" bottom at the front a bit, I´ll see.
The "k" option in the template shape editor allows the bottom of the "V" to be expanded sideways, making it rounder or flat. That´s why a 20-sided template was needed so that the "V" bottom is made up of 2 points that can be pulled apart.
It´s interesting how it works. Vertex alignment between fuselage sides and wing root seemd to go OK by simply adjusting fuselage template widths. The Intersection option had been done for the wing parts before.

Anyway, it is a great a relief that the fuselage shape improvement has worked!
Cheers,
Aleatorylamp
 
Last edited:
whew...i thought we might have lost you.
am glad to see you stuck with it
and figured out template the shaping.

sorry, you misunderstood my delete vertices comment.
as you know, you can not delete a template vertex.
but, after, say, two templates are covered,
vertices can be added or removed,
which in turn will change the shape of the "cylinder"
to have, in this case, a V shaped bottom.
of course, square panels would have to be modified
into triangles with some hand work.
but, it can be done.

as an experiment, build an 18 sided template,
cover it, then look at the chain head on
in the chain editor, use the N key
to scroll through the vertices.
when you get to the lower left vertex,
just to the left of center, delete it.
do the same for the lower right of center.
there's your sharp V bottom.

granted, this is over simplified
and it's only for one covered template.
if you're interested, i'll explain
how to modify two covered templates,
which i eluded to earlier in this post.
 
New Mid-fuselage + basic cabin + nose.

Hello Smilo,
I must confess it is very tedious, and a pity that the available shaping and intersection options are so complicated to use.
It´s more like work than a hobby.


Even if you know how, the work is meticulous and hard, but it seems the only way to get a better model into the sim air without deeply delving into SCASM to improve AF99 models.

So the alternative is deeply delving into AD2K, or simply sticking with the somewhat more rudimentary but simple AF99 on its own - albeit with small SCASM enhancements. This would be a cop-out, but understandable, but not for the moment...

I understand what you mean by deleting and/or adjusting vertices to fix the shape of the panelled fuselage.
For the moment, I´ve continued building it forwards, adding Cabin and Nose Sub-assemblies, editing bulkhead template shapes to get cross-sections a bit better. Then, I´ll cut out parts and adjusted panels in the cabin section to fit the windscreen.

Later, if necessary, I can doctor up the rounded bottom corners left and right under the wing roots in the way you describe.

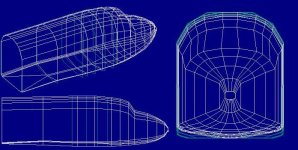
Here´s a 3-view fuselage screenshot. I still have to delete the old templates, that can be seen in light blue.
Also, I have to correct the nose Bulkhead Templates, to widen them a bit and make them less high, to get the round nose cross-section shapes better. I had adjusted the side view shapes again, and now I have to work in top and front views, to make the "spiderweb" lines more harmonious.


I´m also looking to see if there´s a way to import this build into the version I have with the wings and nacelles, and delete the old fuselage.

We shall see...
Cheers,
Aleatorylamp
 

Attachments

  • nufus.jpg
    nufus.jpg
    63.2 KB · Views: 0
you are absolutely correct.
it is time consuming and tedious.
i guess it all depends
on what you're into.
i can spend hours,
chasing pixels around
a drawing in ms paint,
trying to get the curved lines
of the nacelle just right.
so, i know about tedious.

you, on the other hand,
can spend untold hours
tweaking and air file
to attain a few feet of altitude
or a couple mph here or there.
...it's all what you're into.

all i can say is,
if you don't like it,
don't do it.
it's a hobby, not a job.

remember me?
i've spent the last month bitching
about wing profile templates.
or the lack there of.
someday, i'd like to finish
my work on a solution.
i feel was getting close.

i guess another build option
would be to stop being so picky,
accept the program for what it is
and use what's offered.
sorry, that's not my style.
i want to find a work around
to build the best model i can.
BUT, i must keep reminding myself,
perfection is an unattainable option.

as for importing...yes, you can,
but, take care... there will be
a visual complexity issue.
 
Hello Smilo,
Firstly, thanks a lot for your patience and for your suggestions!
I agree there´s a philosophical part to this, relative to the time required to build a plane.
AD2K gives so much room for better building, and it´s so much more complicated, that it could well take a year or two to complete a plane.

Years ago, when my knowledge was more rudimentary, an AF99 plane for FS98 took a couple of months. Then, after Ivan´s patient coaching to improve my AF99 abilities and include a little SCASM, a new CFS plane possibly takes 4 to 6 months to build, and an FS98 improvement with adaptation for CFS1, 2 to 4 months. Times are relatively short, because AF99 makes you keep things as neat and simple as possible to maximize possibilities, and also because of my impatience to get things finished.

Anyway, with the new AD2K fuselage, I hadn´t expected it would cause visual complexity issues to incorporate it into an existing AD2k build. I didn´t mean importing it from AF99, I only wanted to avoiding re-building it from scratch.
Well OK then: The best way will be to call the fuselage as a separate assembly, and do the same with wing + nacelle, I suppose.

Cheers,
Aleatorylamp
 
i would imagine that once one figures out
the ad2k tricks and techniques,
build time will become greatly reduced.
remember, we're muddling around in the dark here.
basically, crashing into walls.
after a few bumps and bruises,
i'm sure we'll get the hang of it.

side note,
i've been playing with the intersection process today.
danged if i didn't have to relearn it...again.
this time, i'm writing a step by step.
later, all i'll have to do is remember
where i put the document.

about importing...
there are several import options.
click on file/Import menu.... to see them.
PLUS, there is an Insert Assembly option
located in the model editor.
it's real handy for complex models.
i would use it to build the base model
and add say, the wing/nacelle
and the tail section....
it saves a lot of resources
for the final build.

but, that's for later.
i know you're antsy to see it come together.
so try this, save the fuselage master assembly,
go into ad2k main folder and make a copy of it.
(you should be doing this anyway in case disaster strikes)
okay, back in the program, click File/Rename.
call it what you want...save and open your wing/nacelle master,
or where ever your wing and nacelle are located.
go into the sub assemblies you want to export.
click menu Sub Assy/Select first chain/Select all chains for export
(also, check out the bottom of the Utilities menu)
i highly recommend only exporting from one sub assembly at a time.
unless, you want a giant conglomerated mess.
anyway, save and open that new master we just made.
click file/Import chains
in the window, select the master we just set up the export.

a new Import sub assembly will be created.
create a new wing sub assembly and move all that stuff into it.
save and go back and get the nacelle and so on and on.
BE SURE TO CLEAR THE EXPORT LIST EACH TIME.
you can do the same thing with template classes,
if you want.

there you go.
that should keep you busy for a while.
i forgot to tell you,
all polygons will be back to TPOLYs in the model editor,
so, there's that to look forward to.
 
Hello Smilo,
OK, I´ll try out the Import Options. I thought they were only for things built by external means.
The visual complexity issue you said, seems to be the TPOLY to GPOLY conversion, so that´s OK.
Thanks very much for your
detailed instructions, and suggestions on necessary orderly storage!

Individual intersections seem to require individual selection of planes. The nightmare I see is that on convex wing and curved
nacelle surfaces, there are so many planes and vertices to select each time, these can be so numerous that the process
becomes endless, added to the difficulty in finding the desired planes.
Anyway, I´ll be looking forward to your step-by-step description in due course!

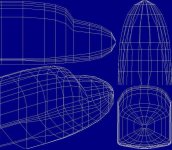
Update: I managed to correct the nose bulkhead shapes just by adjusting their heights and widths.
Contrary to what I had feared, it is NOT necessary to try and adapt a separate Nose Section with a different Template Class and other Theta Values, which is very relieving. The "k" values I´d edited before, proved to be fine.
The result of the basic Cabin and Nose Shape on the mid-fuselage Section is now much more pleasing, I´d say.
At least this improvement has given me some sense of achievement.

Here´s a compound Screenshot. What do you think?
Now I´ll try the Import Option, which should be another achievement!

Cheers,

Aleatorylamp
 

Attachments

  • nose-OK.jpg
    nose-OK.jpg
    106 KB · Views: 0
Last edited:
she's looking very good.
have you compiled her
and had a look in game?

i could go on and on
about importing too much
into a master assembly,
but, i think i'll leave it alone.
let's just say,
the reasons are many.
i've learned the hard way.

so, instead, i'll go on about intersections.
yes, it's true, each individual intersection
must be done individually.
you can't just click a magic button and...
BINGO! you're done.
it is tedious and meticulous hand work.
...if you want it done right.
yes, i guess one could see it as a nightmare.
(i don't....i like that sort of thing)

therefore, one doesn't want to redo it multiple times.
time must be spent finalizing the intersecting "components".
ie, the wing, the fuselage, the nacelle, stabilizers, etc.
obviously, if any, and i mean any, changes are made
to shapes of any of those components,
the intersections also change and must be redone.
there, my friend, is your nightmare.
the only saving grace might be,
one has gotten good at it through repetition.

oh crap!!! i just started thinking
about the sequencing process.
that's going to be fun....later.
 
sorry, i can't help my self...
save yourself some time.
don't import from other master projects.
especially, if you've already done the work
to compile them in game.
why do it all over again?

try this, let's say, you want to import
a wing and nacelle that you compiled
and looked at in game.
in that wing nacelle master project,
click File/Rename and uncheck the master project box.
save and exit
(always say YES to save? or, you'll be sorry)
open your, say, Fuselage master.
when you're ready to compile,
instead of adding a GOSUB or RETURN,
keystroke Ins or click on the insert button,
at the bottom of the list, select Insert Assembly.
clicking the ? will bring up a window
with a list of projects you can insert.
ie, the ones with unchecked boxes.
select and compile.
of course, sequencing has not been done.
unless you want to.

the caveat is, a master project
with the box unchecked
is no longer a master project.
if it's been compiled individually,
it will not be seen in game.
but, you can always re-check the box.
 
Hello, Smilo,
Oh dear... Oh dear... I really don´t know what I´ve let myself in for.

I haven´t compiled the fuselage yet. I was trying to insert that assembly into the existing long-wing/partial-nacelle build first, but I´ll have to check on the insertion process from the Tutorial first, to see how I did it there. ...I remember now, it had to have its own assembly name. That´s why it wasn´t working!
However, it´s no good anyway to look at because it isn´t correctly ordered in the sequencing yet.

Then, I haven´t exported anything yet for later import either, because I expected the to-be-exported section to change colour, and it didn´t.

Mid-Fuselage, Cabin and Nose are in separate sub-assemblies, but I think I´ll unify them into a single sub-assembly for the first trial at exporting for import.

Cheers,
Aleatorylamp
 
first, let me make it perfectly clear
just exactly what anal retentive crazy is....

oops...there are couple spots i missed.
can you see them?
 

Attachments

  • -2017-aug-9-002.jpg
    -2017-aug-9-002.jpg
    81.4 KB · Views: 0
  • -2017-aug-9-001.jpg
    -2017-aug-9-001.jpg
    55.7 KB · Views: 0
Last edited:
Hello Smilo!
Where does the Electra have a bomb or a suppository? Ha ha! Is AD2K anal retentive?

In my old age, I still haven´t figured out what exactly anal retentive is supposed to mean, other than putting off bowel movements, causing severe constipation. I suppose it means to get het up or to fret about something, but impatience is probably not meant.

Anyway, I´m not really so worried about the complicatioins involved, and will be willing to be more patient.

I wasn´t really going to dive into anything yet, or to really produce anything definite yet. It was only a suggestion for my preliminary practice with the export/import options and/or the INSERT command in the Sequencing text.

Anyway, I think I might build the Prometheus Spaceship with AF99 in the meantime!
Cheers,
Aleatorylamp
 
according to google it's,
"a person who is excessively orderly and fussy"
obsessive compulsive might be a better description.
as i see it, it's striving for unattainable perfection.

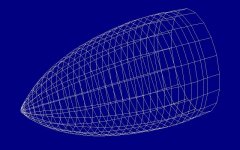
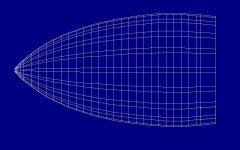
the images above are the nacelle
curvature taken to the nth degree.
each template is, for the most part,
located in 0.250 intervals.
granted, this is overkill, but,
i wanted to see if i could do it.
and i have to admit,
i think it looks damned good.

next, i will uncover the whole nacelle
and recover it using every other template.
there by, reducing the panels by half.
who knows, maybe even more.
we shall see how it goes.
when i'm finally satisfied with the shape,
then, i'll start chopping it up for the gear well.

about export and import;
before you consolidate the fuselage, cabin, etc,
be sure to make a copy of the master project.
opening the copy will be a hell of a lot easier,
than undoing the consolidation.
personally, i would practice
on something small first.

for visualization purposes,
(assuming you don't want to mess with Insert)
(or, if you do want to try it,
let me know and i'll walk you through it)
anyway, before you compile,
make a GOSUB fuselage
followed by a GOSUB wing
that way, the fuselage will be drawn first, then, the wing
and you should have a bleed free view
from wing tip to fuselage.
of course, if you mirror the wing,
or, look from the other side,
the view will be all screwed up.

here's an idea i should try,
create a new master project.
call it VIEW TESTS.
go directly to the model editor
Insert a wing/nacelle project
and Insert a fuselage project
compile and see what happens.
 
okay, the VIEWTEST master project idea works.
but, as always, there are a few hoops
that need to be jumped through.

parts overlap is a major issue
and will remain so without sequencing.

if you are interested in the VIEWTEST steps,
let me know and i'll post them here.

all i can say is,
it's a real time saver for a quick view.
 
Saturn Weekender

Hello Smilo,
OK, I see your point on the shape concept with the nacelle blueprints, but I haven´t got the patience for that kind of perfection. But of course, the curvature of the shape is amazingly smooth. Probably when you reach the stage of taking away templates and re-panelling, you will get away with skipping two templates a time, instead of only one.
And, yes, near the wide end, I saw the slightly maladjusted templates you had mentioned!

Anyway, comparing this way of building to mine, is like comparing the big LEGO blocks for babies to the normal LEGO blocks for older kids. Looking at my fuselage, I would say that the nose could indeed do with one template more, to shorten the intervals for a bit more smoothness, and that, for me, would be about it!

I´ll give the VIEW TEST your suggested a go tomorrow. I already have fuselage and wing/partial nacelle assemblies ready, so it shouldn´t be difficult, but I´ll have to pull myself together once more.

I needed a break from AD2K, so I spent the afternoon playing around with AF99. It was quite refreshing, because it was so quick to get things done, albeit with fewer panels. Progress was tangible, and in this case, bleeds were also surprisingly low.

This is off topic, but I was tweaking a Spaceship I built, inspired by the 2-Seater "Saturn Weekender" type suggested in one of Robert Heinlein´s sci-fi novels. It also has some influence from Ridley Scott´s Prometheus design.


Curiously, checking the workings of the ship, I discovered that the altitude limit for CFS1 is 220000 ft.

I got up there quite soon at 1760 mph. Then the altimeter suddenly read ZERO feet for a few seconds, and then went to about 100000 ft, and continued from there, without crashing the program.

Scenery graphics are not visible at that height, but at least CFS1 kept on functioning happily!

I had done this with FS98, discovering that the limit here is 120,000 ft, and that the sim then crashes.

Just for fun, here is some eye candy. It looks like a LEGO toy...!!
A change is as good as a rest, as the saying goes...


Well, good night then!

Aleatorylamp
 
i've never heard the saying,
A change is as good as a rest,
it's a good one...thanks.

have had a few interruptions here today,
so, progress has been slow.
i guess it always is.

for quite some time,
i've been wanting to accurately crop the wings
and today, i found a way.
basically, i built an over sized nacelle template
and moved it along the wing from fore to aft.
at each wing panel line,
i created an intersection point
on both sides of the nacelle.
after deleting the old interior
and exterior vertices,
i now have accurately cropped wings
very close to the nacelle.

i've also started building a new nacelle
using the templates from the ultra smooth version.
i only skipped one near the tip,
then three and finally, four.
the curvature seems to be holding,
but, i haven't compiled yet.
we shall see.

i like your lego analogy....thanks.
i was going to mention the nose,
earlier, but, thought better of it.
i agree, a couple more templates
would enhance the curvature.
but, who am i to criticize?
the last thing you need
right now is negativity.

a few pointers for the TESTVIEW process,
before you rename an "INSERT" assembly,
compile the master, then, rename and uncheck the box.
compile again to create an MD1 Assembly.
then rename, or check the box, save and exit.
yes, it's a lot of tiny steps, but, they're easy.
the thing is, ad2k will not open an MD1 Assembly.
they are for inserting into a master project only.
they are dropped into whatever folder you're using
for the electra 3DM files within ad2k,
so, when you call for an INSERT ?
they will be easy to find.

one more thing,
insert a Return above the INSERT ?
then, use GOSUBs to call each INSERT Assembly.
yes, you will have to name each one first.

i'm anxious to see how you do.
 
Captain Obvious Strikes again

Hello Smilo,
Thanks once again! This time for the extra instruction details and all the other details too.

I was trying to use INSERT and couldn´t make the program find the Assembly for the ?. Ouch! Captain Obvious strikes again!!
I didn´t have an MD1 Assembly. I should have known because it´s in the TWO tutorials I did before, which I just found now, and looked inside, and you´re right - it´s quite easy!

When the memory fails to even find the register which registers that precisely THIS had ALREADY been done TWICE before,
it is a symptom where a prescription of "a change is as good as a rest" is mandatory. I looked into Google, and it´s a 100-year-old British saying. The Spanish have a good equivalent for this old saying: Translated, it says, "to need a change of airs". The German one isn´t bad either: "Changes work wonders" would be the translation.

Anyway, the abduction into the stratosphere up to 200000 ft did change the airs, and it´s clearer now - I mean the memory, not the air. The question is how long the positive effects will last, but I can always repeat the experience...

I´ll also make sure I have the necessary RETURN instructions correctly placed.


Thanks also for your Tip on the Wing Tip... Pun intended... bad joke...
I was already wondering how to get a round one (not around one.. uuufff, another bad joke...), as only 2 automatic types are offered: Pointed and Trapeze (2 points). Great!

Then for the nose: I had initially thought and said that one or two extra templates for the nose were going to be needed, but then edited my comment to read as only one template - but I´ll put in two, especially because of the blunt rounded nose.
Also, what you described about your very much more rounded rear-nacelle is interesting: Where it gets straighter, you could use fewer templates.

OK then. I´ll get a Nose Job and then put together the VIEW TEST later today.
Cheers, and thanks again!
Aleatorylamp
 
i hate to tell you this,
for most of us,
the memory only gets worse.
i love spending time
trying to remember
where i put the list
i made to remember
all the things i need to do.
another favorite is looking
for something i know i've seen
...somewhere.
i've come to the conclusion
that what i've seen
and can't seem to find
was really in a dream.

i'm sorry, did i give a wing tip tip?
i give so many tips,
i can't seem to remember that one.

i need coffee.
 
Hello Smilo,
Our English teacher back at school always said "tie a knot in your neck, then you´ll remember" ,
instead of "a knot in your tie...", but nowadays we don´t wear ties any longer...
Anyway, I remember once, I tied the knot (in the tie) to remember something, and at mid-morning
I saw the knot and thought "now what the heck was that for?", and forgot again.

Oh dear me, again... it wasn´t a wing tip tip at all!
You are quite right. You never posted one.
I completely misunderstood what you were describing.
It was on how you cropped the wing to make a gap for the nacelle.

More than only memory seems to be failing here, worsened by the

41 degrees C heat we had yesterday. Excuses, excuses.
Luckily it cooled down to 26 degrees C at night, and today it wasn´t
quite as bad.
Now it´s evening, and there´s "only" 25 degrees C.

Anyway, I got the 2 extra templates into the nose at the front,
and it´s much smoother.
It´s getting the "look"!

Well, it´s too hot to do any more, and the 2 stupid little buttons on the
left-front-side of the mouse continually mess around with site pages,
and it´s just deleted this whole message I´d prepared.
I think I´ll ruthlessly rip them out like I did with the other mice I had.

More tomorrow!
Cheers,
Aleatorylamp
 
Back
Top