P-47 Progress Thread

Yea Joost the bump mapping is a great addition, opens up a lot of neat options!
Your not doing the razorback?:biggrin-new:

But before I can start painting, I have to map the model... not really looking forward to that :dread:. I've got Tom's tutorials to help/guide me but to do all that without much distortion, hmmm...

About the Razorback; I don't have very warm feelings for it but tonight it dawned on me that I could graft the upper deck of the Razorback on the D-30/40 model and relocate the landinglight. But it would also require a complete newly built windshield, canopy and partially rebuilt cockpit. It's much more work than would appear at first glance. I am however interested in the P-47s of the 5th ERS, which would require a Razorback model (and a Malcolm hood). I have already modeled a squarish droppable dinghy container after some photo's/plastic models and encountered an official manual to convert a 75gal droptank to a dinghy container (I still haven't given up on the search-and-rescue mission -idea).

But let's first finish this ship, 'cause it's already taking very long!
 
Hiya, Frosty...

Just a note, on the prop thingy. Same thing I do, for the prop dome, link the hub to the prop. You'll have to have a copy for each prop part, and named to go with each.

Might be worth giving it a shot, to see the results.

(Ain't making these complicated models fun!!??) Ha!
 
Joost, I wasn't being serious, regards the razorback, you do what you need to do, it's going to be a great model, I'm really looking forward to it!
Oh yea, from what I have understood with the model makers I've worked with, is that mapping isn't a favourite part of the progress, but trust me, coming from a painter, the better you do the mapping, the better the finished paint job will be. Compromised textures can ruin the look of your model, no matter how good it is!:encouragement:
 
+1 for the razorback. Imagine setting up a campaign with the 4th FG and transitioning from Spits to the P-47C! But seriously this model is going to be awesome. Got any screenies of the bump mapped bombs?
 
Joost, I wasn't being serious, regards the razorback, you do what you need to do, it's going to be a great model, I'm really looking forward to it!
Oh yea, from what I have understood with the model makers I've worked with, is that mapping isn't a favourite part of the progress, but trust me, coming from a painter, the better you do the mapping, the better the finished paint job will be. Compromised textures can ruin the look of your model, no matter how good it is!:encouragement:

I was - a bit :playful:
And, yes, I gree with you completely on the mapping / painting subject. I'll do my best!

... Got any screenies of the bump mapped bombs?

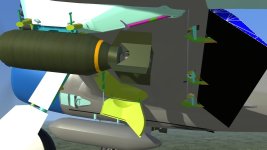
I hope you can distinguish the noise I added to some of my bombs in this screenie. If not, I can send you a fullscreen piccie. Don't mind the mapping/texturing I did so far: The wheels were just for fun (that's why they are visible on the fuselage as well) and the flaps to check the functioning of the drive mechanism. BTW, you can see why I had to add the whole linkage thing: the mechanism is very visible with flaps deployed. You may also notice that the tail wheel area isn't finished yet: I still have to do the inside of the doors and the linkage to the tail wheel yoke etc.
 

Attachments

  • Teaser 23.jpg
    Teaser 23.jpg
    42.7 KB · Views: 16
  • Teaser 22.jpg
    Teaser 22.jpg
    42.5 KB · Views: 14
Question

Question:

Does anyone know if it is possible to have both a static and a dynamic reticle at the same time?

I was fiddling around with the K-14 gunsight and it is supposed to have multiple settings: Gyro (our dynamic) recticle, Static reticle and both. I had a static reticle modeled but when I activated the dynamic one through Ankor's shaders, a string in the effects.xml and the aircraft's .xdp file (all according to the instructions that came with the Dynamic Recticle Collection download), the static one got replaced by the dynamic reticle. I want/need to have both! Any ideas?

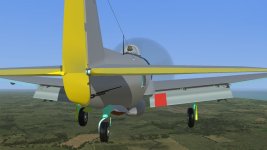
In the meantime; I have remodeled the oilcooler ducts, the oilcoolers, the air intake in the primary cowling and the round 'lip' leading to the air intake, the size of the cowl flaps and added balance tabs to the elevators, the right aileron and some eyecandy to both the wheelwells and at the back of the primary cowling (can you spot that last bit in the screenie below?).
Right know I am copying and simplefying the already textured parts of the VC to the external cockpit so that the awful pilot model isn't hanging midair in an empty tub (still haven't found a better pilot...). Unless I make it a metal, of course, but I am sure that is not the idea.

Oh, and I don't seem to be able to get a nice shiny plexiglass canopy. Any suggestions for the gmax material values? That FSX recipe on FSDeveloper doesn't work because of the differences in FSX and CFS3 possibilities (no bloom, Fresnel etc).
 

Attachments

  • Teaser24.jpg
    Teaser24.jpg
    93.4 KB · Views: 49
For the Tempest II which has the gyro gunsight I made two VCs, one with a dynamic reticle, the other with the fixed reticule. Otherwise, they're identical. :wiggle:

BTW, details, details! Me likey!!
 
... Unless I make it a metal, of course, but I am sure that is not the idea.

Oh, and I don't seem to be able to get a nice shiny plexiglass canopy. Any suggestions for the gmax material values? That FSX recipe on FSDeveloper doesn't work because of the differences in FSX and CFS3 possibilities (no bloom, Fresnel etc).

That first sentence was to go here:

"Oh, and I don't seem to be able to get a nice shiny plexiglass canopy. Any suggestions for the gmax material values? That FSX recipe on FSDeveloper doesn't work because of the differences in FSX and CFS3 possibilities. Unless I make it a metal, of course, but I am sure that is not the idea."

It doesn't make sense the other way... (a metal pilot? :biggrin-new:)
 
It's pretty easy to set-up reflective / transparent glass by hex editing the m3d file, but I have no idea about gmax.
 
A question for (re)painters

A question for (re)painters:

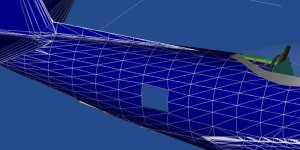
With the main fusleage nearing completion, I thought it would be fun to try which unwrapping method gave the least distortion or could be 'undistorted' with relative ease - nothing definitive, just a try-out.

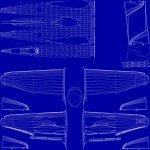
First I gave the standard left/right planar map of the complete fuselage a try. Of course this distorts horribly near the top and bottom of the fuselage, requiring stretching of the UV-map. I wasn't sure I could do that with reliable consistency over both the length and the left/right side of the fuselage, so I opted for method two; planar mapping in four standard views: left, right, top and bottom. This gave decent results with the checker testmap but also introduced blank areas between the four maps because of the tapering of the fuselage (see screenie 1).

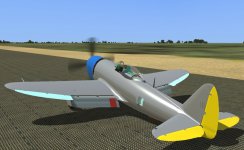
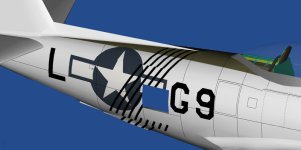
However, when I applied the map, the fuselage looked pretty good with no apparent distortion (screenie 2). To check that, I started painting the map with a few crude horizontal and vertical panel lines, some riveting, a roundel and some lettering. For the most part, it seemed okay but the joints/gaps between the four planar mappings are giving some trouble, especially when trying to paint diagonal lines that cross the gaps between the fuselage parts (see screenie 3).

With a lot of trial and error it might be possible to adjust any painted lines on a fuselage quart so they fit (nearly) seamlessly with the neighbouring fuselage part but it seems a lot of trouble for something that can probably be done differently. My question is how much trouble to (re)paint a texture is acceptable? Is it normal for you to fiddle a bit with lines etc. to get them lined up?
 

Attachments

  • Teaser25.jpg
    Teaser25.jpg
    102.3 KB · Views: 12
  • Teaser26.jpg
    Teaser26.jpg
    90.2 KB · Views: 12
  • Teaser27.jpg
    Teaser27.jpg
    44.3 KB · Views: 11
With a lot of trial and error it might be possible to adjust any painted lines on a fuselage quart so they fit (nearly) seamlessly with the neighbouring fuselage part but it seems a lot of trouble for something that can probably be done differently. My question is how much trouble to (re)paint a texture is acceptable? Is it normal for you to fiddle a bit with lines etc. to get them lined up?

Models that are perfectly logical to paint are so rare that I don't think I've ever seen one with a 100% success rate. Just recently I made a skin that needed D-Day stripes and not only was each wing surface in a very slightly different scale, the ailerons didn't line up on any of those surfaces and one of the flaps was mapped straight but the other one in an angle. And of course in different scales - even different from the wing undersurfaces in which they belonged.

But I got it done. It took several hours, yes, but it was possible. Pretty sure that whatever you do, it won't be that bad, and even that was doable in the end.
 
I also await replies with interest, since the memories of how long mapping mine took haven't faded!
 
Rene pretty much summed it up, very rare to get a perfectly mapped model.
Some model makers I've worked with have come close but never perfect. A good painter will have ways of getting around certain things, mainly a lot of trial and error lol all part of the job. Just try to get it the best you can Joost, but don't kill yourself over it.

You can get away with a little, but I would try and keep stretching down as much as possible because that always looks ugly. Looking at your last shot, the lines on the top and side look pretty much what I've seen many times, nothing out of the ordinary there, but the bottom of the fuselage looks way out?
 
OK, thank you guys!

I'll see what I can do. Parts scaled differently shouldn't be something you have to worry about, specifically not for the major external parts. If I see a need to use a different mapping scale for smaller parts, I'll add a note with the scale.
I'll try one other method and see what effect that gives before deciding with which one I will continue.


... but the bottom of the fuselage looks way out?

That is correct :encouragement: - I've only tried correcting the top part so far.
 
I believe everyone who has done full repaints for more than a couple of models has seen so much mapping horror that you simply can't get to that level if you put even half a thought into doing it. As long as nothing is randomly mirrored or excessively distorted it usually can be worked out relatively easily.
 
I believe everyone who has done full repaints for more than a couple of models has seen so much mapping horror that you simply can't get to that level if you put even half a thought into doing it. As long as nothing is randomly mirrored or excessively distorted it usually can be worked out relatively easily.

Totally agree!
 
Back
Top